Country Living in a Cariboo Valley

Homesteading in BC

  • How to Get Started
  • Vegetable Gardening
  • Preserving Food
  • Recipes
  • Homemade Wine Recipes
  • About Us
  • Work With Me
  • Shop
    • Vegetable Garden Planner Printable: Grow Your Best Garden Ever
    • Grow Enough Food for a Year
    • Delicious Dandelions: A Recipe Collection
    • Dirt to Dollars: Selling at the Farmers Market
    • 8 Pounds in 8 Weeks: Raising Chicks for the Dinner Table
    • Making Wild Wine
    • Build a Hanging Chicken Feeder
    • 15 Things to Know About Living in the Country

Homemade Chunky Salsa Recipe for Canning

By Annie

This homemade chunky salsa recipe for canning is so easy to make! Keep reading for tips on how to use a hot water bath to can your homemade salsa!

Making and canning Salsa is pretty much a yearly event here. After all, who doesn’t love homemade salsa? We often have a pre-dinner snack of fresh tomato salsa and tortilla chips or nachos, usually with a cold mug of home brewed beer. 

Want more articles about preserving food? Check out all of our Preserving Food posts here.

 
Home made Salsa recipe for canning. bowl of fresh salsa with chips
This Salsa recipe for canning is the best one I have found.

This is the Best Homemade Chunky Salsa Recipe for Canning!

You can also add a couple of teaspoons of this hot salsa to egg dishes, as it adds wonderful flavors. Or ramp up the taste of tacos or grilled fish with a good dollop of salsa; you can even add it to sauces for meats.

Here is the ultimate homemade salsa recipe for you to try. It’s one of our favorite canning recipes!

Make a small batch to eat fresh or make a large enough batch of this canned salsa recipe to can some up to enjoy come Winter. The canning instructions are included below!

Watch this short video that shows you the process of making homemade salsa!

Now that you’ve seen the video above with the process of making this Canning Salsa recipe, let’s get started.

Best Salsa Recipe Ingredients

Salsa ingredients on a wooden chopping board.
Ingredients you need to make home made salsa.
  • chopped fresh tomatoes – form the base of this delicious homemade salsa recipe. Roma tomatoes are the best, but you can use any kind. We don’t bother to remove the skins from the tomatoes, but it’s up to you whether you want to or not.
  • chopped onions – another commonly found ingredient in salsa.
  • chopped bell pepper – I used green to give this salsa a pop of extra color, but any kind of bell pepper will work just fine!
  • jalapeno peppers – provides some real heat and spiciness to the salsa, but these can be omitted if you prefer something milder. If you want more heat, you might try chilies or serrano peppers.
  • minced garlic – buy organic minced garlic or finely dice cloves of fresh garlic.
  • tomato paste – aids in bringing out the delicious tomato flavors.
  • white vinegar – gives the salsa a nice bite and acidity. Used instead of bottle lemon juice.
  • chopped fresh cilantro – a classic herb found in salsa, cilantro helps to marry all of the other flavors and bring them out more strongly.
  • ground cumin – adds a bit of heat and warm flavor!
Fresh Salsa being cooked on the stove.
This homemade salsa recipe is so simple and delicious, and you can also can it yourself!

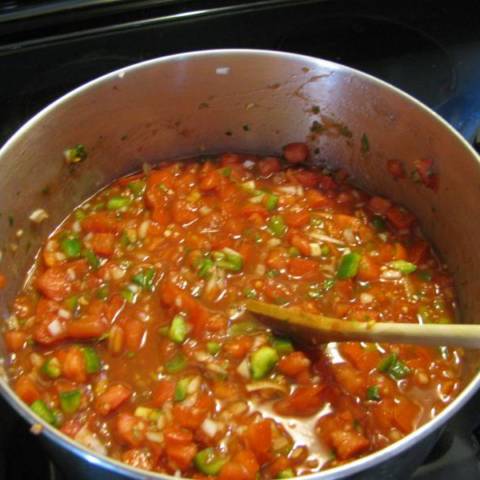
How to Make Homemade Chunky Salsa

  1. Coarsely chop all the veggies (I actually dice them quite small.) You can use a food processor, but I always just hand chop.
  2. Remove the seeds from peppers (Hah! that’s no fun – we throw some seeds in the pot too for an extra kick.)
  3. Combine all ingredients in a large stainless steel saucepan (I use our large stockpot) and put on the stove on medium or medium high heat.
  4. Bring to a boil and boil gently, stirring occasionally. Let it simmer until it has the desired consistency.
  5. Let it cool and it is ready to eat!
Fresh ingredients are on the stove for chunky salsa recipe for canning
Mixing ingredients for homemade salsa.

How to Can Salsa – the Salsa Canning Recipe

  1. Ladle into clean sterilized canning jars, leaving 1/2 inch headspace and remove air bubbles. Wipe rims of the jars, using a clean paper towel.
  2. Put on the seal and ring. Boil in a boiling water bath 20 minutes for pints. We can for 25 minutes, because we are above 1000 ft elevation. Check your elevation; it makes a difference. Remember to use a canning rack if you are setting jars on top of each other!
  3. Remove from the canner and let jars sit for 24 hours. Don’t move them and keep the jars out of drafts. You can just put a towel over the jars if you need to keep them from a draft.


Jars of homemade chunky canned Salsa ready for the pantry.
Jars of home-canning ready for the pantry.

This homemade salsa recipe makes 5 pint jars of salsa. Then, this winter, enjoy this salsa, I think you’ll like it! You may find yourself planning to make even more jars next year.

Questions about Making and Canning Chunky Salsa

Do you have to boil salsa before canning?

There are different opinions on this. I always do bring my salsa to a boil, then let it simmer before canning.

What tomatoes make the best salsa?

Roma tomatoes are the best for salsa, as they are naturally a more meaty tomato. However, I use whatever kind I can grow or find at the grocery store.

Salsa in canning jars on a wooden table.
Easy Spicy Salsa recipe to make your own salsa at home.

How do I make thick salsa?

Using Roma tomatoes works the best, but if you let your salsa simmer (without a lid) some of the liquid will evaporate.

Another option would be to use a slotted spoon when filling your jars, so some liquid stays behind in the large pot you used for cooking the salsa.

More Tips for Canning

If you are new to canning, you need to know which foods can be safely canned in a water bath canner and which foods need to be canned using a pressure canner.

Fresh homemade chunky Salsa sits on a taco chip ready to be eaten.
Making and canning salsa is a yearly delight here.

Salsa can be safely canned in a water bath – I usually put mine up in half pint jars. Perfect size for us and if we have company to visit, I just crack the lid on another jar and transfer to a serving bowl. Always nice to squeeze a little fresh lime juice on top of the salsa.

Water Bath Canning

And water bath canning is an GREAT way to start canning if you are a beginner. It’s easy, inexpensive and a good way to start building up your pantry.

A complete water bath canning kit sitting on a counter.
Complete water bath canning kit is what you need!

Here’s the water bath canner set up that we use here and we get a LOT of use from it. This water bath canner is used to can fruits, make jams and jelly, salsa, applesauce and lots of other foods.

Some years I put up hundreds of jars of vegetables and soups. Graham loves canning stews and fish, so he often adds hundreds more jars to our cold room. These need to be pressure canned, which is a bit different than water bath canning. I’ve included some links to other canning articles here on the website – you’ll find them at the bottom of this post.

Canning is a very worthwhile skill to learn – you can save so much money! Plus, you are serving your family healthy food.

Home made chunky Salsa on taco chips in a basket.
Home made Salsa with chips and beer for an afternoon treat.

Get yourself a copy of the Ball Blue canning book –  it has all the information you need. And there’s some great recipes as well!

There is a difference between canning fruits, vegetables and meats – you need a good reference book, one that you can count on.

home canned goods sitting on a stove
Canned Salsa is added to our pantry shelves for winter eating.

When I see all my canned jars on the shelf, I want to KNOW for sure that every one of them is safe to open and feed my family.

More Info on Canning

  • Using a Pressure Canner – here’s what you need to know.
  • Pressure Canning Beans – grow your own and then can them up!
  • Pressure Canning Salmon – and other fish.
  • Making and Canning Sauerkraut – ferment your own.
  • Canning Pears – this recipe works for almost any fruit you want to preserve.
  • Pickled Brussels Sprouts – these “Frog Balls” are delicious!

Want ALL of our CANNING RECIPES? Find them all right here!

Salsa in a bowl with tortilla chips
This Salsa Recipe for canning is going to be a family favourite!

More Recipes

Our entire Country Living in a Cariboo Valley Recipe Collection can be found here, and here are some more recipes!

  • Once you’ve got the hang of canning, try this Pickled Pearl Onions, which you can also can for yourself!
  • This No Cook Strawberry Jam is another great homemade delicacy that can be jarred and kept around.
  • Love garlic? This Roasted Garlic with Oil Drizzle is the recipe for you!

Chunky Salsa Recipe for Canning

Homemade Salsa Recipe

If you enjoy this recipe for homemade salsa, please be sure to rate it 5 stars below! And print this off or save it to your Recipes folder!

Home Made Salsa Recipe

Home Made Salsa Recipe

Yield: 10 cups
Prep Time: 45 minutes
Cook Time: 15 minutes
Total Time: 1 hour

The Ultimate Home made Salsa recipe - you will love it! And you will be glad this makes enough Salsa to can a few jars to enjoy later.

Ingredients

  • 7 cups chopped tomatoes (about 6 lbs)
  • 2 cups chopped onions
  • 1 cup chopped green bell pepper
  • 8 jalapeno peppers
  • 3 gloves minced garlic
  • 1 can tomato paste (5.5 oz or 156 ml size)
  • 3/4 cup white vinegar
  • 1/2 cup chopped cilantro
  • 1/2 tsp ground cumin

Instructions

  1. Coarsely chop all the veggies (I actually dice them quite small.)
  2. Remove the seeds from peppers (or leave them in, if you like)
  3. Combine all ingredients in a large stainless steel saucepan and put on the stove on medium heat.
  4. Bring to a boil and boil gently, stirring occasionally, until it has the desired consistency.
  5. Let it cool before eating.
Nutrition Information:
Yield: 30 Serving Size: 1
Amount Per Serving: Calories: 22Total Fat: 0gSaturated Fat: 0gTrans Fat: 0gUnsaturated Fat: 0gCholesterol: 0mgSodium: 6mgCarbohydrates: 5gFiber: 1gSugar: 3gProtein: 1g

Did you make this recipe?

Please leave a comment on the blog or share a photo on Pinterest

© Annie

First Published July 2017; latest update September 2022

Thanks for checking out this recipe chunky salsa recipe for canning. For more, follow me on Facebook, Pinterest, Instagram, and Twitter!


Filed Under: Canning, Food, Recipes

How to Make Dandelion Jelly – Recipe

By Annie

I’ve always wanted to try making some Dandelion Jelly – and this year, I did.

Spring is Dandelion season here in southern BC! And wow do we get a lot of Dandelions here; we run an organic homestead here so do not use any pesticides or commercial weed killers.

And, because of that, our native flowers and plants are left to grow, flower and reseed themselves.

Dandelions are not weeds, no matter what people say! They are nutritious for us – we often eat salads made up of young Dandelion greens in very early Spring here. They are one of the earliest blooming flowers here!

So in Spring, I enjoy making Dandelion Jelly and we love eating it year round on toast and spread on English muffins for breakfast.

Dandelion jelly in a jar surrounded by dandelion flowers
Dandelion honey in a jar and fresh flowers

It’s quite easy to make and doesn’t take a long time to put up a batch. It has a sweet and delicious taste – now I have 8 jars in my pantry for us to enjoy all year around.

Here’s how to make Dandelion Jelly from fresh dandelion flowers for your family; great for gifts too! Then, maybe you’d like to try this Spicy Jalapeno Plum Jelly; it’s delicious.

Make your own Dandelion Jelly. It's tasty, easy and fast to preserve. Here's how to water bath can Dandelion Jelly. #dandelion #canning #recipe
This dandelion jelly is light and sweet and the perfect way to use dandelion petals instead of killing them!

How to Make Dandelion Jelly

Note: One batch will make about 4 or 5 half pint jars.

dandelions in a field.
These flowers actually have many uses!

With some fresh petals and just a few ingredients, you can easily make your own jelly!

First, you will need to go picking! For one batch of Dandelion Jelly, you will need 2 cups of dandelion petals.

You don’t need to compact the dandelion blossoms. Just pick two cups of loose flowers.

You do NOT want the green parts or stems on the backs of the flowers, you just want the yellow flower petals.

I found the easiest way was to take scissors and my measuring cup out into the yard and just snip the yellow petals right from the leaves into the cup.

how to make dandelion jelly
Start by making a dandelion tea by steeping the petals in hot water.

Take 2 cups of boiling water and add this to the petals to make a dandelion tea. Leave for up to 24 hours to let the dandelions steep in the water.

I waited until the water had cooled down, then placed the measuring cup in the fridge.

straining dandelion petals.
Strain the petals well so your jelly doesn’t have any unwanted solids.

When you are ready for the next step, pour the contents from the measuring cup and strain through a strainer into a large pot. I like to use a really big saucepan.

Boiling Dandelion Jelly

Add 1/4 cup lemon juice. Then add 4 cups of sugar and give it all a good mixing.

bringing the dandelion tea to a boil.
Get the liquid nice and hot before adding the other ingredients.

Bring this mixture to a full rolling boil, which is a boil that cannot be stirred down.

Once it boils, add 1 package of Certo liquid fruit pectin. You may also be able to use powdered pectin.

Bring it back to a boil, and boil it for 2 minutes, stirring constantly.

If some foam develops from air bubbles, just skim it off using a metal spoon. Eat it if you like, it’s yummy. Kids usually love the skim!

ingredients for dandelion jelly
You only need a few additional ingredients to finish up your jelly!

You may find, as I did, that the liquid has a greenish tinge to it.

Since I wanted my finished jelly to be a bright yellow, I added drops of yellow food coloring. Just add a few drops, then stir and see if it is a pretty yellow. If not, add a few more drops.

You can also add some honey for natural sweet flavor and the golden color for your dandelion jam!


Canning Dandelion Jelly

boiling seals and lids.
Heating your lids and seals is great both for sanitation and to loosen them up so they’re easier to work with!

Since I am going to be water bath canning these jars of jelly, I poured hot water over the seals. This helps soften them up, ensuring a better seal when you screw the lid on the jar. It may be easiest to leave hot seal or jars on a towel.

Ladle the jelly into clean half pint jars. Leave 1/4 inch headspace. Wipe the rims of the jars and add seals and rings. At this point, you can just let the jelly jars cool on the counter at room temperature with the lids on for 24 hours. Then, keep the jelly in the fridge – it will last several weeks.

Why not make your own Dandelion Jelly? Here's the full recipe plus canning instructions! #dandelions #jams #preserving #jelly #canning
This jelly has a beautiful golden color and a light refreshing taste!

If you want to store the jelly for a longer time, process the canning jars (right after filling and sealing) in a water bath canner for 10 minutes.

Here’s how I water bath canned Cherries. Different fruit but the process is just the same, so go ahead and read through how water bath canning works.

All kinds of jellies and jams can be safely preserved by using the water bath canning method. It’s easy to do and it’s a great way to learn how to safely can food at home.

Dandelion Questions:

Is it safe to eat dandelions from your yard? 

Yes it is safe to eat dandelions, as long as you can be assured no chemicals have been sprayed on your lawn! 

Can you eat dandelions right our of your yard?

Yes! All of the dandelion plant is edible (and delicious!) Again, be sure that the plants have not be sprayed or had any chemicals used on them at all. If in doubt, pass them by! 

(And next year, don’t spray – this way you’ll be able to harvest dandelions for eating all season long)

Is it safe to eat fried dandelions?

Yes, and we have a delicious recipe for fried dandelions in our book full of Dandelion Recipes!

How to safely eat dandelions?

Once you’re sure you are picking unsprayed flowers and plants, simply rinse well to get any dirt off. Then use in recipes!

Preserving Food at Home

If you want to read more about preserving and find our awesome recipes, take a look at this page all about Preserving Food. It has links to every preserving recipe on this site!

And it goes through all kinds of preserving including pickling, freezing food, water bath canning, pressure canning and even dehydrating!

jars of finished dandelion jelly.
Dandelion Jelly is a great option for a homemade gift.

Isn’t it pretty? That Dandelion Jelly is such a pretty colour of yellow – it’s sure to please.

spreading dandelion jelly on a piece of toast.
Enjoy your jelly on a nice slice of toast for breakfast!

Enjoy on homemade toast! It is also delicious as an appetizer – spread some softened cream cheese on a nice cracker and add a small dollop of jelly. Or try some spread on pancakes – yumm!

two glasses of golden dandleion wine.
Dandelion Wine is another homemade treat you can make from the yellow petals!

Want to try your hand at making Dandelion Wine? We have been making this for years and we often give a bottle as a hostess gift. Check the link for the complete recipe and process for making your own Dandelion Wine from dandelion flower heads!


Want even more Dandelion Recipes?

cooking with dandelions, eat dandelions
Check out this whole collection of recipes to make using dandelion.

Grab my ebook Delicious Dandelions: a Recipe Collection!


Want to print the recipe for making your own Dandelion Jelly? Here it is:


Dandelion Jelly Recipe Card

 
Dandelion Jelly

Dandelion Jelly

Yield: 5 half pint jars
Prep Time: 1 hour
Cook Time: 20 minutes
Additional Time: 10 minutes
Total Time: 1 hour 30 minutes

Dandelion jelly, preserved in jars tastes wonderful and makes a pretty gift!

Ingredients

  • 2 cups Dandelion petals (just the yellow petals)
  • 2 cups boiling water
  • 1/4 cup lemon juice
  • 4 cups sugar
  • 1 pkg Certo Liquid Pectin
  • 8 - 10 drops yellow food coloring

Instructions

  1. Add boiling water to dandelion blossoms. Let steep for up to 24 hours.
  2. Pour the liquid through a strainer into a large saucepan.
  3. Add lemon juice and sugar.
  4. Bring to a full rolling boil.
  5. Add Certo and bring again to a full rolling boil. Let boil for 2 minutes. Stir constantly.
  6. Skim any foam off the top of the liquid, using a metal spoon.
  7. Add food coloring, until you are pleased with the color.
  8. Ladle into jars, wipe the rims and seal. Keep in fridge if the jelly will be used within three weeks.
  9. Use a water bath canner to process the jars if you want to store the jelly for later use. Can for 10 minutes.
Nutrition Information:
Yield: 16 Serving Size: 1
Amount Per Serving: Calories: 204Total Fat: 0gSaturated Fat: 0gTrans Fat: 0gUnsaturated Fat: 0gCholesterol: 0mgSodium: 9mgCarbohydrates: 53gFiber: 0gSugar: 50gProtein: 0g

Did you make this recipe?

Please leave a comment on the blog or share a photo on Pinterest

© Annie
Cuisine: American / Category: Recipes


jars of dandelion jelly on a counter.
You’ll love this golden and sweet homemade dandelion jelly!


originally published 2017; latest update August, 2023

Filed Under: Canning, Flowers, Food

Easy Japanese Chicken Recipe

By Annie

This easy Japanese chicken recipe is an easy and delicious meal that packs a lot of nutrients and will satisfy any cravings for Japanese flavors.

Chicken with rice, peas and sauce on a plate.
This easy Japanese chicken will become a staple for an easy dinner that’s bursting with flavor!

Why You’ll Love Easy Japanese Chicken

One of our favourite special dinners is when we make this Japanese Chicken recipe. It’s zingy and just dang delicious. If I have a lot of chicken pieces, I just double the sauce recipe.

The secret with this dish is to be sure to baste it several times. Since we raise our own chickens for meat, we often use our homegrown chicken for this meal.

When you’re craving sweet and sour chicken but don’t want to shell out an arm and a leg for takeout, this recipe comes to the rescue! Easy, tasty, and so adaptable, you’ll come back to this one over and over!


Ingredients

(Full list of ingredients listed in the recipe below.)

Cut chicken ready for coating with flour and egg.
Fresh chicken ready for cooking!
  • chicken – I use any type of chicken pieces for this dish. Breasts, thighs, whichever. If you use wings, cut them in half. This is one of our homegrown chickens – nice and big! I’m using drumsticks and thighs tonight.
  • egg
  • flour
  • butter
  • soy sauce – a classic sauce for making an Asian-inspired chicken dish.
  • water
  • white sugar – pairs well with the soy sauce for a sweet and sour kind of effect.
  • vinegar – puts the sour in sweet and sour!
  • salt

How to Make Japanese Chicken

Flour, egg, and chicken ready to be coated.
This simple coating gives your chicken a fantastic crispy exterior!

Directions

  1. Dip each piece of chicken in beaten egg. Then coat the chicken really well with flour on both sides.
  2. Fry in butter until deep brown and crisp, turn over part way through the frying time. We always use one of our cast iron deep frying pans. These Lodge cast iron pans are the best, hands down. Over 10,000 great reviews on them.

    Chicken frying in a skillet.
    Cook 10 minutes each side.
  3. Put chicken pieces in a shallow roasting pan and pour the sauce over top. I like to turn the chicken over several times before I pop the dish in the oven.
  4. Bake at 350 degrees for 1/2 hour, depending on the size of the chicken. I often leave the chicken in for at least 45 minutes, but our chickens are quite large.
  5. Baste the chicken or just turn it over several times, to let the sauce soak in. The more you baste, the better it tastes. You simply cannot baste the chicken enough.


Fried chicken in a roasting pan with lots of sauce.
Baste the chicken often while baking for a moist and tender result.


Recipe Tips and Variations

  • We like to serve it along with rice and some homegrown garden peas. This Japanese Chicken is a delicious dinner that everyone loves!
  • Two thirds of this meal is totally homegrown – we love knowing what we are eating. And it’s so satisfying knowing we can grow so much of our own food.
  • This chicken would also be great served over your noodle of choice.
  • For an even more holistic meal, fry the chicken with some vegetables! Peas, carrots, broccoli, green beans, peppers, snow peas, mushrooms, onions, and a whole assortment of other vegetables would taste delicious served with this Japanese chicken recipe!
  • You could even try this with another kind of meat like pork, the sauce in this dish is extremely versatile and works in a large number of recipes!


Japanese Chicken with sauce served along rice and peas
We love this Japanese Chicken recipe!


More Chicken Posts

Our entire Country Living in a Cariboo Valley Recipe Collection can be found here, and here are some posts that specifically deal with handling chicken and chicken recipes!

  • Check out this post on chicken farming 101 if you’re interested in learning how to raise chickens yourself.
  • Forgot to let frozen chicken come up to room temp? This guide will show you some ways to quickly defrost a chicken.
  • Easy Mediterranean Lemon Chicken is a delicious recipe that can be made with both homegrown chicken and herbs!
  • Another great recipe you can make with your very own chicken and vegetables is this Roasted Homegrown Chicken Dinner.


Easy Japanese Chicken Recipe

If you enjoy this easy Japanese chicken recipe, please be sure to rate it 5 stars below! And print this off or save it to your Recipes folder!

Japanese Chicken, sweet and sour chicken, dinner, recipe, food

Japanese Chicken

Yield: 4
Prep Time: 20 minutes
Cook Time: 45 minutes
Total Time: 1 hour 5 minutes

Like a Sweet and Sour sauce....but not. It's better. The flavour goes right through the chicken. Baste it several times. A mouth watering favourite at our house.

Ingredients

  • 3 lbs. chicken, cut up and skin on
  • 1 egg, beaten
  • 1 cup flour
  • 1 cup butter
  • 3 tbsp Kikkoman soya sauce
  • 3 tbsp water
  • 1 cup white sugar
  • 1/2 cup vinegar
  • 1/2 tsp salt

Instructions

  1. Dip in beaten egg and then cover them really well with flour.
  2. Fry in butter until deep brown and crisp, turn over part way through the frying time.
  3. Make a sauce with the remaining ingredients.
  4. Put chicken pieces in a shallow roasting pan and pour the sauce over top.
  5. Bake at 350 degrees for 1/2 hour, depending on the size of the chicken

Did you make this recipe?

Please leave a comment on the blog or share a photo on Pinterest

© Annie
Category: Main Course

First Published March 2017; Updated April 2021

Thanks for checking out this recipe. For more, follow me on Facebook, Pinterest, Instagram, and Twitter!

Tangy Japanese Chicken wings on a plate with sauce.
This take on sweet and sour chicken works with so many cuts of poultry and pairs well with any kind of rice or noodle!
 

Filed Under: Food, Recipes

Raspberry Vinegar with Honey

By Annie

This Raspberry Vinegar with Honey is a sweet and tangy mixture that’s a refreshing and delicious way to use raspberries. Make it into salad dressing or drizzle it on anything that needs a punch of fruity flavor!

Collage that shoes raspberries in a bowl, leaves, and a close up of raspberries.
This raspberry vinegar utilizes delicious honey to bring extra sweetness that plays nicely with the berry flavor!


Thanks so much to Annie for allowing me to do a guest post on her blog! I’m happy to be here and share the good things in life with her readers!

Why You’ll Love Raspberry Vinegar with Honey

Raspberries have been a favorite since childhood. Even as a little girl, I knew that when I had my own home, raspberries would be at the top of the list. Not only are the fruits delicious, but they grow well even in cold climates, which is a double-bonus for northern folks!

While I don’t own land (or a cottage) yet, I am part of a community farm with a wonderful raspberry patch, from which my man and I get a full harvest each year. I’ve been promised I can dig my own starts from these bushes when we do purchase land!

Oh yes, that excites me! And at that point, I’ll be refreshing my mind with Annie’s blog post on how to grow and care for raspberries!

In my mind, no summer is complete without these red, luscious fruits! When harvest season rolls around, I have a difficult time actually using them. A winter freezer without whole, frozen raspberries is like a bank account without money!

I usually talk myself into sacrificing half the berries for a few cordials, a batch or two of raspberry kvass, mini-jars of delicious jam and of course, raspberry vinegar!

With this fermented liquid, brilliancy of color is equally matched by brilliancy of flavor. And the salad dressing you can make with the finished product is lovely.

Because good things are meant to be shared, I’m going to share my favorite raspberry vinegar recipe with you today! The recipe makes approximately 7 cups of the finished product.

Both fresh and frozen berries are viable options. If using frozen fruit, be sure to thaw before beginning the process. Hint: making vinegar from frozen raspberries in early spring while snow blankets the earth is a wonderful way to curb the garden itch!

Bowl of raspberries in water.
These raspberries are so red and beautiful, and full of flavor!

Ingredients

  • 4 cups raspberries (x3)
  • 6 cups chlorine-free water (x3)
  • 1/2 cup raw honey
  • glass jar or bowl
  • 2 finely-woven cloths


How to Make Raspberry Vinegar with Honey

  1. Place 4 cups raspberries in a glass jar or bowl. Add approximately 6 cups water. Cover the mouth of container with a cloth and secure to keep fruit flies out.
  2. After 24 hrs have passed, place a second cloth in a colander and place colander over a bowl. Pour berries and liquid into cloth-lined colander, straining the liquid.
  3. Tie up the ends of cloth and hang from a kitchen cupboard, allowing juices to drip into the bowl for several hours.
  4. When dripping has ceased, toss berries or save for morning smoothies. Place another 4 cups of new raspberries in the container or jar.
  5. Take the strained, red raspberry water and pour over fruit.

    Raspberries dripping through cloth.
    Making this vinegar in multiple rounds ensures there’s plenty of punchy raspberry flavor.
  6. Let it also set for 24 hrs. Strain as instructed above and toss the old berries. On day 3, repeat the process by pouring twice-infused liquid over another 4 cups fresh fruit, once again letting it stand for 24 hrs. Strain liquid for the 3rd time.
  7. In a glass jar, bowl or in a crock, add 1/2 cup honey (crystallized or liquid), then add the deep red, raspberry-infused liquid. Come back 24 hrs later and stir honey. It will quickly dissolve. Be sure to cover the open-mouthed container with a cloth, tightly tying down to keep fruit flies out. The aroma of fermented fruit is certain to attract them!
  8. Vinegar ferments best in temperatures of 60-70F (15-21C). Let it sit without a lid for 2-5 months. When fermentation begins, you’ll see tiny bubbles on the sides of the glass.
  9. Several weeks later, it will smell slightly sour. The process to completion will take several months. Be aware that if you seal up vinegar while its still in the fermenting phase, pressure will build and explode glass jars and bottles!

Err on the side of caution: if you must seal it up, be sure to check for pressure 2 days later! If free from pressure build-up, vinegar is done processing and has gone “flat.” It’s delicious, ready to use immediately.


A bowl of raspberries and glass jar of raspberry vinegar.
The beautiful color from the raspberries transfers over to the vinegar!


Autumn Rose is an author, blogger and chronic Lyme survivor. She is passionate about bringing nutrition into her home and for this reason cooks from scratch, gardens and practices raw food preservation. She loves old fashioned living and leads what she refers to as the simple cottage life. Together, she and her husband are working to implement this lifestyle while saving to purchase land. There, they hope to build their own cottage and lead a life focused on what really matters most. Her tutorials, writing and musings can be found on her blog atraditionallife.com


More Sweet and Fruity Recipes

Our entire Country Living in a Cariboo Valley Recipe Collection can be found here, but here are some fruity highlights!

  • Homemade Lemonade
  • Chewy Coconut Cookies
  • Pumpkin Cranberry Banana Bread


First Published February 2017; Updated April 2021

Thanks for checking out this recipe. For more, follow me on Facebook, Pinterest, Instagram, and Twitter!

Filed Under: Food, Grow Your Own Fruit, Recipes

How to Can Homemade Sauerkraut

By Annie

Ever wondered how to can sauerkraut so you can enjoy it all winter long? You can easily ferment and can your own sauerkraut in the comfort of your own kitchen!

Recently I wrote about our Cabbage harvest and using some of it to make Sauerkraut. Water bath canning Sauerkraut is pretty easy; a beginning canner can preserve cabbage with confidence and just a few ingredients.

a head of cabbage growing in the garden
We love our home-grown cabbage!

What is Sauerkraut?

Hailing from Germany, this salted cabbage dish is created by fermenting cabbage and results in a distinctive sour flavor.

Because it has a long shelf life, it’s an easy way to preserve some shredded cabbage and Graham loves it along with pierogies and sausages.

Read here to see how to make your own Sauerkraut including more details about the normal fermentation process.

The best part is the sauerkraut ferments passively, which means for the most part you can let it be.

The process essentially involves removing the outer leaves of the cabbage (don’t discard these, you can eat them!), shredding the cabbage with a knife or food processor, and layering with pickling salt.

It’s easy to cover cabbage and let the fermentation process do its job! Check out the recipe above for more detailed instructions on fermented sauerkraut.

Jar with homemade Sauerkraut ready to be canned.
Learn how to can Sauerkraut safely.

After leaving the kraut in a 3 gallon crock for a couple of weeks and checking it often, I scooped some out for Graham to do a taste test. He found it to be delicious and mild, which he likes.

That meant it was time to finish off the preserving of the Sauerkraut. If we wanted to, we could just put the crock down in our Cold Room and use the Sauerkraut when we wanted some.

We keep our Cold Room between 32 and 40F, and this temperature would be fine for the Sauerkraut.

However, we chose to can it instead – so should you if you cannot keep the crock in a cool enough place. Here’s how I did it.

You can also raw-pack your sauerkraut by skipping the steps that involve heating it before packing it into the jars. I prefer to hot-pack when canning sauerkraut.

See every one of our Preserving Recipe and Instructions Guides – right here!

Water Bath Canning for Homemade Sauerkraut

  1. Heat the Sauerkraut in a large pot, stirring with a plastic or wooden spoon. You want it to gently simmer, don’t boil it. Gentle bubbles means you’re at the right temperature.
  2. Add a bit of the juice. Make a brine (1 1/2 tablespoons of salt for each 1 quart of water), in case you don’t have enough juice in the crock.

    sauerkraut heated on stove before being canned in jars
    To hot-pack, you’ll want to heat the sauerkraut on the stove before transferring to jars.
  3. You’re going to Hot Water Bath the Sauerkraut, so wash your jars and then set them into your boiling water canner. Keep them in there for 10 minutes.
  4. Meanwhile, get your seals and rings ready. Pour boiling water over them and let them sit until you need them. I’m using Tattler lids for some of the jars – I should have ordered more so I had some new lids!

    tattler lids on a counter
    I love using these lids for easy and reliable food preservation!
  5. Use 1 1/2 tablespoons of salt for each 1 quart of water. Heat this brine on the stove.
  6. Once you get your Sauerkraut warmed up, hot pack it into jars. I use these pint jars but you can use quarts if you like a larger jar size.
  7. Leave 1/2 inch headspace in the jars. Add the warm liquid and use the brine, if you need to. Leave 1/2 inch of headroom and wipe jar rims.
  8. If you are using Tattler lids and seals, there is a slightly different process to follow and you can read it here. It is very important to let the contents vent during the processing.
  9. Place your jars in the Boiling Water Bath and once the water comes back to a boil, set your timer for 15 minutes for pints. If I had used quarts, the processing time would be 25 minutes.

    hot packed sauerkraut in jars ready for water bath canning
    Be sure to leave a bit of head room in your jars.
  10. I have to add 5 minutes because of our altitude (2800 ft). Make sure you always take your elevation into account when you do canning, it is very important.
  11. Once the time is up, remove your jars and leave them alone for 24 hours. After that, you can wipe the jars down, remove the metal bands if you like, and place the jars on your pantry shelf.

    canning jars of sauerkraut ready for canning
    Here’s the sauerkraut all packed into the jars. It’s easy to make dozens of jars like this all at one time!

What Supplies Do I Need for Home Canning?

Not sure where to start when it comes to canning? Here are some recommendations:

I have a very handy food grade Canning kit (Presto) that includes jar lifter, seal grabber, a funnel, a measuring gauge that allows you to easily figure out the headspace and more.

These items are almost a necessity when canning. You can order one of these Canning kits here.

For sauerkraut, I also recommend getting a nice sharp knife to slice the cabbage into nice thin shreds. A mandolin is also another option for slicing.

Here, you can find the Canning Supplies and Equipment Needed to Preserve Food

What Can I Use Sauerkraut For?

Graham has already enjoyed a meal of Bratwurst and Sauerkraut along with Perogies, and is looking forward to many more.

It can also be eaten on its own or as a simple side dish if you really enjoy the flavor. It pairs well with bold, savory flavors like onions and garlic.

Sauerkraut has many health benefits: lots of naturally occurring probiotics that foster beneficial bacteria in the body to improve digestion, nutrients, vitamins, and it can even help strengthen the immune system and reduce the risk of certain diseases.

A hearty mason jar of sauerkraut can also be given as a nice homemade gift for friends, family, and loved ones.

We ended up with 17 pints of Sauerkraut using a 3 gallon crock, which held a total of 15 pounds of cabbage.

Here’s an article about Canning Tips You Should Know

Jar of Sauerkraut ready to be canned.
Save this to your Pinterest board for later!

More Home Food Preservation Guides

  • Want to can some fruit? Here’s How to Can Cherries so you can fill your pantry shelves.
  • Here’s How to Can Salmon (and any other fish)
  • Using Tattler Lids? Here’s how I make sure to use Tattler Lids and Seals properly!
  • Make these Quick Pickled Carrots from the Minimalist Baker!
  • Learn how to store Home Canned Food Properly
How to can Sauerkraut jars on a shelf

How to Can Homemade Sauerkraut

Cook Time: 25 minutes
Additional Time: 1 day
Total Time: 1 day 25 minutes

This easy homemade sauerkraut is perfect to quickly can right in your own kitchen! This will extend its shelf life and keep it fresh and tasty for much longer.

Ingredients

  • 10 pounds cabbage leaf
  • 6 tablespoons pickling salt

Instructions

  1. Heat the Sauerkraut in a large pot, stirring with a plastic or wooden spoon, until it reaches a gentle simmer.
  2. Add a bit of the juice. Make a brine, in case you don’t have enough juice in the crock.
  3. You’re going to Hot Water Bath the Sauerkraut, so wash your jars and then set them into your boiling water canner. Keep them in there for 10 minutes.
  4. Meanwhile, get your seals and rings ready. Pour boiling water over them and let them sit until you need them.
  5. Use 1 1/2 tablespoons of salt for each 1 quart of water. Heat this brine on the stove.
  6. Once you get your Sauerkraut warmed up, hot pack it into jars.
  7. Add the warm liquid and use the brine, if you need to. Leave 1/2 inch of headroom and wipe jar rims.
  8. Place your jars in the Boiling Water Bath and once the water comes back to a boil, set your timer for 15 minutes for pints (or 25 for quarts).
  9. Once the time is up, remove your jars and leave them alone for 24 hours. At this point, wipe them down, remove the metal rims if you like, and store them wherever you like.

Notes

  • This recipe takes sauerkraut that's already been made and prepares it for canning. Check this post for information on how to make your sauerkraut from scratch!
  • As a general rule of thumb, you can fit 5 pounds of cabbage for every gallon that your crockpot or slow cooker will fit. Feel free to tweak the amount of cabbage depending on the size of your pot.
  • Make sure you always take your elevation into account when you do canning, it is very important. Higher altitudes will require more time.

Did you make this recipe?

Please leave a comment on the blog or share a photo on Pinterest

© Annie


Filed Under: Canning, Food, Grow Your Own Vegetables, How To Tagged With: Grow Vegetables, preserving, Sauerkraut, vegetables

  • « Previous Page
  • 1
  • 2
  • 3
  • 4
  • 5
  • Next Page »

Connect With Us!

  • Email
  • Facebook
  • Instagram
  • Pinterest
  • Twitter

Search this site

Generic selectors
Exact matches only
Search in title
Search in content
Post Type Selectors
Search in posts
Search in pages

Our Most Popular Posts

Garlic cloves in oil

How to Preserve Garlic in Oil – and Other Ways to Store Garlic

a open jar of pickled brussel sprouts on a counter

Easy Pickled Brussels Sprouts Recipe (Water Bath Canning)

Privacy Policy

Read about our Privacy Policy

Disclosure

Please note that some of this site’s links are affiliate links, and CountryLivinginaCaribooValley.com is a participant in the Amazon Services LLC Associates Program, an affiliate advertising program designed to provide a means for us to earn fees by linking to Amazon.com and affiliated sites. At NO ADDITIONAL COST TO YOU, I will earn a small commission, if you purchase them. I recommend them as they are good products.

Theme Design By Studio Mommy · Copyright © 2026