This post contains affiliate links. Learn More
These easy and flavorful Pickled Pearl Onions are the perfect recipe for anybody who’s new to canning.
With just a couple of simple ingredients, you can have your own pickled onions to use in drinks, condiment trays, or cooking. Here’s a quick and easy pickling recipe.
Water bath canning is a great way to learn how to can and these quick pickled pearl onions just need a short processing time.

Why You’ll Love this Pickled Onions Recipe
You can use either the small pearl onions or sliced regular size onions. And you can cut the recipe if half if you don’t want to can them and store the finished jars in your fridge. Or, make a full batch and then water bath can the jars so they can be safely put into your food storage.
Onions are really easy to grow, but if you don’t have a vegetable garden then just buy the onions instead. Sometimes you can find a great deal on pearl onions at the store, your local farmers market or at a farm store near by.
Onions are inexpensive and they are easy to store whole to use over winter. Here’s how we store onions all winter long. But if you like pickles and you like onions, whip up a batch of these pickled onions.
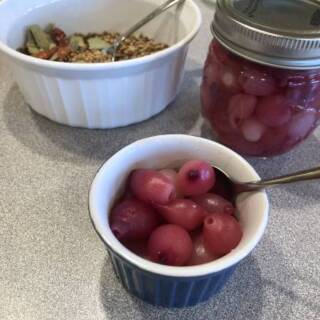
Add them to meat based dishes, tacos or wraps and even in salads. Enjoy them with other pickles on a condiment tray. Or, just eat them right out of the jar.
Ingredients Needed
- pearl onions – you’ll want to make sure they’re peeled before you pickle them.
- pickling vinegar – this typically means your classic white vinegar, but apple cider vinegar can be used for a specific flavor addition if you don’t mind slight discoloration.
- water
- salt
- sugar – helps offset some of the salt and acidity from the vinegar.
- pickling spice – a perfect pre-made blend of spices that will result in a delicious pickled onion every time!
How to Make Pickled Pearl Onions

- We needed 8 cups of pearl onions, trimmed and cleaned, so we took off the loose papers and then dropped the onions into boiling water for 30 seconds.
- I used my mesh sifter to hold the onions so they were easier to deal with. From the hot water, they went straight into really cold water for about 30 seconds. This made the outer layer easier to slip off. That layer is fairly thick and tough so we didn’t want to pickle the onions with that layer on. It did take a bit to slip all the skins but you can see it’s worth it – those small onions look beautiful once they are ready for pickling. They are going to look so pretty once they are in jars.
-

Taking all of the skins off your onions can be slightly tedious, but so worth it for the finished product. - Wash the jars and place them in a boiling water bath for at least 15 minutes to sterilize.
- Place your canning seals in a bowl and cover with hot water.
- Combine your vinegar, water, salt, and sugar in a medium saucepan and bring this mixture to a boil, then reduce to a simmer. Add the onions, simmer for about five minutes, bring it back up to a boil, then bring it down to a simmer for another 5 minutes.
- Add your pickling spice to the empty jars, then follow up with the onions and pickling liquid.
- Put on the seal and canning ring, then place the jars in the water bath canner and boil for 15 minutes. Remove them and allow them to sit for at least 24 hours.


Variations for Flavouring Pickled Onions
As long as you don’t change the measurements of vinegar or water, it is possibly to change up the flavour of these pickles. You may like to try adding a teaspoon or so of:
- thyme leaves
- mustard seed
- celery seed
- cloves
- bay leaves
- coriander seeds
- black peppercorns
- garlic cloves
- hot peppers such as cayenne or jalapeno
Getting Mason Jars Ready for Canning
Canning for your first time can be a bit of an intimidating process, so here’s another breakdown for you.
While the onions were being prepared, we got the water bath canner full of water and set on the stove to boil. Make sure to have a bottom rack in the canner, so the mason jars do not sit directly on the canner.
Then, we set all the clean empty jars in the water bath canner and let it boil. After 15 minutes the jars are sterilized and they can be taken out. Also, we got the canning seals ready in a shallow bowl and covered with hot water.
They will sit in the water until the moment they go on the jars. We also got the pickling mixture going on the stove. This included vinegar, water and sugar.
After the pickling solution came to a boil, we turned to the stove down to a simmer and cooked the onions about 5 minutes.

At this point, add the clean pearl onions to the pickling mixture and wait for it to come back to a boil. Once it boils, turn it down and let it all simmer for 5 minutes.
Filling the Canning Jars
Now, we’re ready to fill the jars. We’re canning these in half pint jars, but you can easily use pint jars if you like. The smaller jars get used a lot here, as we like to open a jar and then use it all up!

Sprinkle some pickling spice (or whichever spices and herbs you like) into each jar and then add the pearl onions. Then fill the jar with the warm pickling liquid (sometimes called brine) and leave 1-inch headspace. Be sure to remove any air bubbles as well.
Be sure to wipe rims of jars with a wet cloth. This helps remove any food or liquid on the rim – that will definitely interfere with the jar becoming properly sealed. Don’t skip this step.
Put your canning seal on top and add the ring. Tighten just to fingertip tight – don’t overtighten them.
Canning Pickled Pearl Onions
Using your jar lifter, add each jar to the boiling water in the water bath canner. Reminder: be sure you have a rack on the bottom of the canner, so there is a barrier between the bottom of canner and the bottom of the jars.
Try to not let the jars touch each other. I can usually get 7 jars in my boiling water canner; if I want to add more, I add another rack on top of the jars.
Then add more jars on top of the rack. Put the lid back on the canner and let the water come back to a boil.

The depth of your water bath canner will determine how many jars you can do at one time, on two levels.
Let the water boil and then set the timer for 15 minutes. Once done, remove the canning lid and use your jar lifter to carefully remove the hot jars.
Set the jars on the counter (put a thick towel down first) and be sure to leave space between each jar. Now leave the jars alone for 24 hours to seal and cool down. As they jars seal, they will make a pinging noise.
After the 24 hours, test each jar to ensure it is sealed. Are all the seals concave? If not, put the jar in the fridge and plan to use it up first or you can again put them in the water bath to see if they will seal.
FAQs
How to Store Pickled Pearl Onions
If you don’t want to bother water bath canning any jars of pickles, you can easily reduce the recipe to make fewer jars. Then, after the jars have been filled with the pickling mixture, wipe the rims and place the seals and lids on the jars.
Let them cool on the counter for at least 12 hours (24 is better) and then just store the jars in your fridge. They will last indefinitely in the fridge because of the pickling.
Remember: If you do NOT can them, keep them in the fridge at all times.
If you do water bath can them, you can add these to your food storage, whether that is in your pantry or cold room. Because they have been through the canning process, they will be safe stored at room temperature.
How to Serve Pickled Pearl Onions
They’re a great appetizer, or use them in cocktails. Put a couple of pickled onions on a toothpick and serve with a martini with gin and vermouth. This is sometimes also called a Gibson cocktail. And pickled onions work as a great garnish for a Bloody Mary!
You can also add them to pulled pork, burgers, or other sandwiches, tacos and salads.
I recommend you drain off some of the liquid before serving, or you could combine it with a bit of oil and use it as a salad dressing.
Can you eat pickled pearl onions out of the jar?
Of course! If you love the flavor of these pickled pearl onions, feel free to grab a fork or toothpick and eat them right out of the jar.
Are pickled pearl onions good for you?
Pickled onions are known to have antioxidants, and ingredients that are anti-inflammatory and that can help with heart health and blood sugar levels!
What is a good substitute for pearl onions?
You can make this recipe using chopped white onions, shallots, or even leeks.
Do pearl onions have another name?
Pearl onions are also sometimes referred to as white cocktail onions, but are also called button onions, baby onions, or silverskin onions in certain places (like the UK).

More Preserving Recipes
Our entire Country Living in a Cariboo Valley Recipe Collection can be found here, and here are some more fantastic canning and preserving recipes hand-picked for you!
- Check here for an entire collection of preserving recipes.
- This Pickled Asparagus is another great and easy pickling recipe!
- And for something a little more festive, check out this recipe to learn how to can your own Homemade Salsa.
Homemade Pickled Pearl Onions Recipe
The Bottom Line: these Pickled Pearl Onions are easy to make and are a great way to fill your pantry
If you enjoy this recipe, please be sure to rate it 5 stars below! And print this off or save it to your recipes folder!
Quick Pickled Pearl Onions Recipe
These quick and easy Pickled Onions are perfect for a condiment tray or used in cooking. Add to meat dishes, in tacos or in any tomato dish.
Ingredients
- 8 cups peeled pearl onions (typically 10-12 oz)
- 5 1/2 cups pickling vinegar
- 1 cup water
- 2 tsp salt (optional)
- 2 cups sugar
- 8 tsp pickling spice
Instructions
- Prepare jars for canning by washing them and then setting in a boiling water bath for 15 minutes to sterilize.
- Place canning seals in a shallow bowl; cover with hot water. Replace water as needed, if water cools too much.
- Put a large pot water on to boil.
- Prepare onions by removing loose wrappers. Then set in a colander and place into simmering water for 5 minutes.
- Plunge onions into cold water and then peel. Measure out 8 cups onion.
- Combine vinegar, water, salt and sugar and bring to a boil. Reduce to a simmer.
- Add spices to empty jars.
- Add pickles to the jars, put on the seal and canning ring (fingertip tight)
- Place jars in the water bath canner, bring to a boil and let boil for 15 minutes.
- Remove canning jars and place on the counter where they can stay for 24 hours without being moved.
Nutrition Information:
Yield: 16 Serving Size: 6Amount Per Serving: Calories: 138Total Fat: 0gSaturated Fat: 0gTrans Fat: 0gUnsaturated Fat: 0gCholesterol: 0mgSodium: 294mgCarbohydrates: 34gFiber: 1gSugar: 29gProtein: 1g
First Published October 2020; Updated October 2023