This post contains affiliate links. Learn More
Once you learn how to can salmon, you can pressure can many kinds of fish!
We have always loved to go fishing and years ago, we had to learn how to can salmon because there was only so much room in our freezer. And once we learned how to can fish, we started doing it every year!
This weekend, we canned most of the Salmon we had in the freezer, leaving only 4 bags with filleted fish to eat with meals.
Canning Salmon is not hard, but you definitely need to use a Pressure Canner. Here’s how we can Salmon and enjoy eating it all year around.
You can use this same canned salmon recipe for any type of fish such as tuna or trout. If you haven’t used a pressure canner before, read this, as it will explain exactly how to use a pressure canner.

How to Can Salmon
The only ingredients needed are the fish, 1/2 teaspoon of coarse salt and 1 teaspoon of lemon juice per jar. We like to use these half pint wide mouth mason canning jars. It is much easier to get the fish out of a wide mouth jar as opposed to a regular jar!
Also, because there are two of us here, we can use the whole jar up in one use. If you have a family of four, you may want to use pint jars instead.
We thawed the frozen fish overnight and then made sure to rinse each piece well, under cold water. You can prepare the fish at room temperature or cold right out of the fridge.
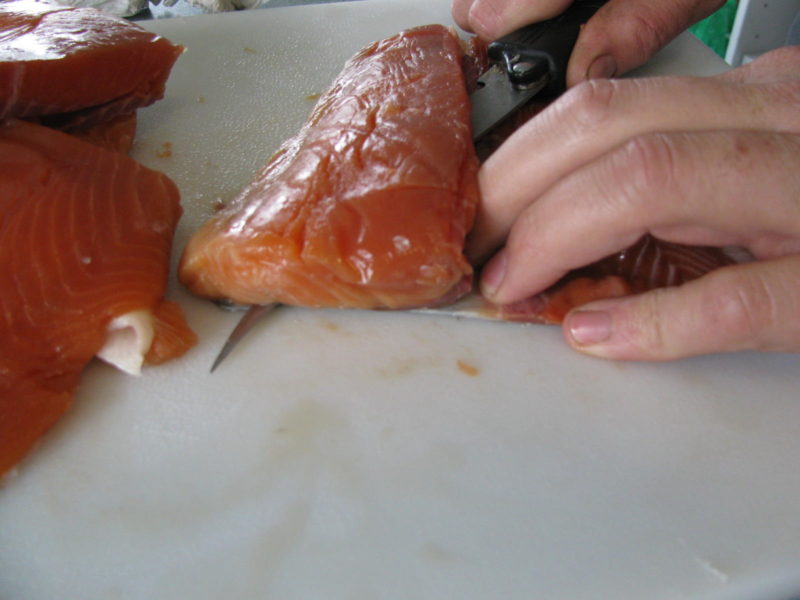
Graham then used his fillet knife to cut the salmon flesh off the skin. He cuts as close to the skin as possible, essentially skinning each piece of fish. It’s sometimes easiest to do this with the fish skin side down. Then, the fish pieces get laid onto a plate lined with paper towel.
You may also need to remove bones, depending on what cut of salmon you’re working with. The backbone is particularly common to find and will need to be cut out.
Getting Jars Ready for Pressure Canning Fish
Meanwhile, I got all the canning equipment organized that we would need. I washed 24 half pint jars.
If you are pressure canning, you don’t need to sterilize the jars, like you do when you water bath can.

The canning jars however do need to be clean and I always wash them out in soapy water before reusing them. I set the canning lids to soak in hot water and set all the lid rings aside.
Here are the jars all cleaned and ready for fish. Graham cut each piece of fish into smaller ones that will fit in the small jars.
We like to place the first pieces of fish in the jar so that they are along the sides, then start to pack layers of fish in the middle of the jar. Make sure the pieces are not so long that they can interfere with the seals. You’ll want about a 1-inch headspace to prevent issues.

Once filled, I added 1/2 teaspoon of coarse salt and 1 teaspoon of lemon juice to each canning jar.
Clean rims of each jar after they are filled. Then I put on the seals, which have been soaking in hot water and finally, adding screw on a ring over each seal and make sure the canner lids are on tight.
Instructions for Pressure Canning Salmon
- When we have enough jars filled, we add four quarts of water to the pressure canner and then we put a layer of jars inside. Room temperature water works just fine.
- Since we have a pressure canner rack to separate levels of jars, we put that in and have two levels of jars. This way, we were able to process 14 jars at a time.
- If you want to process a lot of jars at once, you need to use a second rack to keep the tops of the jars from hitting the bottom of the others.

Canning salmon is a great way to enjoy it as good as fresh through the entire year! - Close the canner and turn up the heat on the stove. Once it starts steaming, we time it to vent for 10 minutes.
- After the venting time is over, we add the weight (15 lbs of pressure, because of our elevation) and then wait for the canner to again start steaming.
- Be aware that the higher the altitude, the more weight you’ll need to add. Times and weights may also vary a bit depending on the type of pressure canner you own.
- Once the ball weight starts to jiggle and let out steam, we can slowly start to turn down the heat under the pressure canner.
- Set the timer for 90 minutes and let the canner do its thing. It will continue to jiggle and build up pressure and then release it. That’s normal! Here is everything you need to know about using a pressure canner.


What to do after your Pressure Canner is Finished
After 90 minutes, I turned off the stove and let the pressure canner sit there to start cooling down. This takes awhile, but it’s really important to not open the canner too soon.
Once it cooled down, I removed all the jars and set them off to the side where they can sit undisturbed for 24 hours. By then, I can give the jars a good wipe with a clean wet cloth and store the jars in the pantry.
In the end, we ended up with 22 half pints of salmon. We’ll enjoy this all Winter long!
How to Use This Canned Salmon Recipe
- We’ll use this fish on sandwiches, on cooked pasta with a cream sauce or on top of a fresh garden salad.
- Make a salmon salad and take advantage of all of the healthy proteins of this fatty fish.
- Smoking salmon is also a great way to enjoy it and add some flavor before canning. The smoke process doesn’t need to get the salmon to a certain temperature when canning; it’s mostly to get the texture and smoky flavor. This guide has more information on smoking and canning salmon.
Guides for Canning at Home
- How to Home Can Cherries
- Here’s how to Make your own Salsa – and Can it too!
- How to Make and Can Sauerkraut
- Does the thought of pressure canning scare you? Here’s everything you need to know about How to Use a Pressure Canner to home can.
Originally published June 2019; Updated September 2024