Country Living in a Cariboo Valley

Homesteading in BC

  • How to Get Started
  • Vegetable Gardening
  • Preserving Food
  • Recipes
  • Homemade Wine Recipes
  • About Us
  • Work With Me
  • Shop
    • Vegetable Garden Planner Printable: Grow Your Best Garden Ever
    • Grow Enough Food for a Year
    • Delicious Dandelions: A Recipe Collection
    • Dirt to Dollars: Selling at the Farmers Market
    • 8 Pounds in 8 Weeks: Raising Chicks for the Dinner Table
    • Making Wild Wine
    • Build a Hanging Chicken Feeder
    • 15 Things to Know About Living in the Country

Dehydrated Kale Chips Recipe

By Annie

These dehydrated kale chips are crispy, flavorful, and best of all, they’re a filling snack that’s nutritious and satisfying!

We decided to invest in a quality food dehydrator a few years ago and did a lot of research into the different brands. After reading reviews I bought an Excalibur dehydrator and love it.

We’ve made apple chips (delicious!), garlic salt and different kinds of dehydrated vegetables. We have dried kale to toss into winter soups and stews.

And we made chips…homemade kale chips…Paprika Kale Chips!

Why You’ll Love this Dehydrated Kale Chips Recipe

There are so many health benefits to kale – and so worth it for us to be eating. Kale can help to manage your blood pressure, protect against getting diabetes and may even help with reducing cancer.

Ready to learn how to make kale chips in the dehydrator? Buy the best looking bunch of kale from your local grocery store and dive in!

Dehydrated kale chips in a bowl on the table.
This simple and delicious recipe for homemade kale chips will become a go-to!

How to Make Kale Chips

My Excalibur dehydrator.
Don’t worry if you don’t have a dehydrator; these kale chips can also be made in the oven!

This is my 9 tray Excalibur dehydrator with timer (automatic shutoff). It gets used a lot here and I am very happy with the quality. I store it away over Winter in the basement. Usually though it is upstairs through the entire garden harvest season.

I compared the different types of dehydrators and thought the Excalibur with the automatic timer was the best one to get. I am so glad I did.

It does cost more, but the convenience (and not having to wait up at night until the batch was finished) was well worth it.

One of my friends made homemade kale chips and they were pretty good, so of course I wanted to try making them myself. Since the garden isn’t in season, I had to buy some kale at the grocery store.

A bundle of kale on a counter.
Kale can be a bit expensive so if you have the opportunity to grow it yourself, I highly recommend!

They were $2.99 and there were 11 stems of Kale. That’s pretty expensive and reinforces the idea of growing our own food and eating seasonally.

I am loving having the dehydrator, Excalibur’s are expensive but from every review I have read, they are the very best. Mine came with a 10 year warranty and free shipping and I intend to use it a lot. If you want to research them, click on the links above.

I also have a Salton dehydrator. It is much smaller so cannot hold anywhere near the quantity of the Excalibur.

Separated kale stems lying on a cutting board.
Be sure to cut as close to the stem as you can in order to get as much of the leaf as possible.

Ingredients

  • kale leaves – kale is a fantastic leafy green that can help boost your immune system, lower your cholesterol, improve your heart health, and even prevent against certain kinds of cancer! It’s full of antioxidants and fiber and low in calories, fat, and carbs, which makes kale the perfect ingredient for a healthy snack.
  • extra virgin olive oil – helps your kale leaves get nice and crispy.
  • paprika – adds a hint of sweetness and spiciness which pairs well with the hearty, green taste of the kale.
  • sea salt – just because they’re kale chips doesn’t mean you shouldn’t add a little bit of salt for flavor!


Instructions for Homemade Kale Chips

  1. I separated the kale leaves and gave them a good washing. After cutting out the stems and cutting the kale into chip sized pieces, I tossed the kale pieces in a large bowl.
  2. Combine the coating mix and add it to the kale. You have to get in there with your hands to toss the kale around and make sure it is covered with the coating mixture.
  3. Arrange the kale leaves in single layers on the dehydrator trays for 5 hours. Let them cool down a bit, then enjoy!
Paprika Kale Chips in a white bowl on a wood table.
These easy Paprika Kale chips make for a healthy snack.


Dried Kale Chips Variations

  • If you don’t have a dehydrator, you can also arrange on a baking sheet and bake these kale chips in the oven for about 10 to 15 minutes at 350 degrees F (175 degrees C).
  • Play around with the spices and seasonings you use to switch up the flavor of these chips and give yourself some variety. Chili powder or flakes, nutritional yeast, red peppers flakes, garlic powder, onion powder, cayenne pepper or black pepper, or whatever your favorite flavors are would all take these homemade kale chips to the next level!
  • These paprika kale chips can be made with a number of other greens like chard, collard greens, bok choy, and even brussels sprouts!
  • Sprinkle dehydrated kale leaves with a bit of lemon juice for a pop of citrus flavor.


FAQs

Why aren’t my kale chips crispy?

If there’s any excess moisture on the kale leaves after washing them, this can prevent them from crisping up properly, even in the dehydrator. I recommend using a salad spinner to help remove moisture, and be sure to pat them dry with some paper towels as well.

Are dried kale chips healthy?

Absolutely! Kale is packed with vitamins, minerals, and nutrients that are great for heart health, anti-inflammatory purposes, gut health, and can even help fight cancer! Among these are vitamin C, vitamin K, calcium, potassium, and iron.

They’re naturally gluten-free and low in carbohydrates, so this tasty snack is also much healthier than a lot of other chip options.

Does kale need to be blanched before dehydrating?

No, blanching kale isn’t necessary to make dehydrated kale chips. In fact, skipping this step can help preserve a lot of the vitamins and nutrients that are present in kale.

How long does it take for kale to dehydrate?

It will take about 5 hours for your kale to fully crisp up in the dehydrator.

Is it OK to eat kale chips every day?

In moderation it should be fine. Just be aware that kale contains a large amount of fiber, and eating too much of it on a regular basis can disrupt your digestive system and can cause things like bloating or gas.


More Snack Recipes You’ll Love

Our entire Country Living in a Cariboo Valley Recipe Collection can be found here, but here are some other great snacks for you to try!

  • These Bacon Wrapped Garlic Bites are a delicious and savory appetizer.
  • For a snack on the sweeter side, try these Chewy Coconut Cookies.
  • Homemade Refrigerator Pickles from A Spicy Perspective are another healthy and filling snack!
  • Air Fryer Pasta Chips from Cocktails and Appetizers are a fun new way to enjoy pasta, and so easy to make in the air fryer. Pair them with your favorite dipping sauce!


Thumbs up – we really liked the flavour of the paprika kale chips. I am going to experiment with a few different recipes. If you have tried drying Kale chips, let me know what recipe you use. I’d love to give it a try.


Dehydrated Kale Chips

If you enjoy this recipe for homemade kale chips, please be sure to rate it 5 stars below!

Kale Chips

Kale Chips

Prep Time: 10 minutes
Cook Time: 5 hours
Total Time: 5 hours 10 minutes

These healthy Kale Chips are a great alternative to reaching for salty potato chips. The Paprika adds a nice flavour. Great for afternoon snacks for kids too.

5.0 Stars (2 Reviews)

Ingredients

  • 2 Tablespoons of Extra Virgin Olive Oil
  • 1/4 Teaspoon of Paprika
  • 1/2 Teaspoon of salt

Instructions

  1. Mix together the olive oil, paprika and salt.
  2. Separate and wash the kale leaves . Cut out the stems and then cut the kale into small bite sized pieces.
  3. Put the leaves in a large bowl. Drizzle the oil mixture on the leaves.
  4. Toss the kale around and make sure it all gets covered with the coating mixture. Using your hands works great.
  5. Spread the leaves on the tray in the dehydrator. Be sure the leaves do not touch each other.
  6. Dry for 5 hours at about 145 degrees.. Let them cool down and serve.
Nutrition Information:
Yield: 2 Serving Size: 5 chips
Amount Per Serving: Calories: 120Total Fat: 14gSaturated Fat: 2gTrans Fat: 0gUnsaturated Fat: 11gCholesterol: 0mgSodium: 529mgCarbohydrates: 0gFiber: 0gSugar: 0gProtein: 0g

Did you make this recipe?

Please leave a comment on the blog or share a photo on Pinterest

© Annie
Cuisine: American / Category: Recipes

First Published May 2016; Updated October 2023

Thanks for checking out this recipe. For more, follow me on Facebook, Pinterest, Instagram, and Twitter!

Paprika Kale Chips ready for eating.
These homemade kale chips are nutritious and filling, which makes them a perfect guilt-free snack!

Filed Under: Dehydrating Vegetables and Fruit, Recipes

How to Grow Onions

By Annie

How to grow onions from sets – plant in the garden or in containers!

Onions are so easy to grow in your vegetable garden! If you use a lot of onions in cooking, why not plant a row of onions in your garden? Onions are one of the easiest vegetables to grow and they are really low maintenance. 

Then just add regular chores (watering and weeding) and the onion plants will grow nice and big. Here’s how we grow enough onions here on our homestead to store enough for year round eating.

Onions growing in a raised bed garden.
Save this to your Pinterest Gardening board!

Another vegetable we grow a lot of is potatoes. If you want to learn how to grow potatoes, head over here!

How to Grow Onions

I always buy onion sets, because growing onions from onion seeds takes much longer. You can certainly do it, but you need to sow seeds indoors in January and then transplant later into the garden.


Large onions on a cutting board
Here’s how to grow onions in the garden. Or grow onions in containers or pots on your deck!


Onion sets are just small onion seedlings that can be planted in the garden. Be sure to choose a variety that works with the climate and day lengths where you live.

Long-day onions will need 14 to 15 hours of daylight per day, whereas short-day onions only need about 10.

There are also day-neutral onions which will produce good bulbs regardless of day length.

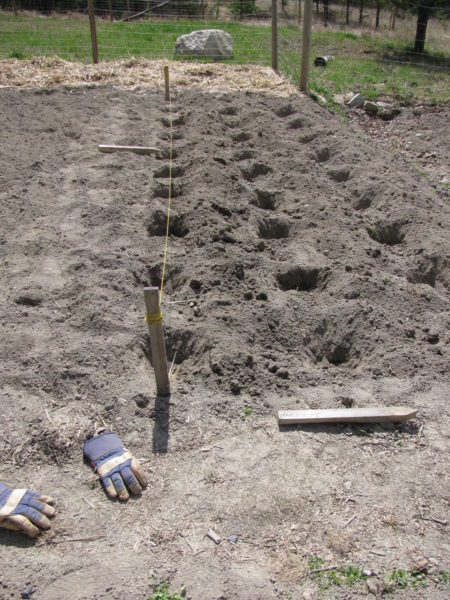
a string used to carve out an even line.
Using a string helps keep your trenches even.

To plant, I first run a string line. This way I can try to keep my rows straight; after it is in place, I make a furrow using my shovel.

Soil Recommendations

I like to add some well-rotted manure or compost to the trench before I plant, but you can also use nitrogen fertilizer like this one to promote bulb growth.

If you’re using mulch, be sure to keep it a fairly thin layer as this can retain too much moisture and you’ll want to tops of the bulbs to have pure sunlight.

If they aren’t able to have fresh air and full sun, this can lead to rot. Good drainage is crucial for healthy onions.

onion bulbs nestled in soil.
Be sure to actively plant the onions instead of scattering them.

How to Plant Onions

Make sure you seat the onion bulbs into the soil. Don’t just toss them into the trench – they really do need to be seated with the roots down and pointed end up.

I situate my onion plants about 4 inches apart, at least an inch deep, making sure they are well seated. Then just fill in the trench and water.

I like to plant my rows fairly close together and thin them later as they grow. I think planting vegetables tightly really helps to keep the weeds and leaves down.

It does make it a bit harder to get into the onion patch though, especially in the beginning months. Some people like to leave a lot more room between plants than I do.

It just makes for a bit more weeding.

How to Thin Onions

We can get onions planted here in the early Spring. They get planted in early May or as soon as I can get into the garden.

Sometimes I can get them planted in late April. Once planted, they will grow all spring and summer and are completely harvested in mid-September.

All growing season long, I thin any onions growing too close together. This way, we get to eat small onions all summer. Meanwhile the remaining onions get to grow a lot bigger.

Harvesting Green Onion

When you see small bulbs, you can snip off a few of the green stalks and use them as green onions, or scallions. Take a stalk from several plants, not ALL of the stalks from one plant.

green shoots coming up from the soil.
These green onion shoots are great to eat!

If you will want lots of green onions all summer long, keep planting sets every few weeks. We can grow large bulbs here; most root crops do very well in the Cariboo.

As the season goes on, you will notice that the onion tops start to turn yellow and fall over. If you are getting into September and the tops are still green, you can speed things up by knocking all the tops down.

Sometimes, we want to get the harvest out of the ground in order to plant fall rye to build the soil through fall and winter, so we knock the tops down.

Also be on the lookout for thrips, which suck sap from onion leaves, as well as other pests and insects like aphids and onion maggots that are naturally attracted to the organic matter.

You may have to get help in order to deal with these pests–your local garden center is a good place to start.

Mature onions in soil.
Once the tops start to yellow and fall over, your onions are close to ready to harvest.

How to Harvest Onions

Don’t cut the onion tops off, just push the tops over. Then let them dry some more before pulling them from the ground.

When it is time for harvesting, try to do it on a sunny and long day. Long summer days are great for this if the onions are ready by then.

Pull the onions, gently brush any dirt off and then leave them in the garden to begin to dry for a few hours.

If you don’t have cool overnight temperatures like we do, you can just leave the onions in the garden for a few days.

We can’t do that here, because we are concerned with even a very light frost falling on them. The onions always get moved before nightfall, just in case.

Curing onions by hanging from barn rafters.
This is a great way to cure your onions and also provide some natural decor!

We cure our onions by tying them in bunches and hanging them from the barn rafters. Here the onions get the benefit of fresh air and wind, but they are under cover.

This way they stay out of the sun. They are also protected from a freak frost, which can happen here in our Zone 3.

We leave them hanging there for two or three weeks. Then, they are brought up to the house and put downstairs. We do NOT store onions in the Cold Room storage. 

Read more about how to store onions for winter here

Onions are easy to grow and don't take much room. Here's how to grow awesome big onions. #onions #gardening #food
Onions are easy to grow and don’t take much room. Here’s how to grow awesome big onions.

If you use onions in cooking, grow some of your own. Almost free onions are much better than having to pay for them at the grocery store!

Varieties of Onions

Here’s a list of some varieties of onions that are good to grow in your garden. I’ve found that red onions and yellow onions tend to grow well!

  • White Bermuda Onions
  • Yellow Granex Onions
  • Yellow Sweet Spanish Onions
  • Walla Walla

Questions about Growing Onions

How long do onions take to grow?

Generally, onions take about 150 to 175 days to grow to full maturity. But, remember that you can dig onions while they are growing. 

How many onions grow from one bulb?

One onion will grow from one bulb. It’s just that you plant a little onion set and get a full size nice big onion months later.

How deep to plant onions?

Plant onion sets anywhere from 1 1/2 inches to 2 inches deep. 


More Posts about How to Grow Onions and Use Them

How to Store Onions for Winter – grow and save fresh onions to eat all winter

Make Pickled Onions – try this recipe!

A list of pretty much every Preserving Recipe we have here, from freezing to canning and more!


originally published 2016; latest update March 2026

Filed Under: Grow Your Own Vegetables Tagged With: Onions

How to Grow Potatoes

By Annie

Wondering how to grow potatoes? All you need to know is right here.

Potatoes are quite easy to grow. You can grow potatoes in a raised garden bed, in pots, in grow bags, you can even grow potatoes in trash cans.

Home gardeners often grow potatoes every year. If you’ve haven’t grown potatoes, you may be surprised at how easy it is to grow your own.

Potatoes are probably the most common vegetable eaten in North America. So if your family is like most, you eat your fair share of potatoes. Some stats say the average person eats more than 30 pounds of potatoes each year.

fresh dug potatoes on soil with hands holding some potatoes
Learn how to grow potatoes. Plant potatoes in grow bags or in the garden

Potatoes get expensive in the grocery store. As the weather cools down and winter comes around, the price of grocery store potatoes keeps going up.

If your family eats a lot of potatoes over the course of a year, then why not plant some? You can buy true potatoes for growing at garden centers and plant nurseries.

Potato plants are easy to grow and they are a great first crop for a new garden bed. Planting and growing potatoes will help break up the soil for future years.

As long as the soil is not too wet, you can plant your potatoes in very early Spring. As soon as you can get into your garden, get some potatoes planted.

You’ll also want to rotate your crops yearly to avoid things like pests like the Colorado potato beetle or other harmful potato beetles. Purchasing disease-free seed potatoes is another way to prevent diseases like potato scab.

sprouted potatoes in a paper bag ready for planting
Look at all these sprouts! These are great for using as seed potatoes.

Potatoes are one of the most versatile vegetables you can grow. Find yourself some great potato recipes and discover delicious new ways to serve them.

You can find lots of delicious potato side dish recipes over here.

Make homemade french fries if you have a deep fryer. Or make a homemade potato salad. Turn several pounds into delicious potato soups or stews.

New potatoes are delicious loaded with sour cream, then sprinkled with fresh garden herbs.

Put a chicken in the oven, add some potatoes, carrots and onions and roast the whole thing for dinner. Serve with peppers, eggplants, or tomatoes. Baking potatoes to serve with any meal is easy and delicious!

Holes dug in garden for potatoes seed
You can plant potatoes in a hole or in a trench.

How to Grow Potatoes – Planting

Potatoes can be planted early in the year. If you can get in to the garden to work, you can plant your potatoes. Soil temperatures are not that critical when it comes to growing potatoes, so they can grow in a variety of climates. 

The only thing they don’t like is an abundance of moisture in the soil – if your garden soil is still mucky and soaked, delay planting for a week or two to avoid rot. Make sure your potato bed has good drainage.

They do love full sun and their growing season here in Zone 3 is from May – October. Generally, you’ll want to aim to plant around a month prior to your last frost date.

There are several different ways to grow potatoes, but here is how we plant ours. I like to use a string line to mark my rows while I plant.

Once my row is planted, I move the string line and I mark the end of the planted row, either with a stake or even a larger rock.

Be sure to dig the holes as deep as possible. You may want to mix some compost (always the best organic matter) or other non chemical organic fertilizer into the soil. If you can dig 12 inches deep, that is fantastic.

Potatoes do like slightly acidic soil, with a pH of around 5.8 – 6.3. If you have doubts, test your soil pH and add composted matter as needed.

If you don’t have a lot of compost available, just add some to the bottom of the hole – the seed potatoes will love it.

Keep your plants spaced about 1 1/2 feet apart. (You’re going to need that extra soil later). Some gardeners prefer digging a trench instead of holes; either way works just fine.

Remember that rotating the potato patch yearly is a good idea, as over time your tubers can develop potato blight from always being planted in the same soil. 

sprouted potato getting planted in garden
If the potato has lots of long sprouts you can remove some of them.

Planting the Potato Seed

You want your potato to have at least 3 eyes on it. They do NOT have to be in full sprout like in this picture, but they should have 3 buds started at least.

Some people cut their larger potatoes with a clean knife, or put two in the same hole. As long as I have 3 eyes or more, I toss that baby in the hole. Plant them sprout/stem (or eye) pointing UP.

Many growers chit their potatoes by cutting the bigger potatoes into pieces and leave to cure the cut surface for several days prior to planting, but I don’t bother to do that.

The sprouting action tends to happen naturally with ours, by the time April rolls around.

After planting, ensure your patch receives 1 – inches of water every week. 

newly planted potato sits in hole in garden
Try to plant the potato with the eye or sprout facing upwards.

How Do Potatoes Grow?

An important thing to know! And here’s the secret to getting over 3 pounds of potatoes from 1 potato.

ALL the new potatoes you will get off of one plant will grow between the seed potato and the surface of the soil. This is important to keep in mind.

This is why you want deep holes and a good layer of soil, straw, or mulch to hill over the plants later. 

growing and hilled potatoes growing in the garden
These potatoes have just been hilled again.

Do You Have to Hill Potatoes

No, you don’t. You could just side-dress the plants with good compost.

Should you hill the potatoes? Yes, you definitely should.

Remember where those potatoes are going to grow? Potatoes grow between the seed potato and the surface of the soil.

So the more dirt you can get up to the foliage of the plants, the more potatoes you should get at harvest time. Remember, the more inches of soil you can hill onto the plants, the more potatoes you will get.

Above is a picture of hilled potatoes. The ONLY thing that will need to be done with these plants is to hill them (we try to do it 3 times) as the green leaves grow.

To hill them, just use a hoe and bring the dirt up tight around the base of the plants. Completely cover the stems if you can, right up to the bottom leaves.

Remember, the more and higher you can hill, the more yield you should get. If in doubt, add more loose soil – as much as you can.

A bonus is that hilling usually takes care of any weeding that needs to be done too! So take the time and get those potatoes hilled and kill every weed you can with the hilling.

It’s the hilling that ensures you get lots of potatoes per plant. So the more soil you can heap around your potatoes, the bigger the potatoes will grow.

Grow potatoes from potatoes that have sprouted.
Easily grow potatoes from potatoes that have sprouted.

How to Harvest Potatoes

Several months later, once the tops die down and turn yellow and brown, you can harvest them.

You can also cheat and steal a couple potatoes while they are growing.

After they flower (in early summer), I sometimes just feel around in the soil and grab a couple whole potatoes. They taste awesome when they are fresh out of the garden and have a better texture than store-bought.

Don’t disturb the plant too much, and it will just keep on growing. Take a few potatoes for dinner from several plants instead of taking them all from one.

a bucket full of harvested large potatoes
Look at the huge size of these potatoes!

In late September, when it is harvest time, use a pitch fork or shovel to Carefully dig up the plant.

Using your hands instead will ensure you won’t stab any potatoes. Make sure you get all the potatoes, they are great at hiding! Dig deep to ensure they have all been harvested.

Bonus points if you can always find that original seed potato! It’ll be the mushy, soggy one at the bottom of the hole.

Leave them laying in your garden for a few hours, then turn them all over and let the sun dry the other side.

Harvesting on a sunny or at least windy day will help. Do not harvest if it is raining  if you can help it.

On the other hand, never leave potatoes exposed to direct sunlight for the entire day. Not when harvesting, nor when storing.

Harvest them, let them dry in the sun and then move them out of the light!

Never leave your potatoes in the garden overnight. After you have gone to all the trouble of digging them up, why chance a cool night which will be detrimental to the tubers?

growing potatoes in the garden
You can use a single potato to grow lots more!

Sorting Potatoes for Seed and Storage

We sort our potatoes right in the field. They go into groups:

  • Stabbed or cut potatoes go into one bag – We will use these one first for fresh eating.
  • Beautiful shape and nice size go into large paper bags – We will use these for seed the following year.
  • Small, misshapen go into boxes – We will cook these up and feed them off to our chickens and pigs.

Once we get all the potatoes up into the house, we like to leave ours upstairs where it is warm and dry.

After a couple of days upstairs, it is time to move them down into our Cold Room.

We make sure we label all the bags, and the Seed Potatoes for the following year are put in a separate spot in the Cold Room.

Want to read about about how to store potatoes for the winter?

Potatoes curing on wire racks before being stored
Cured potatoes ready for winter storage.

If you don’t have a lot of garden room, why not try growing potatoes in growing bags like these? You can get a very good harvest using these. You could also grow potatoes in any deep container.

We always start with using organic seed potatoes. Here are some types of potatoes that are good to start with:

  • Yukon Gold – buy Yukon Gold seed potatoes online
  • Red Potatoes (Red Gold, Carolina, etc.)
  • Russets – buy Russet seed potatoes online
  • White Potatoes (round white and long white)
  • Fingerlings
  • Red Pontiac

Check with local gardeners to find out the potato variety that grows best in your area! You may find one variety does much better than another.

Bottom Line: Now that you know how to plant potatoes, be sure to plant some in your garden or in containers this year!


You May Also Like

  • This may help you to plan your food garden next year.
  • Here’s why you should be growing some of your own food.
  • What you want to know about how to store onions
Potatoes growing in a garden
This guide is full of helpful tips on how to grow your own potatoes.


Originally published 2011; latest update  March 2026.

Filed Under: Grow Your Own Vegetables Tagged With: Potatoes

Water Bath Canner – Everything You Need for Canning

By Annie

Amazon has a great water bath Canning Kit. This is the same canner that we use for so many things.

Many fruits and some vegetables can be preserved using a water bath canning method. Water bath canning is a great way to begin to learn canning and preserving.


Water Bath Canner Sale


Since it comes with the rack and colander, this is a great deal. Also included is the canning kit accessories, which you really do need for safe canning.

Here’s a list of what is included in this set:

  • 9-piece canning kit includes 21-quart canner, canner lid, 7-jar rack, 9-inch colander, lid wrench, funnel, tongs, jar lifter, and magnetic lid lifter
  • Durable enamel-on-steel construction heats quickly and efficiently
  • Side loop handles help ensure safe, secure transport; coated stay-cool tool handles
  • Domed lid with loop handle helps trap in heat for faster boiling
  • Safe to use on both gas and electric stovetops; hand wash
  • Note: Do not use on glass cooktops (does not have a flat bottom)

It’s a great deal and right now it’s 44% off!

Spend less than $40 and get the whole kit – you will be completely prepared to can all kinds of fruits and vegetables.


Can your own cherries


Here’s my recipe and process for canning cherries. Think about buying some in bulk this year, canning them and then enjoying them in the winter without paying the higher price!

If you are fortunate enough to have your own cherry tree, the berries are free – an even better deal!

Want to plant fruit trees but not sure how to? Read all about it here and start getting a few fruit trees in the ground – they will last for decades!


Filed Under: Canning

Cooking on the Wood Stove

By Annie

Having a wood stove for heat is an wonderful thing – being able to cook on it is even better. We love cooking on the wood stove.

But, our wood stove is NOT a cook stove, it is just a wood stove for heating our home. Doesn’t matter! We are able to cook on it because our stove has a flat top.

We have electric heat as well, although we don’t even turn on the baseboard heaters unless it is -20C outside. Then we turn on a few heaters in the basement, just to keep things from freezing down there.


breakfast cooked on the woodstove


If you’re thinking of buying a woodstove for heating your home, good for you! It is amazing how much heating money you can save, if you have access to wood.

Our stove, although small, heats this almost 3000 square foot house, in part because of where it is situated. Located right in the middle of the main floor, with an open loft above it, we have no problem keeping the bedrooms upstairs warm enough, since the heat rises.

We have a large ceiling fan that helps to push the warm air back down. The fellow who built this house was thinking smart when he did the construction.

The only better place for our stove to have been located would have been down in the basement – that way, we would likely never have to turn on the electric heat.

But then, we would have to go up and down a lot to fill up the stove. I’m happy with where it is right now.


cooking on a woodstove


If you’re looking into wood stoves, strongly consider getting one with a flat top. That way you can use it for cooking, even though it is not a true cook stove. We are fortunate that ours does have a flat top and we do use it for making soups, stews, even bacon and eggs.

If you have a power outage and you don’t have a wood stove, how is your family going to stay warm? What if the power outage lasts for several days?

Cold kills and depending on where you live, sometimes it doesn’t take long for hypothermia to set in. If you’re fortunate enough to have a wood stove for heat to see you through power outages, good for you.

Wouldn’t it be even better to use it for cooking, as well as for heat? Of course it would. So, look for a stove with a flat top. Being able to do some cooking on the wood stove will help you take care of the two most important things in an emergency: warmth and food!


chicken broth, homemade chicken soup, cooking on a woodstove, country living in a caribboo valley

Sometimes, we will have bacon and eggs cooking on the wood stove. We also use our wood stove to cook up all kinds of soups and stews.

A couple of years ago, we pressure canned up chicken broth. When we butchered the meat birds, Graham had parted out 5 or 6 of them and so we had the carcasses sitting in the freezer.

When we had time in the late Fall, we heated them up in water, then picked the meat off the carcasses and canned the broth and meat together.

It’s a great way to use up as much of the chicken as possible.

Being able to grab a canned quart of broth to make some soup is a great time saver for us when it comes to cooking.


chicken broth, homemade chicken soup, cooking on a woodstove, country living in a caribboo valley


With a pantry full of canned broth, we just grab a couple of quarts and start heating the broth on the wood stove. Usually we get it going right after we finish breakfast.

We cut up some celery and carrots and added them to the broth. Later we added broken spaghetti noodles as well as a bunch of dried parsley and lovage.


chicken broth, homemade chicken soup, cooking on a woodstove, country living in a caribboo valley


After simmering on the stove for a couple of hours, we were able to enjoy some wonderful healthy Homemade Chicken Noodle soup.

We wouldn’t be able to do this if our stove did not have a flat top.


Do you have a wood stove? Can you use it for cooking? Leave a comment and let us know.

If you’re starting to think of getting a woodstove, I hope this article helps you to narrow down your choices.

Heating your home for free, if you have access to wood, is a great thing – being able to cook on it is even better!


Filed Under: Heating with Wood, Save Money Tagged With: Carrot

  • « Previous Page
  • 1
  • …
  • 42
  • 43
  • 44
  • 45
  • 46
  • …
  • 53
  • Next Page »

Connect With Us!

  • Email
  • Facebook
  • Instagram
  • Pinterest
  • Twitter

Search this site

Generic selectors
Exact matches only
Search in title
Search in content
Post Type Selectors
Search in posts
Search in pages

Our Most Popular Posts

Garlic cloves in oil

How to Preserve Garlic in Oil – and Other Ways to Store Garlic

a open jar of pickled brussel sprouts on a counter

Easy Pickled Brussels Sprouts Recipe (Water Bath Canning)

Privacy Policy

Read about our Privacy Policy

Disclosure

Please note that some of this site’s links are affiliate links, and CountryLivinginaCaribooValley.com is a participant in the Amazon Services LLC Associates Program, an affiliate advertising program designed to provide a means for us to earn fees by linking to Amazon.com and affiliated sites. At NO ADDITIONAL COST TO YOU, I will earn a small commission, if you purchase them. I recommend them as they are good products.

Theme Design By Studio Mommy · Copyright © 2026