Country Living in a Cariboo Valley

Homesteading in BC

  • How to Get Started
  • Vegetable Gardening
  • Preserving Food
  • Recipes
  • Homemade Wine Recipes
  • About Us
  • Work With Me
  • Shop
    • Vegetable Garden Planner Printable: Grow Your Best Garden Ever
    • Grow Enough Food for a Year
    • Delicious Dandelions: A Recipe Collection
    • Dirt to Dollars: Selling at the Farmers Market
    • 8 Pounds in 8 Weeks: Raising Chicks for the Dinner Table
    • Making Wild Wine
    • Build a Hanging Chicken Feeder
    • 15 Things to Know About Living in the Country

How to Grow Potatoes

By Annie

Wondering how to grow potatoes? All you need to know is right here.

Potatoes are quite easy to grow. You can grow potatoes in a raised garden bed, in pots, in grow bags, you can even grow potatoes in trash cans.

Home gardeners often grow potatoes every year. If you’ve haven’t grown potatoes, you may be surprised at how easy it is to grow your own.

Potatoes are probably the most common vegetable eaten in North America. So if your family is like most, you eat your fair share of potatoes. Some stats say the average person eats more than 30 pounds of potatoes each year.

fresh dug potatoes on soil with hands holding some potatoes
Learn how to grow potatoes. Plant potatoes in grow bags or in the garden

Potatoes get expensive in the grocery store. As the weather cools down and winter comes around, the price of grocery store potatoes keeps going up.

If your family eats a lot of potatoes over the course of a year, then why not plant some? You can buy true potatoes for growing at garden centers and plant nurseries.

Potato plants are easy to grow and they are a great first crop for a new garden bed. Planting and growing potatoes will help break up the soil for future years.

As long as the soil is not too wet, you can plant your potatoes in very early Spring. As soon as you can get into your garden, get some potatoes planted.

You’ll also want to rotate your crops yearly to avoid things like pests like the Colorado potato beetle or other harmful potato beetles. Purchasing disease-free seed potatoes is another way to prevent diseases like potato scab.

sprouted potatoes in a paper bag ready for planting
Look at all these sprouts! These are great for using as seed potatoes.

Potatoes are one of the most versatile vegetables you can grow. Find yourself some great potato recipes and discover delicious new ways to serve them.

You can find lots of delicious potato side dish recipes over here.

Make homemade french fries if you have a deep fryer. Or make a homemade potato salad. Turn several pounds into delicious potato soups or stews.

New potatoes are delicious loaded with sour cream, then sprinkled with fresh garden herbs.

Put a chicken in the oven, add some potatoes, carrots and onions and roast the whole thing for dinner. Serve with peppers, eggplants, or tomatoes. Baking potatoes to serve with any meal is easy and delicious!

Holes dug in garden for potatoes seed
You can plant potatoes in a hole or in a trench.

How to Grow Potatoes – Planting

Potatoes can be planted early in the year. If you can get in to the garden to work, you can plant your potatoes. Soil temperatures are not that critical when it comes to growing potatoes, so they can grow in a variety of climates. 

The only thing they don’t like is an abundance of moisture in the soil – if your garden soil is still mucky and soaked, delay planting for a week or two to avoid rot. Make sure your potato bed has good drainage.

They do love full sun and their growing season here in Zone 3 is from May – October. Generally, you’ll want to aim to plant around a month prior to your last frost date.

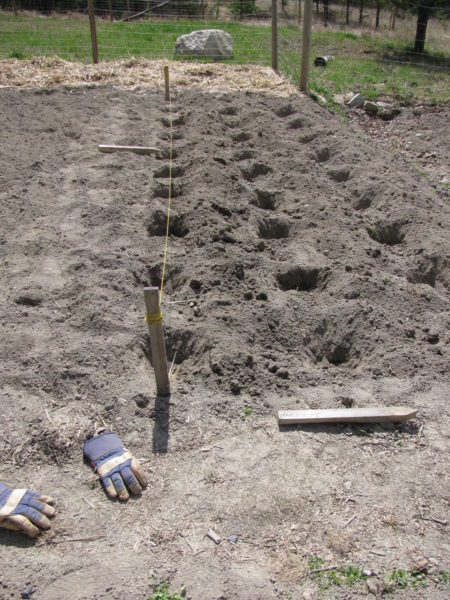
There are several different ways to grow potatoes, but here is how we plant ours. I like to use a string line to mark my rows while I plant.

Once my row is planted, I move the string line and I mark the end of the planted row, either with a stake or even a larger rock.

Be sure to dig the holes as deep as possible. You may want to mix some compost (always the best organic matter) or other non chemical organic fertilizer into the soil. If you can dig 12 inches deep, that is fantastic.

Potatoes do like slightly acidic soil, with a pH of around 5.8 – 6.3. If you have doubts, test your soil pH and add composted matter as needed.

If you don’t have a lot of compost available, just add some to the bottom of the hole – the seed potatoes will love it.

Keep your plants spaced about 1 1/2 feet apart. (You’re going to need that extra soil later). Some gardeners prefer digging a trench instead of holes; either way works just fine.

Remember that rotating the potato patch yearly is a good idea, as over time your tubers can develop potato blight from always being planted in the same soil. 

sprouted potato getting planted in garden
If the potato has lots of long sprouts you can remove some of them.

Planting the Potato Seed

You want your potato to have at least 3 eyes on it. They do NOT have to be in full sprout like in this picture, but they should have 3 buds started at least.

Some people cut their larger potatoes with a clean knife, or put two in the same hole. As long as I have 3 eyes or more, I toss that baby in the hole. Plant them sprout/stem (or eye) pointing UP.

Many growers chit their potatoes by cutting the bigger potatoes into pieces and leave to cure the cut surface for several days prior to planting, but I don’t bother to do that.

The sprouting action tends to happen naturally with ours, by the time April rolls around.

After planting, ensure your patch receives 1 – inches of water every week. 

newly planted potato sits in hole in garden
Try to plant the potato with the eye or sprout facing upwards.

How Do Potatoes Grow?

An important thing to know! And here’s the secret to getting over 3 pounds of potatoes from 1 potato.

ALL the new potatoes you will get off of one plant will grow between the seed potato and the surface of the soil. This is important to keep in mind.

This is why you want deep holes and a good layer of soil, straw, or mulch to hill over the plants later. 

growing and hilled potatoes growing in the garden
These potatoes have just been hilled again.

Do You Have to Hill Potatoes

No, you don’t. You could just side-dress the plants with good compost.

Should you hill the potatoes? Yes, you definitely should.

Remember where those potatoes are going to grow? Potatoes grow between the seed potato and the surface of the soil.

So the more dirt you can get up to the foliage of the plants, the more potatoes you should get at harvest time. Remember, the more inches of soil you can hill onto the plants, the more potatoes you will get.

Above is a picture of hilled potatoes. The ONLY thing that will need to be done with these plants is to hill them (we try to do it 3 times) as the green leaves grow.

To hill them, just use a hoe and bring the dirt up tight around the base of the plants. Completely cover the stems if you can, right up to the bottom leaves.

Remember, the more and higher you can hill, the more yield you should get. If in doubt, add more loose soil – as much as you can.

A bonus is that hilling usually takes care of any weeding that needs to be done too! So take the time and get those potatoes hilled and kill every weed you can with the hilling.

It’s the hilling that ensures you get lots of potatoes per plant. So the more soil you can heap around your potatoes, the bigger the potatoes will grow.

Grow potatoes from potatoes that have sprouted.
Easily grow potatoes from potatoes that have sprouted.

How to Harvest Potatoes

Several months later, once the tops die down and turn yellow and brown, you can harvest them.

You can also cheat and steal a couple potatoes while they are growing.

After they flower (in early summer), I sometimes just feel around in the soil and grab a couple whole potatoes. They taste awesome when they are fresh out of the garden and have a better texture than store-bought.

Don’t disturb the plant too much, and it will just keep on growing. Take a few potatoes for dinner from several plants instead of taking them all from one.

a bucket full of harvested large potatoes
Look at the huge size of these potatoes!

In late September, when it is harvest time, use a pitch fork or shovel to Carefully dig up the plant.

Using your hands instead will ensure you won’t stab any potatoes. Make sure you get all the potatoes, they are great at hiding! Dig deep to ensure they have all been harvested.

Bonus points if you can always find that original seed potato! It’ll be the mushy, soggy one at the bottom of the hole.

Leave them laying in your garden for a few hours, then turn them all over and let the sun dry the other side.

Harvesting on a sunny or at least windy day will help. Do not harvest if it is raining  if you can help it.

On the other hand, never leave potatoes exposed to direct sunlight for the entire day. Not when harvesting, nor when storing.

Harvest them, let them dry in the sun and then move them out of the light!

Never leave your potatoes in the garden overnight. After you have gone to all the trouble of digging them up, why chance a cool night which will be detrimental to the tubers?

growing potatoes in the garden
You can use a single potato to grow lots more!

Sorting Potatoes for Seed and Storage

We sort our potatoes right in the field. They go into groups:

  • Stabbed or cut potatoes go into one bag – We will use these one first for fresh eating.
  • Beautiful shape and nice size go into large paper bags – We will use these for seed the following year.
  • Small, misshapen go into boxes – We will cook these up and feed them off to our chickens and pigs.

Once we get all the potatoes up into the house, we like to leave ours upstairs where it is warm and dry.

After a couple of days upstairs, it is time to move them down into our Cold Room.

We make sure we label all the bags, and the Seed Potatoes for the following year are put in a separate spot in the Cold Room.

Want to read about about how to store potatoes for the winter?

Potatoes curing on wire racks before being stored
Cured potatoes ready for winter storage.

If you don’t have a lot of garden room, why not try growing potatoes in growing bags like these? You can get a very good harvest using these. You could also grow potatoes in any deep container.

We always start with using organic seed potatoes. Here are some types of potatoes that are good to start with:

  • Yukon Gold – buy Yukon Gold seed potatoes online
  • Red Potatoes (Red Gold, Carolina, etc.)
  • Russets – buy Russet seed potatoes online
  • White Potatoes (round white and long white)
  • Fingerlings
  • Red Pontiac

Check with local gardeners to find out the potato variety that grows best in your area! You may find one variety does much better than another.

Bottom Line: Now that you know how to plant potatoes, be sure to plant some in your garden or in containers this year!


You May Also Like

  • This may help you to plan your food garden next year.
  • Here’s why you should be growing some of your own food.
  • What you want to know about how to store onions
Potatoes growing in a garden
This guide is full of helpful tips on how to grow your own potatoes.


Originally published 2011; latest update  March 2026.

Filed Under: Grow Your Own Vegetables Tagged With: Potatoes

How To Start a Homestead

By Annie

Have you been used to buying your groceries at the supermarkets? Never raised animals or had a garden?

Are you  trying to figure out how to get started on the path to providing for your family? Have you thought about starting a homestead?

It can certainly feel overwhelming just to get started. So think about getting started, but doing it on a small level.

Trying to do too much too quickly can be a recipe for burnout and frustration.

Here’s what we did when we first move here in 2006. Learn from our mistakes and keep an open mind. And have fun – never forget to have fun!


sel sufficiency, homesteading, country


How to Set up a Homestead


Starting small will not only get you on the path to providing for your family, but it will teach you a lot. As your confidence grows and time goes by, you can implement another activity on your homestead (or in your backyard).

Let’s start with a garden.


Planting a Garden


What kind of vegetable seems to on your family’s plates the most often? That’s a good one to plant this year.

For us it is potatoes. So, it’s important for us to be sure to grow lots of potatoes this year.

The bonus with potatoes is you can feed them off to animals, once you are sure you have enough to store for winter eating for your family.

Other veggies we eat a lot of include green beans (so 2 double rows get planted), beets (3 or 4 rows) peas (so plant these up the fence that runs around the garden perimeter.


If you don’t have much experience with veggie gardening, it will take a few years before you can closely figure out how much to plant, in order to put enough by so there is food for your family over the winter.

Just get a start this year, and this fall you can count up your jars of canned beans, then figure out if you need to grow more next year.

Take a look at our 5 Easiest Vegetables to Grow and just start small!

Keep notes and start a garden journal to record this kind of information.

Next year, when it comes to ordering seed, you’ll have a good idea of how much seed you will need.


Raising Chickens

Looking to add animals into the mix? As far as I am concerned, #1 are chickens. Wonderful, you just feed them and water them – every day (almost) they will pay you back. We started with 4 hens, the next year we were up to 15.

EVERY time you have an extra dozen, (after you have put a couple dozen away for your family) sell the eggs. Keep the egg money in a separate jar. Once you get an egg customer, call them each week and see if they are in need of another dozen.

Pay for your chicken feed OUT of the jar. Find another customer (or as it often seems to happen, your one customer will find you the next one)….rinse and repeat.


Over time, you will have enough money in your jar to pay for their feed and still more money in the jar.

Got an extra $15 in there? Next time you are at the feed store, pick up a couple of T-posts or pick up a roll of chicken wire.

I am a big fan of T-posts and chicken wire. Temporary fencing can be set up wherever you need it and for however long you need it.

Put the chickens in there in the afternoon, and let them find their own food of bugs and grass.

Don’t let them scratch right down to the ground. Before that happens, pull out the T-posts and set your fencing up somewhere else that needs a good grazing.

Setting up fencing against existing buildings or fence posts reduces the number of T-posts you need.

Chickens like to work! Bored chickens get unhealthy and start picking on each other, just to give themselves something to do.

Harness that energy and put it into something that will help you. Chickens allowed to free range and graze will lower the feed bill, and that’s what you want.

Meanwhile, your family is enjoying the eggs, extras can be sold, and the money saved up for feed and the “next thing on the farm list”.


raising chickens, hens, layers


If you have access to fresh manure, set up temporary fencing around the manure pile, and let the girls in.

Within days they will have eaten all the small seeds they find and any bits of leftover grain.

They’ll also scratch and fluff up that manure pile for you. Let Them do the work! Then move the fencing.

Once the manure has sat for a month or two, you can wheel it over to use on your veggie garden.


Raising Chicks for Meat

Meanwhile, you’re saving your egg money in the jar. Over time, say you end up with an extra $50 in there (after the feed, that you are now able to buy in either bulk or buy multiple bags so you have them on hand).

An extra $50 will buy you some meat birds (in season of course). Here in BC, $50 will probably get you 20 birds, by the time you take shipping into consideration.


How many meat birds can your family eat? Averaging about say 5.5 lbs, 20 chickens will enable your family to have chicken every 2 1/2 weeks or so.

It’s possible to get 4 meals off a chicken (including the soup at the end). See how all this is adding up over time?


Yes, the first year you will have to put out money for meat bird feed, however, time it right for your season.

Raise the birds when you hardly have to supplement their heat after the first 2 weeks.

During the spring, summer and fall, if you let your laying hens free range of graze in temporary coops, you won’t be spending as much money on their feed.

Use the money instead to buy feed for the meat birds (20% protein). Keep selling eggs – rinse and repeat.

Another easy way to offset your laying hen’s feed bill (while collecting their eggs) is to feed them veggies and greens from the garden during the growing season.

You can feed greens to meat birds too, but you’ll always have to buy them their special feed.

Meat birds are bred to gain weight FAST, and they just won’t do it living off of garden greens.

Read how we manage to raise 8 pound meat birds in just 8 weeks.

Eight weeks later, butcher your meat birds. Still have your one or two egg customers?

Do yourself a favour (and them) and give them one bird, all dressed out. Thank them for buying your eggs and hand over a chicken.

Let them know you’re going to do meat birds the following year. If they should want some, they can order some.

In addition, you’ve just been given a LOT of fantastic manure from those meat birds.

Let it compost, then add it to your veggie gardens – rinse and repeat.


Meanwhile, you’re making sure you spend any egg money on feed. If you have leftover money, keep buying T-posts or wire or veggie seeds.

Every time, put the money BACK into either your garden or your animal needs.

You will see, over time that you can add slowly to your homesteading – every little bit helps.

Concentrate first on what your family needs are, sell any excess.


Keeping Goats for Milk

Does your family drink a lot of milk? Think about saving towards a goat. You can supply milk and cheese for your family.

Goats like to eat brush and scrub, so if you have areas like this that you want to clear off for future pasture or gardens, put the goats in there.

You’ll need stronger fencing tho than T-posts, you know what they say about goats!

If you have small trees that need to be spaced, you can cut the trees down and use them for fence rails.

You can also take the branches off and use them for bean or pea supports in your veggie garden.

The idea is to spend as little as possible in the beginning. Over time, keep plowing your monies back into your barnyard and gardens.

Feed ANY weeds you pull to your laying hens. When you finish harvesting parts of your veggie garden, move the T-posts in to section off part of the garden, then put some hens in there.

They’ll work your soil, eat the bugs, and add manure all at the same time. Better for you that They do the work.

When you cut the grass, give the clippings to both the laying hens and the meat birds.

If you have excess, start putting it down between the veggie garden rows to keep the weeds down. It will also add to improving your garden soil.


One more thought – for goodness sake, don’t underprice your eggs!

That is the Worst thing you can do – any customers that are wanting to buy farm fresh eggs or veggies are willing to pay at Least what the supermarket charges.

It should be more, because of your attention to growing as naturally as possible. People are willing to pay a premium for this.

Don’t overcharge, but jeez, don’t undercharge. That’s totally shooting yourself in the foot, plus you are messing up any other farmer’s plans to try to recoup their original costs.

Note I’m not including hay in the above, the way we work here, we do not overwinter any animals except for laying hens.

We may get a beef cow in the future, once we start rejuvenating our pastures and putting aside our own hay to feed them over winter.

You’ll need to have some hay or straw or something on hand for on the floor of your chicken coop.

No reason you can’t grow the grass long, then cut it down and use that.

Or straw, leaves or anything else you can think of that is no cost. Your hens will not mind!


Begin to think of your farm or backyard as a cycle. Everything has a season and as much as possible needs to be returned to the land to increase soil fertility.

Put things in (cover crops, green manure, composted manure) and take things out (the meat, eggs, vegetables).


chickens, pigs, goats and a garden in the country


Focus on improving your soil and the health of your family as cheaply as possible.

I’m willing to wager that in the next couple of years, you will be eating a LOT healthier for a lot less money.

Start small, but get started! You can do it!

Your family will eat healthier, eat fresher, you’ll save money and hopefully in a year or two, all your animals will be self-sustaining.

Think about how you can get started on the path to providing for your family.

Filed Under: How To, How to Get Started, Raising Chickens, Raising Meat Birds, Raising Pigs Tagged With: chickens, chicks, Grow Vegetables, hens, How To:, laying hens, Potatoes, Raising Meat Birds, self sufficiency

Connect With Us!

  • Email
  • Facebook
  • Instagram
  • Pinterest
  • Twitter

Search this site

Generic selectors
Exact matches only
Search in title
Search in content
Post Type Selectors
Search in posts
Search in pages

Our Most Popular Posts

Garlic cloves in oil

How to Preserve Garlic in Oil – and Other Ways to Store Garlic

a open jar of pickled brussel sprouts on a counter

Easy Pickled Brussels Sprouts Recipe (Water Bath Canning)

Privacy Policy

Read about our Privacy Policy

Disclosure

Please note that some of this site’s links are affiliate links, and CountryLivinginaCaribooValley.com is a participant in the Amazon Services LLC Associates Program, an affiliate advertising program designed to provide a means for us to earn fees by linking to Amazon.com and affiliated sites. At NO ADDITIONAL COST TO YOU, I will earn a small commission, if you purchase them. I recommend them as they are good products.

Theme Design By Studio Mommy · Copyright © 2026