Country Living in a Cariboo Valley

Homesteading in BC

  • How to Get Started
  • Vegetable Gardening
  • Preserving Food
  • Recipes
  • Homemade Wine Recipes
  • About Us
  • Work With Me
  • Shop
    • Vegetable Garden Planner Printable: Grow Your Best Garden Ever
    • Grow Enough Food for a Year
    • Delicious Dandelions: A Recipe Collection
    • Dirt to Dollars: Selling at the Farmers Market
    • 8 Pounds in 8 Weeks: Raising Chicks for the Dinner Table
    • Making Wild Wine
    • Build a Hanging Chicken Feeder
    • 15 Things to Know About Living in the Country

4 Ways to Preserve and Store Food

By Annie

Food preservation isn’t just a skill; it is a way to really maximize your harvest, reduce waste, and preserve the flavors of the season all year round. I share how to store your food properly so you can save money, time, and stress.

Whether you grow your own vegetables or take advantage of farmers markets, you need a way to preserve and store that food for several months. Here are 4 ways to preserve and store food.

Stocking up in September & October when the harvest is plentiful is a great way to do it. Prices are lower, and there are a lot of choice veggies available.

Below, I’ve linked up some of our best posts on preserving food. Take a look! From preserving herbs, pickling (using brine and vinegars), making kimchi from scratch, jerky, homemade sauces, soups, salsas, stews and more, all from your own garden.

(Want a complete list of all of our preserving articles? They’re right here)


Here are 4 ways to preserve and store food:


Harvested carrots and lovage


Storing some food is a great way to save money. Prices are definitely going to be higher all winter long because of the lower local supply and the same high demand.

Starting your own food stockpile is a way to save money and feel more in control of your personal food supply.

Plus, preserving food is a fantastic way to reduce food spoilage if you are looking for a lower footprint. Plus, you can maximize long-term storage on items and reduce grocery store trips.

Read on for some popular methods of home food preservation.


A basket of fresh garden greens sits on a kitchen counter


Freezing Food

You can freeze some veggies. Every summer, I freeze a one-year supply of shelled green peas. And why not? Canning recipes is a great way to add shelf life to all that summer produce you worked hard on all summer. 

They taste fresh all winter long and don’t take long to make. You can even use fresh fruit like pears and apples to make jams and more in jars to keep on hand in your pantry. 

Plus, it’s guaranteed rocking time in the late afternoons – someone has to shell all the peas! Having self-sufficiency tools for preserving your goods is going to be a game-changer.

Other food items that works best for freezing include:

  • poultry
  • seafood
  • meat

 Use good quality freezer bags and ensure you close them air tight to keep out moisture and stop any growth of microorganisms.


Canned carrots and pickled beets on a counter


Canning Food

You can home can some veggies. Want to water bath can some Pickled Beets? How about pressure canning some Green Beans?

Water bath canning is the most usual way to preserve fruit like cherries, peaches and other stone fruits.

You can also water bath can a variety of juices too.

Home canning food can completely fill your pantry – you can literally save thousands of dollars a year by canning extra food. Aim for airtight containers, mason jars, and more that will help truly create that seal you need when it comes to canning jellies, berries, beef, and more.

They taste fresh all winter long and don’t take long to make. You can even use fresh fruit like pears and apples to make jams and more in jars to keep on hand in your pantry.

Now you can can the old-school way with pots of boiling water, or invest in a pressure canner. Either way, you have choices of food preservation methods that work best for you.

I love using the fermentation process for cabbage to make sauerkraut and other items to keep in your pantry. It adds so much flavor.

You can do this with pickling carrots, tomatoes, and other vegetables as well. Helps veggies last in the fridge or pantry for much longer without reducing their nutritional value.


Fresh kale trimmed and washed on a cutting board


Dehydrating Food

You could dehydrate lots of different types of fruits, vegetables and even meat. Dehydrated food takes up a lot less room.

Herbs, of course, are often dehydrated. We dry herbs and some spices every year, including:

  • mint
  • basil
  • lovage
  • oregano

That means extra freezer room for you to stock up on meat when it’s on sale.

You can also dehydrate foods you pick up on sale or grow, such as:

  • bananas
  • peppers
  • cucumbers
  • kale (make these healthy kale chips!)
  • turn ripe fruit into fruit leather


basket of fresh garden produce ready for preserving

Storing Food in a Cold Room

You could store a few boxes of root vegetables down in the cool part of your basement. These need to be in a cooler area in your home to preserve and extend the life and prevent bacteria, botulism, mold, and more from showing up on your food.

Vegetables that store well in a cold room are:

  • potatoes
  • onions
  • carrots
  • garlic

Squashes including:

  • pumpkins
  • acorn squash
  • hubbarb squash
  • all other winter squash

Note: Zucchini can be stored in a cold room, but use it up sooner rather than later. Winter squashes can be stored longer.

Storing Food When You Don’t Have a Basement

But what do you do if you live in a rancher home? If you have no basement,  you have to start looking at other option.

You could look at building a small insulated and vented room in a corner of your garage. Another option is to have a root cellar.

If you don’t have room for food storage inside your house, an outdoor root cellar is a great way to go. Built right into the ground, you can store all kinds of root vegetables inside  a root cellar.

Mother Earth News has several plans for outdoor cellars and they range from the super simple to structured cellars.

You need to live in an area where there are cold winters. You also need to put in some time digging and setting up the root cellar.

You do not want the cans at room temperature; they need to be in a cooler area in your home to preserve and extend the life and prevent botulism, mold, and more from showing up on your food.


Use Old Freezers to Store Livestock Feed


I have seen pictures of outdoor root cellars but instead of being boxed in with wood, the builder instead drops an old deep freeze in the ground.

This is a great idea and would really work well. We use old freezers here down at the barn to hold animal feed.

We don’t care if the freezers work or not. And we are keeping a few old freezers out of the landfill. Come to think of it, that’s where we got the three we have. A great way to recycle!


fresh produce at a market


Want to see all of our food preservation posts? Head right over!

Originally posted June 2020; latest update March 2026

Filed Under: Canning, Dehydrating Vegetables and Fruit, Food

How to Dry Herbs

By Annie

Discover how to dry herbs the right way, even if you don’t have a dehydrator. 

We use a lot of herbs in cooking and so we always have some growing in the gardens. We grow Oregano, Lovage, Parsley and Chives which are all perennial herbs. Today I want to show you how to dry herbs.

Plant these perennial herbs once and they should come back each year with new growth.

Learn how to dry herbs like Lovage for later use.

Our climate (Zone 3) dictates that we have to mulch the Oregano heavily for insulating over winter, if we want to plant it right into the ground.

Usually I grow the Oregano in a pot and just move it into a sheltered area for the winter time.

Mint too needs to go in a pot, because it grows like crazy here and I don’t want it taking over the herb garden. 

a pot of growing Rosemary
Discover the quickest way to dry herbs, even if you don’t have a dehydrator.

How to Dry Herbs the Right Way

The best time to harvest any type of herb is before it starts to flower. So, keep pinching the tops off your herbs. This will delay flowering and you can harvest more leaves throughout the season for using fresh or dried.

Any kind of herb can be dried as follows – it is easy and fast to get them hung up and drying!

Here is Parsley; I always have a plant or two on the porch with all the flowers. This makes it super easy for us to clip some to add to meals without having to go down to the garden to harvest.


getting ready to dry herbs without a dehydrator
Drying and storing fresh herbs isn’t that time consuming or difficult anymore.

Any herb will always taste better fresh and just picked from the plant. Because we live in the north, it’s not possible for us to grow herbs outside all year round. We could move them inside but that adds another thing to the list to be looked after. 

We often go away for a little while in the winter and we would have to get someone to come and make sure they all were watered regularly. Instead, we just harvest and dry the herbs. It works better for us.

chopping fresh cilantro
Fresh herbs will first need to be cleaned and dried, and then dehydrated.

How to Dry Herbs by Hanging

Harvested Parsley can be trimmed with scissors but it takes a lot longer. Instead of trimming, just bundle the stems together and secure with rubber bands. Then hang them or put the bundle into a paper bag and hang it.

This method of drying herbs works great if you have house animals. Our dog was a shedder and so I always used to use the paper bag trick. I don’t want dog hair in my herbs!


dried lovage herbs in a paper bag
The paper bag trick always works wonders, and you’ll end up with a nice, fresh batch of dried herbs.


This is dried Lovage. After a week of hanging time, I open the bag, and strip the stems right inside the bag. I toss out the stems and put the Lovage into a shallow bowl so I can crumble it into smaller pieces. Then I move the herbs into small mason jars.

After I put a canning seal and ring on them, I store them in my cupboard for using all year around.

Frequently asked Questions about Drying Herbs

Drying Herbs Without a Dehydrator- Is it Really Possible?


drying herbs without a dehydrator
Even if you don’t have a dehydrator, you can still whip up a nice batch of dried herbs, all by yourself!


Another way to dry herbs without a dehydrator is to clip the leaves of the herb right into a shallow basket. This is Lovage drying; use a loosely woven basket if you have one. Air circulation is important and will speed up your drying time.

You could also use a shallow glass or pottery bowl but be sure to run your hands through the herbs every now and then to shift them around so all parts can dry.


how to dry herbs without a dehydrator
One of the best ways to store dried herbs is to place them in clean, dry mason jars.


A wide variety of herbs ready for storage and use. We have Cilantro, Parsley, Lovage and two jars of Oregano, and love using these when we whip up our pizzas crafted with our soft and fluffy homemade pizza dough! 

How Can I Store Dried Herbs?

Okay, so you’re probably wondering how you would store the big batch of dried herbs that you’ve just ended up with. Well, it isn’t actually all that tricky to be honest. Here’s what we usually do. 

  • We first wash and clean some airtight containers or jars. I like to stick to mason jars, but if you don’t have those, pretty much any containers will do. 
  • We then empty the dried herbs into the containers, taking care to avoid any moisture. 
  • We store them in the kitchen cupboard and add to our meals right at the end of the cooking time.
  • And that’s pretty much it. You can also consider labelling and dating the jars in which you store them. 


fresh herbs being dried
Dried herbs can really take your culinary creations up a notch!


These will keep us going all winter and sometimes right up until picking time the following year! It’s quick, easy and we love to use dried herbs in the kitchen.

Other Herb posts:

What is Lovage? – If you have never heard of Lovage or grown it, check out this article all about Lovage!

Growing and Using Stevia – Yes you can grow your own sugar substitute! Take a look…

 4 Ways to Preserve and Store Your Homegrown Food – have you got all these bases covered?

3 Ways to Preserve Herbs that you’re going to love!

How to Dry Parsley – then use it all year.

Now that you’ve learned how to dry herbs, it will be easy to dry enough to last all year!


a pot of parsley growing


Filed Under: Drying Herbs, How To Tagged With: dehydrated herbs, fresh herbs, how to dry herbs

Growing Garlic – Part 3 How to Harvest and Cure Garlic

By Annie

Here’s the third part of our Growing Garlic series. Part 1 is an overview of growing Garlic. Part 2 covers harvesting the garlic scapes – which we turn into Pickled Garlic Scapes. Now we’re moving on to how to harvest and cure Garlic.

Your Garlic has now been growing all spring and summer. You’ve removed the Garlic Scape that is on each plant.

Right about now, you are probably quite curious as to when to get your garlic out of the ground. You want to see how big those bulbs are!

How to Harvest and Cure Garlic

 Garlic plants ready to be harvested from the garden.


How to Harvest Garlic

When the leaves of the Garlic are yellowing, it is time for harvesting. In the Cariboo which is Zone 3, that is usually the beginning of September.

As a sidenote:  Our garlic often gets yellowing tops early in the growing year.

This is because we often have very cool nighttime temperatures, so the garlic tops get a touch of frost early in the season. Your garlic tops may well be green all season long. 

We do not find that the yellowing tops affect the taste of the garlic at all. It’s just something that happens here because of those very cool temperatures.

Fresh harvested garlic bulbs with dirt on their roots.

Dig up a couple of plants, preferably from different parts of the garlic bed. Have the cloves formed? It’s time – you can dig up your plants.

It’s always better to harvest your garlic a bit early, rather than a bit late. You can tell if you harvested late if the cloves have started to pull away from the center stem.

You want to harvest when the cloves are still tight with a wrapper on them. This is the best stage for storing the longest.

You may find that there is dirt stuck in the roots, especially if your soil is moist. I rub the root end with my gloved hand and if the soil is a bit dry, it will crumble and fall out.

But if the soil is still quite wet, leave your garlic out in the air for an hour and let them dry a bit. This will make it easier to get the dirt out.

Try to NOT leave your garlic laying in the sun. You are better off to move it into a shaded area, even if there is still dirt on the roots.

harvested garlic hanging to cure in a breezeway


How to Cure Garlic

If the weather is supposed to stay warm, you can hang the bulbs outside (out of the weather). We hang them up in the breezeway down at the barn.

If your weather is supposed to be quite cool or even frosty, bring your Garlic inside instead or hang it where it will not get hit with frost.  I use to bundle the plants with baling twine. 

I’ve moved on to a heavier twine since then, as bundles with huge bulbs can actually be quite heavy. When I bundle them, I put all the largest bulbs together.

Garlic bulbs in a basket curing after being harvested


I may end up with 8 bundles of nice big heads and 4 bundles of smaller heads. That’s a lot of Garlic! I bundle them like this because it is faster.

Also, it’s easier for me to pick next year’s cloves (another post). I hang them in groups of 10, as I sell some and this makes it much easier to count up.

If you stab a Garlic head with the shovel when harvesting, be sure to place those ones of to the side. Use them up first.

Garlic that has been cut or scraped will NOT store well, and could introduce bacteria to other bulbs. Just keep those in the kitchen and start cooking!

garlic curing in a shallow basket 

After the bundles have hung for at least 10 days (maybe closer to 2 weeks), bring them into the house.

We keep our Garlic downstairs, hanging the bundles in my potting room. Or, you can trim off the stalks using your garden shears.


cured garlic stored in a open basket


Be sure to leave a 1 inch stem above the bulb. Then, cut the roots close to the base using some good kitchen scissors . Store the garlic bulbs in an open weave basket.

We don’t keep the Garlic in the Cold Room, as Garlic likes it a bit warmer than the 32 – 40 F temperature we keep the room at. 

When first hung, the aroma of Garlic fills the house –  what a wonderful smell.

buckwheat growing in a garden bed

Preparing a Garlic Bed for Planting

As soon as the Garlic is harvested and hung, we weed out the Garlic bed. It will only be a few weeks before this bed is planted again.

The earlier the bed is prepared, the better. If another layer of compost is needed, now is the time to add it. If we have time before planting, we will seed some Buckwheat in the bed to improve the soil for the coming year.

Buckwheat only takes about 5 weeks to grow and flower; this makes Buckwheat a fantastic soil builder. 


Now that you know how to harvest and cure garlic, let’s move on to replanting. I’ll show you how I choose which Garlic bulbs to replant for the following year. 

Here is the last installment  –  Growing Garlic – Part 4 (how to know which cloves to replant)


Filed Under: Garlic, Garlic (4 Part Series), Grow Your Own Vegetables Tagged With: Garlic, Grow Vegetables

Poison Ivy Rash: Symptoms, Treatment and Prevention

By Annie

Have you recently found out that you have poison ivy rash? If so, you’re not alone. This is quite common for people who venture outdoors frequently.

Today I wanted to share some tips to help you soothe poison ivy rash, get rid of it and how to try to avoid getting into poison ivy in the first place.

Poison Ivy Rash and How to Get Rid of It

Learn to Identify the Plant

Poison Ivy plant
Keep this handy phrase in mind; “Leaves of three, let it be!”

Poison ivy can be identified by leaves of three, but many plants in nature have three leaves. The key is to remember that poison ivy’s three leaves form a pattern. Poison ivy is found all throughout the United States and Canada, aside from Alaska, Hawaii, and certain parts of the West Coast.

You’ll find that poison ivy has one large leaf with two smaller leaves at the base of the stem. Poison ivy is also a vine-like plant that climbs upwards on trees and other surfaces found in nature. It can also grow in the form of shrubs.


You can read more about identifying poison ivy plants here.


What Does Poison Ivy Rash Look Like?

Red inflamed skin due to Poison Ivy
Poison ivy commonly causes a red and irritating rash.

It’s important to know what the symptoms of poison ivy look like. Most people that have touched Poison Ivy have raised red skin that’s very itchy or sensitive, a kind of contact dermatitis. Exposure can also cause blisters, swelling, and can sometimes lead to infection or pus.

This common poison ivy reaction is due to a resin called urushiol, which many people are allergic to in differing degrees. You’ll also find this resin in plants like poison sumac and poison oak.

The rash won’t usually spread unless the oil from poison ivy touches other areas of your body. It’s rather itchy and while this may be uncomfortable you can usually treat the rash at home.

However, if you’re having an extreme response such as difficulty breathing (which can be a result of inhaling smoke from burning poison ivy) or you have a fever higher than 100 degrees Fahrenheit you should seek medical attention immediately.

A poison ivy plant
Learn how to prevent poison ivy rash and also soothe irritated skin.

How to Soothe the Rash

Many people use rubbing alcohol, Benadryl or an oatmeal bath to try to soothe poison ivy rash. The rubbing alcohol will remove the poison ivy oil from your skin.

You may use calamine lotion or a similar over-the-counter topical treatment to help soothe the itch, as well. When all else fails, try some cool, wet compresses. These various ways to soothe the rash are not used to treat the rash; rather they help ease the symptoms such as itchiness or swollen skin.


Poison Ivy Rash Treatments

To treat the rash, soak in an oatmeal bath or rub the rash with rubbing alcohol to ease the discomfort. Some people use oral antihistamines to help alleviate the allergic reaction.

It’s that allergic reaction from poison ivy that causes the rash. If you need to, take the antihistamine at night at the very least so that you can sleep.

You can ease the symptoms with hydrocortisone creams, calamine lotion or from an aloe vera plant.

How to Get Rid of Poison Ivy Rash

Poison ivy rash will typically last 12 days but can last up to 30 days or more in severe cases. The best way to get rid of it will be to use the products to soothe the skin while keeping from scratching.

A blistered hand due to touching Poison Ivy.
Another example of blisters caused by poison ivy contact.

While this will be uncomfortable, the rash will only last up to 12 days in most cases and disappear on its own.

Scratching your rash will make the poison ivy spread and in turn, your healing time will take longer.

It can’t be said enough – Try to NOT scratch! Take something to relieve the itchiness instead.

No scratching! Remember, you can spread the rash by touching the oil and then touching other parts of your body.


Preventing Poison Ivy Rash

The key to prevention for the long term is to remove any plants from your yard. Be sure to protect yourself when dealing with the poison ivy vines.

Always wear shirts with long sleeves and long pants. For footwear, wear heavy work boots if possible. Never wear open toed shoes or sandals. Cover up completely.

Wear leather or rubber gloves. Be sure to wash all clothing and gloves afterward.

Personally, I would wear my oldest work clothes and put them directly in the garbage after working. Then, wash your hands thoroughly. Then wash them again.

If you do touch poison ivy, quickly wash the affected area with soap and cool water to avoid the rash.

Most pets won’t actually get the rash if they come into contact with the plant, but the oil can stay on pet fur and rub off on you. Try to avoid letting pets run free in areas where there may be poison ivy.

The key to getting rid of this terror is to use this homemade poison ivy weed killer recipe.

All you need is some vinegar, water, salt, and liquid laundry detergent to rid your yard of poison ivy.

Do it when the plants are young because the roots haven’t embedded into the soil deep or long enough to grow back.

Older poison ivy is harder to get rid of, so you may have to treat the poison ivy in your yard again. The plants can be quite stubborn, so keep treating it with the weed killer.

Have too much posion ivy on your property? Just can’t get rid of it all in your yard? 

Then you can mark the spots where you’ve encountered it and try to keep others from trampling through that area.

Now that you have the tips to soothe poison ivy rash, and kill the plants in your yard, you’re well on your way to feeling better and having a yard free of poison ivy.


More Articles You May Want to Read

  • Here’s that all natural weed killer recipe that works on any kind of weeds.
  • Pesky house flies bothering you? Here’s how to rid your home of house flies – naturally!
  • Looking to put in a food garden? Here’s the 8 fastest growing vegetables!
  • Got hornets? Here’s an easy way to kill wasps and hornets!
a poison ivy vine and a hand infected with oil from the plant.
Use this handy guide to prevent, soothe, and treat any kind of rash or irritation from poison ivy!


published June 2020; last updated August 2022

Filed Under: How To

Sicilian Homemade Pizza Dough – Recipe

By Annie

Looking for a delish homemade pizza dough recipe? Here it is!


Pizza made from home made pizza dough recipe.
This homemade pizza dough recipe is classic, delicious, and versatile. Perfect to freeze for an easy dinner later!

Why You’ll Love This Homemade Pizza Dough Recipe

We love pizza – fast, tasty and it can even be nutritious depending on the toppings you choose. We’ve a fast and easy homemade pizza dough recipe to share with you.

Pizza is such a quick but satisfying meal – team it with a loaded veggie salad and there’s your dinner. And kids love pizza!

We love this pizza dough recipe and use it every single time we make pizza here at home. This is hands down the best homemade pizza crust recipe we have ever had.

I am so fortunate that my husband enjoys cooking. Graham loves to be in the kitchen! Check out his great cooking skills in our Recipe section.


How to Make Sicilian Pizza Dough

Here’s the recipe for Sicilian Pizza Crust – get a batch of dough ready, toss the extras in the freezer for next time. Then, add whatever toppings you like or have on hand.

Want to see the whole process of preparing the dough for this recipe? Take a look at our Homemade Pizza post for all the details, but here are a few pictures…


Dough sitting on a warm counter ready to be cut and divided for freezing.
This recipe makes 4 separate pizza doughs so pop the rest in the freezer for an easy meal.


After they dough is ready and cut into 4 pieces, we form each section into a ball and put each one in a separate Ziplock bag. After squeezing out any extra air, we pop them in the freezer.

When we want an easy dinner, we can just grab a bag of pizza dough from the freezer in the morning and let it thaw for the day. There are the beginnings of 4 easy meals sitting in that bowl! Who wouldn’t like that?


Pizza dough formed in the pizza pan and ready for toppings.
The thin pizza crust ready for toppings to be added; you can make so many kinds of pizza from this one dough!


Why You Should Make Pizza Dough in Bulk


  1. It’s a HUGE timesaver – you already have to get out the bowls and the ingredients…and the measuring cups….and the measuring spoons. Do yourself a favour and make a bigger batch. Do the work once, end up with 4 crusts.
  2. It’s much CHEAPER than buying ready made (read: unhealthy) pizza crusts at the grocery store. You can easily make 4 pizza crusts for the price of 1 premade crust.


Fresh from the oven homemade pizza on the counter.
We love this homemade pizza dough recipe! We just keep the extra dough in the freezer.


Pizza Topping Ideas


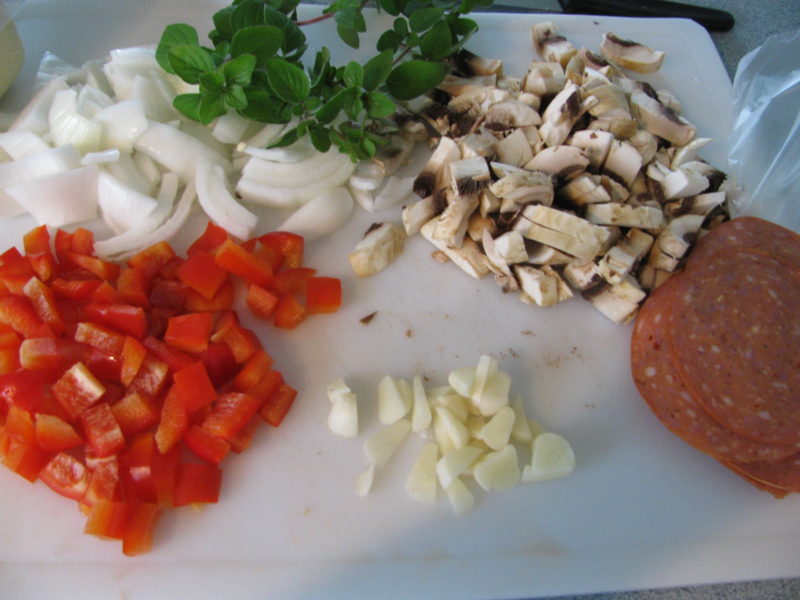
Diced tomatoes, onions, mushrooms, garlic, sausage and herbs.
Use any toppings you choose for your pizza to make it your own!


  • Use toppings that are as fresh as possible to get that great healthy (but easy) dinner for your family. Fresh mushrooms, tomatoes (or homemade Tomato Sauce) can be combined with sliced ham, pepperoni or other sausage.
  • Fresh herbs like oregano and basil add a wonderful flavour.
  • Along with Mozzarella cheese, add some aged Parmesan or Asiago cheese. These can be found at your grocery store, either shredded or in blocks. Grate some of these wonderful aged cheeses to top your pizza – it adds a whole other layer of flavour!
  • Use this homemade pizza dough recipe the next time you’re craving a pie – we think you will love it!


Fresh basil and tomatoes sit on a cutting board.
We love added fresh basil to our homemade pizza.

Extra Pizza Tips

  • Want my secret on how to preserve fresh Basil? I love this method and use it every single year. I grow Basil in the summer and then preserve it (not dried) to use all winter long.
  • Dried Basil just doesn’t have the flavour of fresh (to me)  – that process takes away any strength of the Basil taste. But I’ve found a great way to preserve Basil while keeping that great strong flavour.
  • Here’s our homemade Pizza Dough recipe – go ahead, make a batch to use right away or to freeze. And if you want the full process on how to make a great homemade pizza take a look!


More Recipes

Our entire Country Living in a Cariboo Valley Recipe Collection can be found here, but check out these highlights!

  1. Fireball Pumpkin Pie
  2. Bacon Wrapped Garlic Bites
  3. Turmeric Garlic Pork Chops
  4. Paprika Kale Chips


Sicilian Pizza Crust

If you enjoy this recipe for easy easy homemade pizza dough, please be sure to rate it 5 stars below! And print this off or save it to your Recipes folder!

Sicilian Pizza Dough

Sicilian Pizza Dough

Yield: 3 crusts
Prep Time: 2 hours
Cook Time: 20 minutes
Total Time: 2 hours 20 minutes

This pizza dough recipe makes enough dough for 3 pizzas. Use what you need and toss the other one in your freezer. Makes for a fast tasty meal - just add toppings of your choice.

5.0 Stars (4 Reviews)

Ingredients

  • 1 pkt, 2 1/4 tsp. yeast
  • 2 cups warm water
  • 1 tbsp salt
  • 4 tbsps olive oil
  • 5 cups flour

Instructions

  1. Dissolve the yeast in the warm water. I like to let it sit for 10 - 15 minutes.
  2. Then stir in the salt and olive oil. Finally, add in the flour.
  3. Knead the dough about one minute, just until it is smooth. Let it sit and rest for about 20 minutes.
  4. Then cover and keep the dough warm for 1/2 hour. I usually turn on the oven, set the bowl with the dough on top and cover with a clean tea towel.
  5. If we've got the woodstove going, it's a great place to set the bowl.
  6. Split the dough into 3 or 4 separate balls (3 for thick crust, 4 for thin crust)
  7. Cover your pizza pan with extra virgin olive oil. Punch out your dough and add the toppings of your choice.
  8. Put the extra balls of dough in separate containers and put them in the freezer. This dough is great to have on hand for fast and delicious dinners!
Nutrition Information:
Yield: 18 Serving Size: 1 pizza slice
Amount Per Serving: Calories: 155Total Fat: 3gSaturated Fat: 0gTrans Fat: 0gUnsaturated Fat: 3gCholesterol: 0mgSodium: 390mgCarbohydrates: 27gFiber: 1gSugar: 0gProtein: 4g

Did you make this recipe?

Please leave a comment on the blog or share a photo on Pinterest

© Annie

First Published May 2020; Updated February 2021

Thanks for checking out this recipe. For more, follow me on Facebook, Pinterest, Instagram, and Twitter!


Pizza dough rising for homemade crust.
Once you try this easy homemade pizza crust, you’ll never want to go store-bought again!

Filed Under: Recipes

  • « Previous Page
  • 1
  • …
  • 13
  • 14
  • 15
  • 16
  • 17
  • …
  • 53
  • Next Page »

Connect With Us!

  • Email
  • Facebook
  • Instagram
  • Pinterest
  • Twitter

Search this site

Generic selectors
Exact matches only
Search in title
Search in content
Post Type Selectors
Search in posts
Search in pages

Our Most Popular Posts

Garlic cloves in oil

How to Preserve Garlic in Oil – and Other Ways to Store Garlic

a open jar of pickled brussel sprouts on a counter

Easy Pickled Brussels Sprouts Recipe (Water Bath Canning)

Privacy Policy

Read about our Privacy Policy

Disclosure

Please note that some of this site’s links are affiliate links, and CountryLivinginaCaribooValley.com is a participant in the Amazon Services LLC Associates Program, an affiliate advertising program designed to provide a means for us to earn fees by linking to Amazon.com and affiliated sites. At NO ADDITIONAL COST TO YOU, I will earn a small commission, if you purchase them. I recommend them as they are good products.

Theme Design By Studio Mommy · Copyright © 2026