Country Living in a Cariboo Valley

Homesteading in BC

  • How to Get Started
  • Vegetable Gardening
  • Preserving Food
  • Recipes
  • Homemade Wine Recipes
  • About Us
  • Work With Me
  • Shop
    • Vegetable Garden Planner Printable: Grow Your Best Garden Ever
    • Grow Enough Food for a Year
    • Delicious Dandelions: A Recipe Collection
    • Dirt to Dollars: Selling at the Farmers Market
    • 8 Pounds in 8 Weeks: Raising Chicks for the Dinner Table
    • Making Wild Wine
    • Build a Hanging Chicken Feeder
    • 15 Things to Know About Living in the Country

Dutch Butter Cake Recipe – Boterkoek

By Annie

This Boterkoek (or butter cake) is a delicious and hearty Dutch recipe.

This Dutch Butter Cake is full of delicious butter and topped with crunchy almond slivers, this unique and tasty dessert is perfect for any time you need a sweet pick-me-up! If you like the flavor of almonds, you will love this Boterkoek recipe. 

A slice of this cake, along with a cup of coffee is delicious!

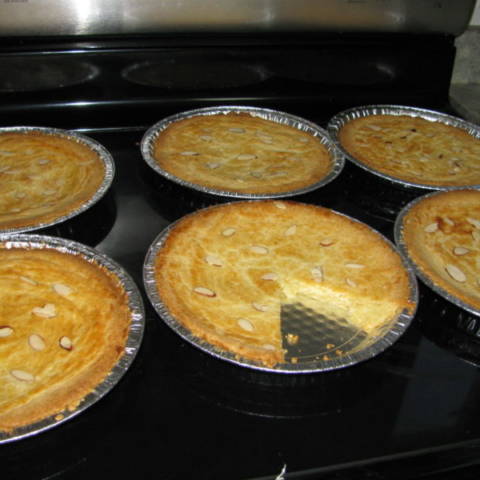
Traditional Dutch Almond Butter Cake cooling just out of the oven.
This delicious Boterkoek recipe makes a buttery cake with lots of almond flavor. You’ll love this for holiday gatherings!


Why You’ll Love This Dutch Butter Cake

Here’s a smashingly simple treat – my Boterkoek Recipe, or almond butter cake. It’s a Dutch tradition in my family, made by almost every Oma (grandma).

My sons have been enjoying this cake for as long as they can remember. We make this every Christmas and any other time of the year we have a hankering for the taste of almonds.

At holiday time, we actually make about 8 or 10 of these cakes. Friends love receiving a Boterkoek at Christmas time and they make a great hostess gift too!

Ingredients Needed for This Dutch Boterkoek Recipe

Ingredients for Boterkoek on a table.
The ingredients to make this almond Dutch Butter Cake.
  • butter – the star of this cake!
  • sugar – makes your almond butter cake nice and sweet.
  • white all purpose flour – another kind of flour can be substituted, but white flour works best here.
  • egg – you’ll need 1 for the cake itself and another to beat and eggwash the top of your cake.
  • baking powder – helps give your cake some volume.
  • almond extract – melds perfectly with the butter and gives your cake a subtly sweet, nutty flavor.
  • slivered almonds – for extra decoration, flavor, and texture.


How to Make Boterkoek Dough

You can either use your cake mixer or just mix together by hand. I just stir in my ingredients by hand and don’t bother pulling out my stand mixer.

Adding flour to butter and sugar mixture.
If the batter seems thick, don’t worry! Just keep combining the dry ingredients and trust the process.

Preheat the oven to 350F.

  1. In a large bowl, whisk butter and sugar together well. Add one egg and mix again. Adding one of our hen’s eggs makes this batter so yellow and pretty! Love those dark yolks from our chickens.
  2. In a separate bowl, sift together flour and baking powder.
  3. Add the flour and baking powder to the wet ingredients.
  4. Start mixing it together – you will find you have quite a thick dough (for a cake), but that’s perfect. Just keep mixing the flour in.
  5. Then add the almond extract – I like adding it when I find the dough getting hard to mix together. Even just a teaspoon worth makes it easier to blend.


Thick batter of Dutch butter cake in a bowl.
Thick batter well mixed and ready for the pie pan.

6. When your dough is well mixed, split it between two 9-inch prepared pans. I like using tin foil pie plates, as we like to give so many of these away to friends.


Spreading the Dough and Baking

Here’s where you need to take some extra time with this recipe! Use a butter knife and begin pressing that dough down.

Spread the dough mixture out to the edges and take your time. Not too much pressure, just slide the knife across the top of the dough, pressing slightly.

Once you have the dough out to the edges and quite even, use the back of a spoon to smooth the top of the cake. Use a light touch! 

Smoothing the Boterkoek with the back of a spoon.
To really perfect this Boterkoek recipe, be sure to spend the time smoothing down the batter. It’ll look so perfect once it’s baked!

Got it all smooth? Take a beaten egg and a pastry brush and very lightly brush the tops of the cakes with just a bit of the egg wash.

You will not use all of the egg! Then sprinkle slivered almonds on top.

Bake in a preheated oven at 350 for a cook time of about 25 – 30 minutes. The total time will depend on your oven.

NOTE: Keep an eye on these while baking. You want to remove them from the oven when the edges start turning golden brown.

The ideal is when the center of the Dutch Butter Cake is still soft to the touch.

Almond slivers pressed into the top of Boterkoek batter.
Adding almond slivers brings out the almond flavor and gives your cake an added crunch.

Let the cakes cool completely, then cut into wedges like a pie. Serve at room temperature with a cup of coffee!

I have yet to meet someone who doesn’t like this Dutch treat! Try this Boterkoek recipe and maybe you’ll make it a tradition yourself. Enjoy!

Baking Pans for Dutch Butter Cake

A bit of information about the baking pans for this recipe, because it does make a difference!

You can use almost any baking tin for this cake but I like to use a 8 or 9 inch glass cake pan. Or, use a pie pan or a springform pan.

You could instead use a square baking tin and cut the finished cake into small pieces, essentially making squares or a cookie.

The baking time will very likely differ depending on the pan used. It’s really important to keep an eye on the Boterkoek in its last minutes baking.

Remove it from the oven when the edges are completely golden brown, even if it looks like the center is not done. 

Remove from the oven and set on top of the oven and then leave it be until it is cooled.


Variations:

Add a little lemon zest to the batter for a delicious zing! 

You can use vanilla extract instead of the almond extract, if you prefer.

Add a little sifted powdered sugar as a cake topping, once it has cooled down after baking.

If you do a crosshatch pattern on the top, it looks quite pretty!

Just use the tines of a fork, after smoothening the batter out in the cake pans.

More Sweet Recipes

Our entire Country Living in a Cariboo Valley Recipe Collection can be found here, and here are some more recipes hand-picked for you!

  • If you love Gingerbread, come over and grab my Gingerbread Boy recipe – a real treat at Christmas time!
  • Fireball Pumpkin Pie is a fantastic dessert to enjoy during the fall months.
  • And for something more summery, this Lemon Loaf Cake with Rosemary is a light and tangy option.


Dutch Butter Cake on a white plate on a blue checked tablecloth.
When finished, this Boterkoek recipe is deliciously buttery and so rich.


Boterkoek Recipe

If you enjoy this recipe for almond butter cake, please be sure to rate it 5 stars below! And print this recipe card off or save it to your recipes folder!
Boeterkoek (Butter Cake)

Boeterkoek (Butter Cake)

Prep Time: 30 minutes
Cook Time: 25 minutes
Total Time: 55 minutes

A traditional Dutch dessert sure to please. If you like Almonds and butter, you will love this rich treat.

Ingredients

  • 1 cup butter, NOT Margarine
  • 1 cup sugar
  • 2 cups white flour
  • 1 beaten egg
  • 1 tsp baking powder
  • 1 tsp almond extract

Instructions

  1. Cream the butter and sugar together, then add the egg. Mix well and then add the rest of the ingredients.
  2. Grease your pie pans (I use the foil disposable ones) and divide the mixture into the 2 pans.
  3. Using a clean butterknife, or the back of a spoon, start patting down the mixture.
  4. The next step takes some time - don't rush it.
  5. Use the back of the spoon to "smoothen" out the mixture. Make it look nice!
  6. Take a bit (and I mean Just a Bit) of a beaten egg and brush that (ever so lightly) on the tops of the cakes.
  7. Then take a few slivered almonds or almond slices and drop them on the top. Push them in slightly with your finger.
  8. Pop them into a 350 degree oven for 25 - 30 minutes, till they are nice and golden brown on top.
Nutrition Information:
Yield: 8 Serving Size: 1 Servings
Amount Per Serving: Calories: 437Total Fat: 25gSaturated Fat: 15gTrans Fat: 1gUnsaturated Fat: 8gCholesterol: 84mgSodium: 253mgCarbohydrates: 49gFiber: 1gSugar: 25gProtein: 4g

Did you make this recipe?

Please leave a comment on the blog or share a photo on Pinterest

© Annie

First Published December 2017; latest update December, 2024

Thanks for checking out this recipe. For more, follow me on Facebook, Pinterest, Instagram, and Twitter!


Dutch Butter Cake on a cake stand


Filed Under: Recipes

How to Dry Bay Leaves

By Annie

Here’s how to dry bay leaves so you can store them to use all year round in your favourite cooking recipes.

Bay leaves are one of the most common fresh herbs to be used in cooking. Instead of buying them at the grocery store, it is easy to dry them yourself at home.

They add a delicious subtle flavor when added to soups, stews and even pasta dishes and sauces.

Fresh cut bay leaves on a short branch.
You can cut small branches of bay leaves or just the leaves themselves.

The taste and aroma of these glossy green leaves pairs perfectly with herbs such as oregano and thyme or spices like black pepper, cumin, or cardamom.

Did you know you can easily dry your own bay leaves at home? There’s no need to buy the expensive package of dried bay leaves at the grocery store.

Bay leaves come from the bay laurel which is an evergreen shrub. If you have a bay laurel hedge or even just one shrub in your garden, you can harvest and dry your own leaves.

When we lived on the BC coast, we grew our own Laurel hedge for a privacy fence. It would be lovely if we could grow bay laurel here in the Cariboo but the Winters are far too cold for this plant which likes a more temperate climate.

How to Dry Bay Leaves for Long-Term Storage

We’re fortunate that one of our Valley friends also has a house down on the Coast. And in their yard there, is a bay laurel tree. They often share their supply of harvested bay laurel leaves from their bay trees and we appreciate the gift. 

I’ve got several branches of fresh bay leaves in my kitchen and I would love to share with you how we air dry bay leaves for using all year round. The fragrant leaf has pointy ends and a leathery feel.

Bay leaves ready to dry in baskets.
Prepare leaves for drying by cutting each leaf from the stem.


But first, a couple of common questions about growing, pruning and picking bay leaves.

How to Grow Bay Leaves?

Bay leaves are laurel leaves, they are the same. You can buy a small laurel shrub or larger laurel tree at the garden nursery or buy a laurel plant online and plant it outside in your yard.

If you live in a cold climate, you can plant one or two bay laurel trees pots and bring them in for the winter. You can learn more about how to grow laurel here.

When to Pick Bay Leaves?

The ideal time to pick bay leaves is in the late summer, but you can harvest bay leaves year round.

How to Harvest Bay Leaves Without Killing the Plant?

There are a few different ways to harvest bay leaves. You can remove individual leaves by cutting them at the base of their stem.

This is a good harvest method if you have a small bay laurel bush. Instead of cutting a branch from a plant that is too small, just cut off a leaf here and there from different branches.

If your laurel is well established and big, you can cut branches. Just be sure to cut them back to right above a lower leaf. If your laurel needs a good pruning, this is the perfect time to remove branches and then dry the leaves.

bay leaves drying in a basket with branch beside
Cut the leaves from the stems over a shallow basket.

Preparing Bay Leaves for Drying

There are several different methods of drying bay leaves and other herbs, including drying them in the microwave or the oven.

You could also freeze the leaves instead of making dried herbs. Freeze leaves on a large baking sheet. Once frozen, transfer them to a freezer bag or other appropriate plastic bag and store in the deepest part of the freezer.

Air Drying Bay Leaves

We always dry our leaves using air drying; that is, drying in open air. We find it the quickest and easiest way to deal with the leaves and it doesn’t require special equipment, so that is the focus of the instructions in this article.

Fresh cut bay leaves on a wood table.
Laurel leaves waiting to be trimmed before drying.

Once you have picked the laurel leaves, you can get them ready for air drying. Cut the leaves from the stem of the branch.

 I like to do this right over a shallow open weave basket. This is what we use for air drying the bay leaves. You could also keep them in a mesh bag.

If the leaves have dust on then, rinse the leaves in cold water, then drain in a colander. Then lay them on a single layer of paper towel to air dry or you can dry them with a clean towel.

Use several baskets so that the leaves end up in a single layer if you possibly can. This will help the leaves to dry by not trapping any moisture between the leaves.

You can use a tray, shallow ceramic bowls or a baking sheet instead of the baskets if you like. Set your drying baskets out of the way but in the open air in a dry place. A darker spot is better than a brightly lit one, but it won’t matter much in the end.

Dried bay leaves in shallow baskets.
After a couple of weeks, the leaves are dry and ready to store.

Once a day, run your fingers through the dried leaves to fluff them up and expose all the leaves to the air. Let them dry for roughly 10 days to two weeks.

Dry bay leaves stored in mason jars.
Store the jars in your kitchen cupboard and use in cooking.

How to Store Dried Bay Leaves

After they are completely dry, transfer them into a glass mason jar, add a seal and a ring. Store bay leaves in an airtight container out of direct sunlight and in a dry location.

Tuck a jar or two in the pantry – their subtle flavour makes a wonderful addition to all kinds of soups and stews. A bonus is they are good for your health – some of the benefits of bay leaves include helping with improving digestion and reducing bad cholesterol levels.

Note: When you add a bay leaf or two to a recipe, always remember to remove the bay leaf before serving. They are not meant to be eaten whole and can be a choking hazard.

How to Use Bay Leaves

  • Add them to your favorite pasta sauce for some extra flavor.
  • Use your bay leaves to add a slightly floral flavor to rice dishes, chicken soup, or sauces like tomato sauce or marinades.
  • Bay leaves are also great to add to curry. Start with a single bay leaf and add more if you want additional flavor.

Now you know how to dry bay leaves, so fill a few jars for year round use in the kitchen!


More posts about herbs:

  • Another herb easy to dry is chives – find out how!
  • Grow Lovage for an herb that tastes like celery.
  • Top picks for herbs you can grow indoors!

How to Dry Bay Leaves


Originally published 2016, updated July 2024

Filed Under: Drying Herbs

What To Know About Straight Run Chickens

By Annie

Wondering what straight run chickens are? Here’s everything you need to know!

Want to get some chickens for eggs, meat or both? If you are thinking of buying poultry, one option is to purchase straight run chicks. But are they right for you? Read on to learn more!

Straight run chickens right after hatching.
What are straight run chickens? Read on to learn more.

What Are Straight Run Chickens?

Straight run chickens are chicks ordered from the hatchery unsexed. This means that when it comes to male and female chicks, you don’t know what you are going to get. You are going to get a mix of male and female live birds.

In theory, you may expect this to mean that you’d receive a 50/50 mix of males or females. But the reality is that it is quite possible you will receive a much larger ratio of one over the other.

This “unknown variable” is exactly why non-sexed day old chicks are more economical than pullets. (Although cockerels – baby roosters – are usually the cheapest option of all.)


A woman with her straight run chickens on the lawn
Straight run pullets are for laying eggs.

Are Straight Run Chickens Right For You?

Are you thinking about adding some chickens to your life? If you don’t want to use an incubator like this to hatch eggs, you can order day-old chicks instead!

If you are purchasing chickens for the first time, you may be uncertain about some of the terms you see used in online brochures for large scale hatcheries (like Rochester Hatchery in Canada or Cackle Hatchery in the States).

Not only that, one thing you will definitely notice is that there can be a wide variety of prices for the exact same kind of chicken. And one of the cheapest options available is the Straight Run Chicken.

But what exactly does that mean? And is that a good option for you?

Where can I Buy Straight Run Chickens?

There are several places you can buy day old chicks (there may be a minimum order quantity):

  • available for pre-order online (see links above for hatcheries). You can find out future hatch dates (3 weeks from ordering). Local pickup location may be your post office.
  • at your local livestock auction (often a minimum quantity)
  • find someone advertising on farm store bulletin boards or ask the store owner if they know of any chick enthusiasts selling day old birds.
  • some limited online advertising forums for chicken lovers

Straight Run Chickens Vs Pullets

Although they are one of the most economical options, straight run birds are not the optimum choice for everyone.

Pullets – young hens – are vastly preferred by most chicken owners, for the simple fact that they are the ones that lay eggs.

Not only that, but if you live in a city or town, you have to comply with the ordinances of your community. And while many communities allow for a certain number of “backyard chickens”, almost none of them allow roosters, due to their noise.

Roosters crowing loudly in the early morning at sunrise tend to make the neighbors cranky.

Therefore, if you live in or very close to high density neighborhoods, be sure to check the local codes of your city or town before purchasing chickens. Be aware of potential issues and when you purchase, you will likely only want to buy pullets.

Flock owners living in any neighborhood can lessen potential issues by checking in with neighbors and gifting free eggs!

However, if you live in the country and there are no rules in your area against roosters, straight run chickens may be a great option for you.

In this case, it mostly depends on how much room you have, and what you want to do with the chickens you raise.


Mixed sex chicks on a table outside
Ordering unsexed chicks is often the cheapest way to get chickens.

When Should I Order Sexed Chickens Instead of Straight Run?

Making the decision to order sexed (straight run) or unsexed chicks depends on what you want the birds for.

I Want to Raise Chickens Just for my Own Eggs

If you are wanting chickens so you can gather fresh eggs, then you will ONLY want to order pullet chicks or hens.

Your pullets will grow into egg layers at roughly 16-20 weeks old. Once they reach egg-laying age, they will give you eggs for roughly 3 years. They take a break every year (wouldn’t you?) and they won’t lay as often at 3 years old.

I Want to Raise Chickens for my Own Meat

If you only want birds for meat you will ONLY want to order cockerel chicks (roosters).

And with male day old chicks often being the least expensive of all, you may actually save a little money ordering this way. Learn more about raising roosters in this next part.

You may want to look at chickens bred for weight gain, such as Cornish Cross. The time frame to grow out a rooster is between 6 -8 weeks for a proper finishing age. At this time, roosters will clearly have wattles and the male bird’s combs are a good size.

I Want to Raise Chickens for Eggs and Meat

Ordering straight run-day old chicks will allow you to have enough of both sexes. 

Male chickens get larger and meatier than hens, making raising roosters a better choice in this case. And with no hens to fight over, they should get along just fine growing up together in their all-male flock.

As they grow, you can cull the extra boys one at a time for your own consumption. If there are any extra roosters showing really aggressive behavior, they’re the ones to get rid of next.

Consider keeping a rooster to be with your hens as a flock protector. Keeping too many roosters can lead to big problems. 

The usual ratio is to keep one rooster for every 10-12 hens.

With the exception of broilers (which are specifically bred to raise for meat), male chicks are generally the least expensive to buy, and therefore, may save you money.

Rooster and hens on a roost in their coop
One rooster is all you need for your hens, if you want chicks!

When Are Straight Run Chickens the Best Choice?

If you have a lot of space for chickens (including enough space to keep separate flocks) and wish to raise chickens for both eggs and meat, ordering straight run chickens is definitely a great way to get your flock started.

But it will also require a bit more planning and hands-on labor to work. Because you will first have to deal with any unwanted roosters you receive, possibly in large number.

You will want to have a separate area or chicken coop for any excess roosters you are planning to raise for meat birds. As long as they are kept separate from the females, they should get along fine.

Can you kill and butcher the chickens yourself? If not, you’ll need to take them elsewhere for processing. Either way is fine, but you’ll want to decide before your little chicks become mature roosters.

You’ll also need to have a plan long term for dealing with any fertilized eggs your hens lay.

Once you have the details sorted out for dealing with any males you don’t want as part of your main flock, you’ll be better prepared to order straight run chicks.

Do Straight Run Chickens Lay Eggs?

Adult hens lay eggs. This includes any hens you receive when you order straight run chickens.

Straight run chickens right after hatching.

What Breed Are Straight Run Chickens?

Some breeds of chicken are easy to sex shortly after birth because they look different. Sexed link chicks usually have differences in their color.

Breeds like the Cream Legbar are considered “auto-sexing” because the male and female hatchlings naturally look different from birth. Some are “sex-linked”, which means that they are cross-bred based on certain genetic traits.

This creates males and females that look different – from different shades of yellow to different speckle patterns.

Technically, the term “straight run chicken” applies only to whether or not chicks have been sexed yet. This means that every breed that exists could be sold this way.

However, you are most likely going to find unsexed chicks in breeds where it is difficult to determine the gender. The process of doing so requires additional personnel.

These are experts at sexing chickens – usually through a difficult technique called vent sexing. This means that the hatchery spends more money paying these experts for their accuracy sexing baby chicks.

In this case, the hatchery is more likely to offer the option of buying straight run or unsexed chickens. They save money – and so do you.

Ultimately, you are the only one who can determine if straight run chickens are right for you. If you have limited space, buying sexed chicks is a better option.

But if you have the space for a large free-range flock of chickens on your homestead, you may find you prefer to only order straight run chickens when you need to increase the size of your flock.

Straight run chickens are unsexed chicks – be sure that is what you want before ordering!


Learn more about raising chickens:

How to set up a brooder for chicks and what you need to have ready before they come!

All the info you need to raise chicks for meat in 8 weeks!

Want to learn about raising Heritage Chickens? Help keep the older hardier heritage breeds going.


originally published November, 2021; latest update April 2025

Filed Under: Raising Chickens

How to Plant Garlic Cloves – Growing Garlic Part 1

By Annie

Here are our best tips for how to plant garlic cloves in your vegetable garden!

Garlic is one of the easiest vegetables to grow in your garden or in containers. And it is wonderful to use in all kinds of cooking recipes, plus it’s also very healthy for us. 

Garlic doesn’t take up much room at all so you can either plant a bed of garlic cloves in a corner of your garden or tuck a dozen garlic plants in a pot and keep it on your deck.

Learn how to plant garlic cloves and hang garlic to cure
Our best tips for how to plant garlic cloves in your garden.

You can see we love to grow and harvest garlic! And because we live in a northern climate (Zone 3 Canada) we only grow a type of garlic called hardneck.

Hardneck garlic is a garlic variety that loves a cold winter; if you are in warm winter areas, grow softneck garlic instead, as softneck varieties are better in warmer climates.

How to Plant Garlic in the Fall

In our climate (cold winters) we plant our Garlic in the early Fall anywhere from around mid-September through to the middle of October. If you live in the South you plant in the early Spring.

Generally, you’ll want to avoid planting garlic where other garlic, onion, or any other member of the allium family has been planted recently.

This also includes plants like leeks, scallions, shallots, and chives. Rotating where garlic or other related plants are grown can help avoid allium pests or diseases.

Keep reading to see just how easy Garlic is to grow and then make sure you plant a few cloves!

How to Grow Garlic in a Raised Bed

Planting garlic cloves in a raised bed
Plant individual garlic cloves in a raised garden bed.

We plant garlic in our vegetable garden beds or in raised beds next door where we have lots of room. Add some good quality compost or well aged manure, blood meal, or fertilizer and dig it in well.

Rake the soil smooth and get ready for planting garlic cloves.

Planting Garlic Cloves

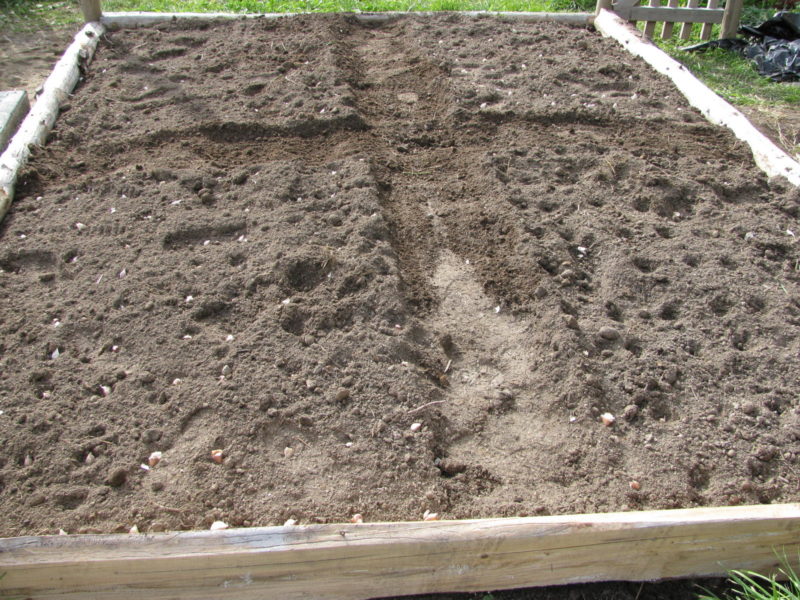
Here’s our Garlic Bed, ready for planting. We plant Garlic close together – you can see I have 4 beds separated by narrow walkways.

I take my box of keeper cloves (here’s how we decide which cloves to eat and which garlic cloves to use for planting) down to the garden.

How to plant garlic cloves in a raised bed.
Plant Garlic cloves six inches apart in a pot or garden bed.

I plant the garlic cloves about 6 inches apart, with 8 inches between the rows. This ensures the garlic will get enough direct sunlight. Then, I push each of the cloves about 3 inches of depth below the soil surface.

 You can see the individual cloves in the picture above because I like to try and get the rows nice and straight, so I don’t push them down to seat them and put the soil on top of them until I am finished planting them all. I use the planted ones as markers for the rest of the cloves.

I was able to plant 288 cloves in that space! You can see it doesn’t take a lot of room to grow enough garlic for your family for the winter months.

Our 288 cloves is a LOT of garlic, but we love roasted garlic and we often have 2 whole heads of garlic between us at dinner time.

We also love making Bacon Wrapped Garlic Bites – so yummy as an appetizer!

If you cook the garlic, it is a lot milder than if you eat it raw and it’s so healthy for you! Lots of nutrients and flavor emerge when cooking.

After you plant garlic cloves, add mulch for winter.
After you plant garlic cloves, add mulch to protect them for winter.

How to Plant Garlic in Pots

If you don’t have room for a vegetable garden, you can easily plant garlic in pots, containers or grow bags. Grow some on your patio or balcony – just follow the same premise as for planting in a garden.

Plant your garlic six inches apart in good quality soil. These long rectangular flower pots work really well for growing garlic in a smaller space.

Since garlic doesn’t grow very deep, these pots are an ideal size.

How to Grow Garlic in a Flower Bed

Garlic plants are quite pretty and look nice when they are mixed in with perennial or annual flowers. If you’ve got a few empty spaces in your flower bed, plant some sprouting garlic cloves there!

Tuck three or four alongside any of your flowers or shrubs – they take hardly any room at all and will be easy to find when it’s time for harvesting garlic bulbs.

How to Plant Garlic Cloves
This guide explains exactly how to plant garlic cloves in a variety of locations!

How to Protect Garlic Cloves for Winter

It is a good idea to find a way to protect the garlic cloves for the winter months. Garlic is very hardy but if winter temperatures stay below zero, they really do need something to insulate them from the cold. 

How to Mulch Garlic

Mulch the whole bed with straw once the temperatures get down around freezing. Our temperatures are cold on Fall mornings and maybe close to freezing overnight.

We do not mulch right after planting. Wait until the temperatures go down; if you mulch too early the bed could be warmer than the garlic likes it.

Sometimes here, our garlic gets planted three weeks before we go out and cover with mulch.

adding mulch to cover a garden bed
Cover your garlic bed with straw or spent hay right before the snow flies.

I loosely add about three inches of straw on top of the bed. I don’t tamp it down at all; the rain and snow that is coming will do that. 

Once planted, all you have to do is weed it regularly during the growing season. One of the reasons I plant my Garlic tightly is that it reduces the weeds that come up.

So to get the Garlic in the ground and ready for Winter, it is just a matter of planting the cloves, covering them with soil, then covering them with a good layer of mulch later. You could use hay, straw, grass clippings or leaves.

During the Fall, your Garlic may start to grow and get a few inches of green leaf on them before Winter sets in. It’s OK…you don’t need to do anything to them – just wait for them to appear in Spring.

After planting garlic cloves, each clove will grow to become a garlic bulb.

In the Spring, you may need to remove some of the mulch, especially if you see garlic trying to poke through but not being able to.

If you see any yellow foliage, this is a good sign that the garlic needs more light.

Spring Growth for Garlic

In the Spring the Garlic bulbs will continue to grow. While the green leaves are growing above the soil, the Garlic bulb is growing below the soil. Water it every few days and keep any weeds out.

Garlic scapes growing from garlic plant.
The curled stems are Garlic scapes growing from the plant.

In early summer (think June and early July), you will see the Garlic Scape forming and coming out from the center of the growing stalk. Every Garlic plant will send out one Scape.

As they grow, they start to curl and they look great on the dinner plate cooked whole. Can you see the Scapes?

Garlic plants growing in a garden
Hardneck garlic sets out one scape per plant.

Before you know it, you’ll have lots of green shoots to harvest – just cut them off at the base of the Scape using a knife. I usually just snap them off, it’s much faster.

If you want nice big garlic heads, you MUST take the scapes off. This directs the energy into the bulb below ground, and it will then grow bigger.

Don’t just toss those Scapes onto your compost pile. They taste great!


How to Store Fresh Garlic

For garlic storage, you’ll want to find a place where the room temperature is on the cooler side and there’s good air circulation.

If you store garlic in the refrigerator, it may start to sprout in a couple of days.

Here are several different ways to preserve garlic in oil – including how to freeze garlic.

Now you know how to plant garlic cloves in the garden – plant some this Fall!

Garlic is very easy to grow and hardly takes any room at all. Every garden should have some garlic growing in it!

Freshly dug Garlic tastes nothing like the store bought Garlic you see in the produce section at the supermarket.

You can find good healthy Garlic by buying some at your local Farmer’s Market – ask if it was grown locally.

Just remember you need 1 clove per plant, so buy accordingly. There are roughly 6 – 8 cloves on one head of garlic. You can also buy hardneck garlic bulbs here online.


More Garlic Posts

  • Part 2 of the Garlic series is called “How to Make Pickled Garlic Scapes” 
  • Here’s how you can store garlic in olive oil – plus more ways to store garlic bulbs.
  • Wondering how to roast a garlic bulb? Find out here
  • This Feta Cheese Garlic Spread is a family favourite!


Published 2012, updated July 2022

Filed Under: Garlic, Garlic (4 Part Series), Grow Your Own Vegetables Tagged With: Garlic, Grow Vegetables

Pumpkin Cranberry Banana Bread – Recipe

By Annie

Pumpkin Cranberry Banana Bread is a sweet and comforting treat that’s so hearty and perfect for extra pumpkin and overripe bananas!

Earlier this week I made a pumpkin pie, but only used half of the large can of pumpkin filling I had bought. Since I already had some over ripe bananas and some dried cranberries, I thought I would give this loaf a try.

I love using my home made Pumpkin Pie Spice in this recipe!

Pumpkin Cranberry bread with a light glaze sits on a wood serving tray.
Save this Cranberry Pumpkin bread recipe to your Pinterest board.

Why You’ll Love This Pumpkin Cranberry Banana Loaf

Here’s a Pumpkin Cranberry Banana Loaf Recipe for you that’s healthy and filling. It’s easy to make, healthy and filling and is perfect for a fast snack or even breakfast on the go!

You can use your stand mixer or just mix this loaf up by hand.


Ingredients for Pumpkin Cranberry Banana Bread

  • mashed bananas – because this is banana bread, the riper the better!
  • eggs
  • olive oil
  • pumpkin puree – I used some that I had leftover from making a pie; this gives your loaf a hearty pumpkin flavor!
  • honey – a delicious natural sweetener.
  • sugar – helps the honey do its job.
  • flour – you can use whole wheat flour or all purpose flour
  • baking powder and baking soda
  • salt
  • pumpkin pie spice – brings out the taste of the pumpkin and adds a new kind of flavor to your banana loaf.
  • cinnamon – works great with the pie spice.
  • dried cranberries – add extra sweetness and a little bit of nutrition as well! You could use fresh cranberries instead.


Pumpkin Quick Bread Recipe Instructions

Preheat your oven to 350 degrees F, then grease and flour two loaf pans (or use cooking spray).

Mashed Bananas to make bread
Use very ripe bananas to make this yummy loaf.

Grab a medium bowl to prepare the banana the wet ingredients. Mash your overripe bananas well, using a fork. You can also use a potato masher if that works better for you.

Pumpkin, bananas and other wet ingredients being blended together.
Mix these well together.

Stir together the mashed bananas, eggs, oil, pumpkin, honey, and sugar in a large mixing bowl.

Mixing dry ingredients for Pumpkin Banana Bread
Mix together dry ingredients.

In another large bowl, combine the flour, baking powder, baking soda, salt, pumpkin pie spice, and cinnamon. I like to use a whisk for mixing this flour mixture, but a large wooden spoon works too.

Mixing dry ingredients well with wet ingredients.
Mix dry ingredients into the pumpkin banana mixture.

Stir the dry ingredients into the banana pumpkin mixture, mixing thoroughly and then fold in the dried fruit.

Pumpkin Banana Cranberry Bread ready to be cut in slices.
Let the baked Pumpkin Banana bread cool before slicing.

Pour batter into your prepared pans and bake for about 45 minutes. Test by inserting a toothpick into the center of the loaf. Pull it out.

The pumpkin bread is done when the toothpick comes out clean, with no batter on it. Remove from the oven; I like to wait 10 minutes, then remove the loaf from the pan and allow to cool on a wire rack. 

Allow to cool for at least 20 minutes until slicing and serving!

Serving Suggestions and Variations

  • Spread with some butter if you like and enjoy this banana loaf with some hot coffee!
  • Add more spice such as ginger or nutmeg.
  • Use a muffin tin or these mini loaves tins to make individual servings of this quick bread or pumpkin cranberry muffins.
  • For some extra crunch, add chopped up walnuts, pecans, or any kind of nut you like to the batter.
  • If you don’t like dried cranberries, any kind of dried fruit will work for this bread. Raisins or dried cherries or apricots cut into smaller pieces would be delicious!
  • This banana loaf would also be delicious with a light glaze over top. Check out this great recipe from The Spruce Eats for how to make a simple glaze out of powdered sugar.
  • To make this recipe vegan, omit the honey and replace the egg with either a half cup of applesauce or 2 tablespoons of ground chia seeds or flax seeds mixed with 6 tablespoons of water.
Pumpkin Banana Bread on a white plate on blue cloth
Click to save for later on your Pinterest board.

More Dessert Recipes

Our entire Country Living in a Cariboo Valley Recipe Collection can be found here, and check out some of these other delicious desserts!

  • Here’s a classic banana bread recipe if you don’t have pumpkin or dried fruit on hand!
  • Chewy Coconut Cookies are a sweet and light treat that are perfect for an afternoon snack or dessert.
  • Can’t get enough loaf cakes? Try this Lemon Loaf Cake with Rosemary Glaze!
  • This Fireball Pumpkin Pie is a great dessert to warm you up in the cold months.


Pumpkin Cranberry Bread

If you like this delicious banana bread recipe, be sure to rate it 5 stars below!

Thanks for checking out this recipe. For more, follow me on Facebook, Pinterest, Instagram, and Twitter!


Baked Pumpkin Cranberry Bread on a table with coffee

Pumpkin Cranberry Banana Bread Recipe

Yield: 12 servings
Prep Time: 15 minutes
Cook Time: 45 minutes
Total Time: 1 hour

This loaf combines three Fall favourites - Pumpkin, Cranberry and Bananas. Perfect with a cup of coffee for an afternoon snack.

Ingredients

  • 2 ripe mashed bananas
  • 2 eggs
  • 1/3 c olive oil
  • 1 1/3 c pureed pumpkin
  • 1/2 c honey
  • 1/2 cup sugar
  • 2 1/2 cups flour
  • 1 tsp baking powder
  • 1 tsp baking soda
  • 1/2 tsp salt
  • 2 tsps. pumpkin pie spice
  • 1 tsp cinnamon
  • 3/4 c raisins, I used cranberries
  • 1/2 c walnut pieces, optional

Instructions

  1. Preheat oven to 350 degrees and grease and flour two cake loaf pans.
  2. In large bowl, stir the mashed banana, eggs, oil, pumpkin, honey and sugar.
  3. Combine the flour, baking powder, baking soda, salt, pie spice and cinnamon.
  4. Stir it into the banana mixture, then fold in the raisins and walnuts.
  5. Pour into prepared loaf pans and bake for about 45 minutes or until a toothpick inserted in the centre of the loaf comes out clean. Cool loaves in the pans for about 10 minutes before removing.
Nutrition Information:
Yield: 12 Serving Size: 1 inch slice
Amount Per Serving: Calories: 336Total Fat: 10gSaturated Fat: 1gTrans Fat: 0gUnsaturated Fat: 8gCholesterol: 31mgSodium: 258mgCarbohydrates: 60gFiber: 3gSugar: 31gProtein: 5g

Did you make this recipe?

Please leave a comment on the blog or share a photo on Pinterest

© Annie
Cuisine: American
Pumpkin Cranberry loaf on a plate
Click to save to your favourite Pinterest board!


First Published November 2013; latest update Dec 2024


Filed Under: Food, Recipes

  • « Previous Page
  • 1
  • …
  • 5
  • 6
  • 7
  • 8
  • 9
  • …
  • 53
  • Next Page »

Connect With Us!

  • Email
  • Facebook
  • Instagram
  • Pinterest
  • Twitter

Search this site

Generic selectors
Exact matches only
Search in title
Search in content
Post Type Selectors
Search in posts
Search in pages

Our Most Popular Posts

Garlic cloves in oil

How to Preserve Garlic in Oil – and Other Ways to Store Garlic

a open jar of pickled brussel sprouts on a counter

Easy Pickled Brussels Sprouts Recipe (Water Bath Canning)

Privacy Policy

Read about our Privacy Policy

Disclosure

Please note that some of this site’s links are affiliate links, and CountryLivinginaCaribooValley.com is a participant in the Amazon Services LLC Associates Program, an affiliate advertising program designed to provide a means for us to earn fees by linking to Amazon.com and affiliated sites. At NO ADDITIONAL COST TO YOU, I will earn a small commission, if you purchase them. I recommend them as they are good products.

Theme Design By Studio Mommy · Copyright © 2026