Country Living in a Cariboo Valley

Homesteading in BC

  • How to Get Started
  • Vegetable Gardening
  • Preserving Food
  • Recipes
  • Homemade Wine Recipes
  • About Us
  • Work With Me
  • Shop
    • Vegetable Garden Planner Printable: Grow Your Best Garden Ever
    • Grow Enough Food for a Year
    • Delicious Dandelions: A Recipe Collection
    • Dirt to Dollars: Selling at the Farmers Market
    • 8 Pounds in 8 Weeks: Raising Chicks for the Dinner Table
    • Making Wild Wine
    • Build a Hanging Chicken Feeder
    • 15 Things to Know About Living in the Country

How to Make Willow Water – for Rooting Plants and Watering Plants

By Annie

You can make willow water, then use it for a DIY rooting hormone!

Have a favorite shrub or bush you would love to have two or three more of, to plant in your yard? Use this awesome DIY method to make rooting hormone from willow branches or willow twig and get your plant cuttings off to their very best start.

Taking cuttings from shrubs you already have is a great way to increase the number of plants you have at no cost. Or maybe you have a neighbor or friend who needs to trim their shrubs and has some cuttings for you.

Make Willow Water to use as rooting hormone
Fresh cuttings standing in Willow Water to help with rooting.

That’s the perfect way to propagate cuttings to grow your own shrubs and plants for free. And it’s not hard to learn how to take cuttings from shrubs.

It’s always a good idea to dip or soak the cut stems in some type of a rooting hormone. There are properties within the rooting hormone that stimulates root growth and plant health.

And you do want your cuttings to be as healthy as possible so they grow into healthy mature bushes for using in your yard landscaping.

There are several different kinds of shrub rooting gels that you can buy and later we will recommend our top rooting gel that we have used many times. For now, let’s discuss how to make your own pussy willow water.


Make Willow Water – DIY Rooting Hormone

Did you know that you can make your own rooting hormone using willow water made from willow trees? This willow rooting hormone recipe is completely natural and easy to make.

Here’s how to make rooting hormone to use for propagating cuttings from shrubs! And….it’s all about the willows!

If you have willows growing anywhere near you and you can take some cuttings from new willow shoots you can use this powerful plant to supercharge your new (or established) plants!

Whether you have upright willows or a weeping willow, willow tree rooting hormone can be made from either type.


Where Do Willows Grow Naturally?

Willows, from the genus Willow Salix, can grow in a weeping form but also more upright. Not to be confused with the American water-willow flower, these trees are often naturally found growing near lakes and rivers, because willows really do love the water.

They grow in the Northern Hemisphere throughout North America, Europe, and Asia. Willow trees grow best in locations that provide ample sunlight and moisture.

Willows growing in wet field
Line of living willows grow along the fence line below the barn.

You can see a hedge row of living willows in the photo – long ago, there was a ditch dug along that fence line to carry water away from the pasture. 

Since willows love water so much, they started growing along the ditch. If you are looking at for property and notice a lot of willows (or a line of willows), that suggests strongly there is water on the property. Where there are willows, there is water.


Overall Benefits of Using Willow Water as Rooting Hormone

Making rooting hormone from willows helps plants and cuttings to take root faster. This simple root hormone water recipe will encourage plant rooting of plant cuttings so they can grow into new plants for use on the homestead.


What Time of Year is Best to Make Willow Water?

You can make and use homemade willow water at any time of the year. However, Spring is definitely the best season to make willow water.

During the spring season, your willows will have fresh limbs to clip and have plenty of time to restore themselves before the winter season arrives.

Willow Water Rooting Hormone used for healthy plants
This natural rooting hormone is a great way to ensure your plants are healthy and safe from any potential threats.

Does Willow Water Really Make a Difference to the Growth? 

Rooting hormone, like willow water, is typically used on cuttings to help them root quicker. It also helps a plant resist certain pathogens that may be harmful. Some cuttings will grow faster using this hack, whereas other plants may not. 

When testing most plants, especially shrubs and perennial plants with willow water, I’ve found the roots grow quicker and in larger supply when using the willow water rooting hormone.


Watering Plants with Rooting Hormone

Willow water can help with your existing plants, too. Some people put aspirin in rainwater to help their established plants root better (because it has acetylsalicylic acid, or ASA, similar to a compound found naturally in willow hardwood), but you can make this natural fertilizer instead and use that on your plants.

Adding some willow water to your already established pants will encourage strong root growth for healthier plants that will thrive.

Willow water is an excellent option for rooting hormone to use on cuttings and other plants that need a little boost in root growth for plant propagation.


How Does Willow Water Work as a Rooting Hormone?

Synthetic rooting hormone contains high concentrations of auxins like Indolebutyric Acid which promote growth. And willow trees just happen to be an excellent natural source of Indolebutyric Acid (IBA), especially the new shoots.

The Willow tree also contains Salicylic Acid which is a source of defense. Its presence is what will allow your Willow Water to protect your cuttings from threats like infection from bacteria and fungi.

Willow trees as a natural plant are known for their rapid growth, largely because of the high quantity of these components. And it is because of them that Willow Water is such an effective tool in getting your shrub trimmings to take root and grow.

If you have access to a willow tree, you can make rooting hormone any time you need it for its beneficial effect – throughout the year. However, there’s a good reason your willow water will be strongest in the springtime.

The fresher the growth of the trimmings from the willow branch you use – the better! That is where the presence of the growth hormones is the strongest, and it will make your “potion” even more potent.


How to Make Willow Water Rooting Hormone

Willow Water Recipe

  1. Simply harvest the newest stems and twigs you can. Keep in mind that your Willow Water yield will be approximately three times the volume of the trimmings you pull. So, if you are hoping to make three cups of rooting hormone, you’ll want to gather around a cup of trimmings. Want pruning tips to correctly take cuttings from shrubs and plants?

    Natural Willow rooting hormone is ideally made from the newest stems in Spring.
    Natural Willow rooting hormone is ideally made from the newest stems in Spring.
  2. Break down your trimmings before soaking, in order to release their essence. You can do this by removing the leaves and cutting the stems and twigs into pieces one inch or smaller.
  3. Or you can do this by breaking and crushing them with a hammer. Either way works. Just keep the willow bark on, no need to remove it!
  4. Once cut up, put your trimmings in a glass container or Mason jar with boiling water. You are looking for a two to one ratio here. So, again, if you have around a cup of willow trimmings, add two cups of boiling tap water to your jar.

    Plant cuttings sitting in homemade rooting hormone
    Set cuttings from shrubs into this natural rooting hormone solution for root growth.
  5. After the water is added, let the water cool a bit so you can handle the jar. Set it in a safe location where it can catch sunlight for two to three days.
  6. Once your jar is done steeping, filter out your trimmings with a sieve or strainer before using or storing your Willow Water. Fix with a tight-fitting lid to keep it fresh.


How to Use Willow Water

Use this DIY willow water mixed 1 to 1 with fresh water to soak cuttings in liquid when you want them to make roots. Alternately, you can simply dip the plant cuttings into the water before setting them in the earth. You can also use another growth medium like peat moss, perlite, or sand.

I like to plant the rooted cuttings close together (basically in a nursery bed) for the first year instead of planting in their final spot. This way, I can keep a closer eye on the plants, make sure they are settling in well and I can feel confident they are going to grow well.

Store any unused Willow Water in a cool, dark place. If you want other rooting recipes, take a look at these 7 recipes for homemade rooting hormone.

If you don’t want to go to the trouble of making your own rooting hormone, we can recommend a really good rooting gel that you can buy – you can get it on Amazon. It’s called TechnaFlora Rootech Cloning Gel.

Rootech Gel
This rooting hormone gel works great as an alternative to making your own.

This one is our favorite commercial rooting hormone, by far. We used it when we started growing a laurel privacy hedge from cuttings. You can read through the step by step process of starting a hedge from cuttings right here. 


Use this DIY hack to make willow water when starting new cuttings!

More Useful Articles

  • Learn to take cuttings from established hedges, shrubs and plants – tips are right here!
  • Looking for more Gardening Tips? Here’s an article with lots of information found on our site.
  • Here’s just how to care for pruning shears so they last for years!
  • Dealing with overgrown shrubs in an overgrown yard? Use these hacks to get your yard and garden in shape.
  • Learn more about willow trees here.


Cuttings sitting in Willow Water to grow roots
This willow water solution is the perfect way to naturally protect new shoots or propagating plants!


Originally published September 2021; latest update November 2022

Filed Under: Gardening

Ultimate HP Sauce Recipe -Homemade Condiment

By Annie

This HP Sauce recipe makes 15 half pint jars. Also known as A1 steak sauce or Brown sauce, this condiment is perfect for savory foods!

We love this homemade HP Sauce recipe! I make some every year, water bath can the full mason jars and then store them in my food pantry. Perfect on steaks and roasts, this brown sauce adds a delicious flavor to tomato dishes.

HP Sauce in a mason jar and a dish ready for brushing on meat.
HP Sauce recipe that is the perfect condiment for steaks, meats and savory foods.

Here’s how to make your own home made HP – invite a friend to spend an afternoon chopping and cooking, open a bottle of red wine, have a wonderful visit, make this ultimate condiment and split the rewards.

This recipe with plums, apples, onions and spices has earned its spot on my once a year canning list.

HP Sauce Recipe and Canning Instructions

I’ve got the detailed recipe here for you – plus, the water bath canning procedure to safely preserve the Brown Sauce in jars. This will allow you to store your jars in the pantry or kitchen cupboard. But first, a bit more info about this much loved condiment.

What is HP Sauce?

HP Sauce is a condiment that is used in many dishes. Popular in the United Kingdom (UK), Canada and other parts of the world, it is a favorite for brushing onto grilling meats. It is often used as part of a full English breakfast.

The original brown sauce recipe was created by Frederick Gibson Garton in Nottingham in the late 1800’s and was used in the kitchens of London’s Houses of Parliament. For years it was a closely guarded secret recipe for this distinctive sauce.

You can find it sold by the bottle – glass, not plastic. Product packaging includes a drawing of the Houses of Parliament on the label.

The commercial manufacturer is Heinz and it is made in Holland. You should be able to find it where you buy groceries, or at a speciality convenience store.

It can be either tart or sweet or both, depending on the ingredients. Commercial HP sauce has glucose-fructose syrup, rye flour, malt vinegar, spirit vinegar, barley, tamarind extract, molasses, artificial colours, artificial preservatives and artificial flavours.

(Our homemade recipe has none of these ingredients.)

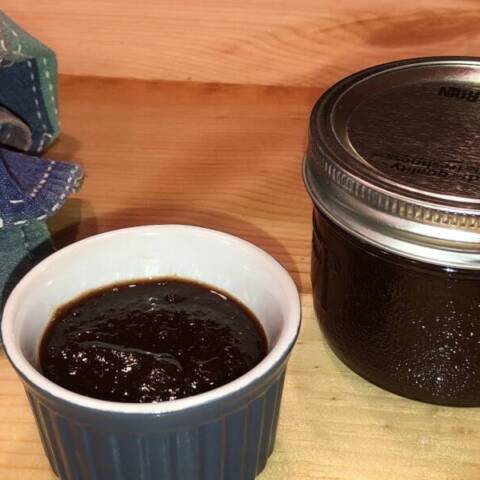
A small bowl of HP sauce on a wood table.
Don’t lose this recipe! Just pin this to your Pinterest board.

What does HP Sauce taste like?

HP Sauce is so good! It is so flavorful; it’s spicy with fruity tones along with a zing of vinegar. It’s thick, but not as thick as ketchup. You can thicken it to whatever consistency you like, just let it cook longer. The longer it cooks, the thicker your sauce will become.

Does HP Sauce need to be refrigerated?

Because of the vinegar in the recipe, Hp sauce does not need to be refrigerated. However, we do keep ours in the fridge after we open the jar. Of course, if you follow the canning recipe below, your sealed jars are perfectly safe in your cupboard or kitchen pantry.

Wondering what HP Sauce is used for?

HP Sauce Uses

There are many ways to use it!

  • Brush onto grilling meats like sausage, steaks, bangers, chicken or heartier meat dishes like pork pies.
  • Use for marinating steaks.
  • Add to tomato based dishes such as Bolognese sauce.
  • Brush onto vegetables grilling on the barbeque. 
  • Add to white rice instead of soy sauce.
  • Adding to casserole ingredients before baking (especially good with cheese)
  • Add to your crockpot of baked beans.
  • Delicious to add to baked beans over toast.
  • Use as a spread for a tomato and bacon sandwich.
  • Use in stews, soups and gravy.
  • A dollop of HP goes great on baked potatoes and chips (french fries).

How to use HP sauce for steak?

Use HP sauce for steak the same way as you would with any other kind of meat. If you are grilling steak, cook one side and when you turn the steak over to cook the other side, simply brush the sauce over the meat.

Use a little or a lot – if you like this sauce, you just cannot use too much!

HP Sauce Substitutes:

There are several different kinds of steak sauces available at your grocer. But, they are not the same! 

These may be good, of course, but they are not the same – in taste, brand or flavor:

  • A-1 sauce
  • Branston sauce
  • Brown sauce
  • Heinz original steak sauce

HP vs A1 Sauce

Hey, it’s totally a matter of preference. We enjoy A1 sauce, but we like HP Sauce more. All I can say is we’ve converted a few A1 diehards over to our homemade HP!

HP sauce is a favourite with Canadians and of course, English folks!

HP Sauce Ingredients:

I always make my sauce in late July, as that is the only time of the year I can find prune plums locally. Sometimes, the grocery store doesn’t even have those. So I have made my sauce with red plums – it tastes a little bit different, but is still really so very good!

Another year, I couldn’t even find red plums locally so I resorted to making this condiment recipe with yellow plums. It tasted delicious and had more of a caramel color.

  • apples
  • prune plums
  • red onions
  • malt vinegar or cider vinegar (better than using white vinegar)
  • Worcestershire sauce (Lea & Perrins)
  • spices
  • salt and pepper
  • sugar

Made with the highest quality ingredients, this recipe is suitable for vegetarians and those with diet restrictions. This recipe makes about 15 half pint jars of HP Sauce.

HP Sauce in a dish ready to be brushed onto meat.


Let’s get started!

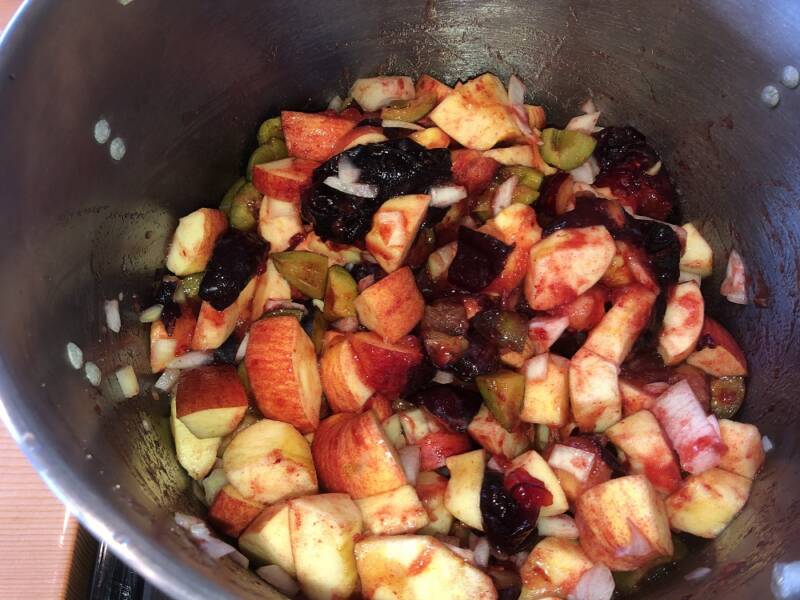
Cut the apples, plums and onions into fairly small pieces. When preparing the apples, I cut each apple into 4 pieces and core them but I don’t bother to peel them.

Because I will use a sieve, that will take out all the peels. With the plums, I just cut each plum into small pieces, leaving me with just the pit.


HP Sauce recipe starts with cooking apples, plums and onions until soft.

Place the fruit and chopped onions into a large stockpot and add just enough water to prevent any scorching, about 2 cups of water, no more. 

Bring to a boil, turn the heat down and let it cook on medium heat until the fruits and onions are softened. Stir fairly often as you don’t want any scorching on the bottom of the pot. Reduce the heat and let it simmer.

Once it’s cooked through and all the fruit is softened, you can use an immersion blender or a potato masher to start breaking down the fruit. Let it continue cooking for another half hour on a low heat.

Using the Sieve or Food Mill

Get your sieve ready and fill part way with the cooked fruit. Press the pulp through the sieve, emptying into a large cooking pot. Really work that pestle and push as much pulp as you can through the sieve.


Authentic HP Sauce after putting through food mill
HP Sauce on the left, all the peels in a bowl on the right!

Left behind in the sieve will be all the peels from the fruit. Discard that, add it to your compost or even better, feed it to your chickens, they will love it!

Thickening Homemade HP Sauce

Set your pot on a medium heat, and add the vinegar. Then add all the seasonings and sugar. Boil this until it becomes thick. You will need to stir it regularly and it will take several hours to reduce and thicken.

Adjust the heat, lowering it as needed and let it continue to reduce down and thicken. Scrape the sides with a spatula if needed.


A1 Sauce simmering on stove before canning in jars
A1 Sauce, HP Sauce – whatever you call it, it’s a delicious condiment for savory food.

Look at the color difference after a couple hours of simmering on the stove! It’s beginning to thicken nicely and it’s almost ready to taste!

After an hour, taste the sauce to see if it is to your liking. We found the taste changed quite a bit as it cooked down, so keep that in mind.

HP Sauce in half pint jars ready for canning

By the end of the afternoon, we had taste tested the sauce several times and enjoyed a nice glass of homemade Rhubarb wine! Once the sauce is reduced to the thick consistency you want, turn your stove down to Low and get out your canning jars for the next step!

Note: Only store in the fridge, enough jars that you will use up in 2 or 3 weeks. The rest of the HP Sauce needs to be water bath canned for safe preservation.

How to Can Homemade HP Sauce

I like to can this homemade brown sauce recipe in half pint mason jars. You can certainly use pint jars if you wish, (can for 20 minutes) and if you have a larger family, this might be your best bet.

This condiment will easily last 3 weeks in your fridge, once the jars are open. Ours never lasts that long because we use it so much!

Fill the water bath canner with enough water to completely submerge the jars. Turn this water on to boil and meanwhile, wash the canning jars and use tongs to set them inside the boiling water. Leave them there for 15 minutes to sterilize the jars.

Meanwhile, heat some water on the stove and add the canning seals. You don’t need to boil the water but make the water hot and leave the seals in the hot water until needed.

Filling Canning Jars

Remove the jars for filling. Use a canning funnel and a ladle to fill your jars. Canning funnels make a messy job a lot tidier. And this thick sticky sauce loves to stick to the jar rims! 

Leave a 1/4 inch of headspace in each jar. After filling, use a wet clean dishcloth or paper towel to wipe around the rim of each jar. If you don’t do this, and there is a bit of sauce on the rim, the canning lid will not be able to seal properly.

Wipe each rim, add your seal and screw on the ring finger tight. Your jars are ready to go into a boiling water bath for 10 minutes.

Once the hot water has come up to boil, set your timer. Process half-pint jars in a water bath canner for 10 minutes, depending on altitude.

Up to 1000 foot elevation, 10 minutes. Between 1001 – 3000 feet above sea level, add another 5 minutes. So I will be processing for 15 minutes, as we are at 2850 foot elevation level.


Add this HP Sauce recipe to your seasonal canning calendar!

Give this recipe a try; you may love it so much, you’ll never buy a1 sauce or any of those other steak sauces again!

Small jars of this sauce make a perfect gift for your favorite chef, too! Don’t have time to make a batch?

Here’s where you can buy the brand name HP Sauce  – made by HP Foods.

More Recipes for You

This home made Rhubarb Wine recipe is a great way to use a large rhubarb harvest.

Here’s the very BEST Salsa recipe around! Canning instructions too.

The perfect Pickled Beets are a treat on a pickle tray or included in your dinner recipes.

Want a sweet sauce? Here’s a Mango sauce you will want to try.

HP Sauce in a mason jar and a dish ready for brushing on meat.

Ultimate HP Sauce Recipe -Homemade Condiment

Yield: 15 half pint jars
Prep Time: 30 minutes
Cook Time: 3 hours
Additional Time: 10 minutes
Total Time: 3 hours 40 minutes

The perfect condiment for steaks, roasts and savory foods, HP Sauce is a traditional English favourite. Also known as A1 sauce or Brown Sauce.

4.7 Stars (12 Reviews)

Ingredients

  • 4 pounds apples, chopped
  • 4 pounds prune plums, chopped
  • 2 large onions, chopped
  • 3 pints malt vinegar
  • 1/4 cup Worcestershire sauce
  • 2 tsps ginger
  • 2 tsps nutmeg
  • 1 tsp cayenne powder
  • 2 tsps allspice
  • 1/2 cup salt
  • 4 cups sugar

Instructions

  1. Cut apples into pieces, removing the core.
  2. Cut prune plums into pieces, removing the pit.
  3. Chop onions.
  4. Put these ingredients into a large stockpot and add just enough water to prevent any scorching on bottom of pot. I used 2 cups water.
  5. Bring to a boil, then simmer until ingredients are soft.
  6. Use an immersion blender or potato masher to begin crushing the apples and plums.
  7. Once soft and cooked, press this through a sieve. Press hard to remove as much as possible. Press into a large cooking pot.
  8. Set aside the pulpy skins.
  9. To the sauce, add the vinegar, seasoning, sugar and Worcestershire sauce. Stir well.
  10. Bring to a boil, then reduce to a simmer. Let this mixture thicken (will take a couple of hours).
  11. Once thick, ladle into canning jars. Leave 1/2 inch headroom, add seal and ring.
  12. Water bath can the jars for 10 minutes (up to 1000 ft elevation). Above 1000 ft, boil jars for 15 minutes.
  13. Using canning tongs, remove jars and set on a thick towel on the counter. Leave alone for 24 hours.
  14. After the 24 hours, check each jar that it has sealed. Unsealed jars can be water bath canned again or placed in fridge to use within 3 weeks.

Notes

You can use half pint or pint jars for your Brown Sauce.

Nutrition Information:
Yield: 240 Serving Size: 1
Amount Per Serving: Calories: 63Total Fat: 0gSaturated Fat: 0gTrans Fat: 0gUnsaturated Fat: 0gCholesterol: 0mgSodium: 242mgCarbohydrates: 15gFiber: 1gSugar: 13gProtein: 1g

Did you make this recipe?

Please leave a comment on the blog or share a photo on Pinterest

© Annie
Cuisine: American

HP Brown Sauce in small jars


Originally published Aug, 2021; latest update Feb, 2026

Filed Under: Recipes

Raising Heritage Chickens in the North

By Annie

Heritage chickens are perfect for northern climates! Here are some of the best heritage dual purpose birds.

Want to get some backyard chickens? Here’s something worth considering if you live in cold winter climates – look into heritage chickens. They are naturally more suited to cold winters than breeds like Cornish Giants or Polish.

Do some research as to your weather conditions, how harsh your winter is and how much natural vegetation you have in season. What about housing for chickens? Do you have an insulated chicken coop?

Heritage Chickens outside in winter snow
These heritage chickens are well equipped for northern climates and cold winters.

Then get some heritage breed chickens! They know how to forage and they are used to being outdoors year round.

Benefits of Dual-Purpose Breeds of Heritage Chickens 

Dual purpose birds are an excellent addition to the homestead as they serve multiple purposes. Dual purpose chickens are often used for homesteaders who want to have a bird that has enough meat to make it worth eating, but also lays enough eggs to make it worth keeping them around for a couple of years.

Heritage breeds of chickens are a great way to support conservation. This prevents older and more standard breeds of chickens–like the ones that were popular in the mid-20th century but have become in danger of extinction–from falling off the radar in favor of hybrids.

These breeds were denoted by the American Poultry Association starting in the late 1800s and early 1900s. True heritage eggs can only be produced by any American Poultry Association standard breed.

What Makes a Heritage Chicken?

Most APA heritage chickens have a moderate or slow growth rate, which typically means reaching the breeding market weight in 16 weeks. These birds must come from mating pairs of both grandparent and parent stock. Breeding hens should be productive for 5-7 years and roosters for about 3-5.

When it comes to egg production, these types of birds will lay more eggs than a meat-only chicken, while having more meat on their bones than an egg-laying chicken.

Raising dual purpose birds helps you maintain a self-sustaining flock of birds, because so many of them are good brooders and great mothers. This means they hatch a good number of chicks that in the end, means more chickens for your backyard.

Dual purpose chickens can free range, provide meat, and provide eggs without needed separate housing options for multiple types of birds.

Are cold hardy heritage chickens generally good foragers and free rangers?

Yes, cold hardy heritage breeds are generally good forages and free rangers. Heritage breeds were the norm on farms right up until the Industrial Revolution. You’ll find that the cold hardy heritage breeds of chicken are good foragers, meaning they will find their food in the yard easily plus they’re great at free ranging.

A heritage breed chicken must have the genetic ability to live a long vigorous life and thrive in the rigors of pasture based feeding. These chicken breeds are known for their good skeletal structure and healthy organs, which makes them hearty and great for egg laying as well as for meat production.

Heritage Chickens in a snowy field.
These breeds are ideal for cold weather and are excellent when it comes to laying eggs and also producing meat.

Heritage Chicken Breeds Best Suited for Cold Climates

Below are some of the chicken breeds that are best suited for cold climates. Learn more about each breed to determine which type of chicken is best suited for your homestead.

Top Heritage Chicken Breeds for Winter Climates

More information on each chicken breed is below, but here’s the list of top chicken breeds for northern homesteads:

  • Buff Orpington
  • Barred Plymouth Rock
  • Rhode Island Reds
  • Silkie Bantams
  • Australorps
  • Brahmas
  • Icelandics
Buff Orpington breed of heritage chicken
The heritage chicken breed Buff Orpington chicken – perfect for eggs plus a great sized roasting chicken.

Buff Orpington

The Buff Orpington chickens are very docile and friendly. This chicken breed does well in hot and colder climates. Many families use this breed for 4-H since they are tolerant of hyper and curious human children. They make great broodies and mothers, too!

Barred Plymouth Rock

These mellow chickens do well in most temperatures but they may need some attention to their large combs and wattles if you have Barred Plymouth Rock roosters in colder climates.

These chickens have been known to live 10-12 years, so they make for a long-lasting chicken to have at the homestead.

Rhode Island Red is a breed of heritage chicken
Rhode Island Red rooster, essential if you want chicks.

Rhode Island Red

These dual purpose chickens were created by poultry farmers in New England. These birds aren’t very quiet and while they are friendly, they can be rather pushy at times.

The Rhode Island Red chickens were originally bred to be dual purpose birds, but since have been bred more for egg laying.

Silkie Bantams

As long as you don’t have the Silkie Bantams that have been bred to be show girls, this chicken breed does well in the colder climate regions of the world. They are great mothers and will often lay on other chicken’s eggs to help with them!

While they can be used as a dual purpose bird, they’re not the most popular option for meat. There are other heritage chicken breeds that are much larger than these.

Australorps

This chicken breed is heavier than other chickens that live in colder climates. The Australorps are similar to the Orpington chickens, but more of an Australian twist on the breed. This is one of the highest egg producing chickens out there! They lay beautiful white eggs.

A Brahma chicken free ranging on grass.

Brahmas

Brahma chickens are rather large in size and can do well in colder climates. Brahmas are dual purpose chickens that do well for meat and are excellent layers, yielding medium to large brown eggs.

This chicken breed is docile and friendly, making them a great addition to any homestead family. This breed is named after a river in India, but most breeders now agree that this breed was actually developed in America.

Icelandic

Icelandic chickens are one of the few that lay well during winter. The chickens are on the smaller size, with roosters weighing in around 5 pounds and the hens less than that. These are a great choice for raising chickens in northern climates.

Icelandics are great at foraging and they also excel at being broody, which should mean lots of chicks for you.

Some other great heritage breeds are Black Minorca, Blue Andalusian, Speckled Sussex, and Ancona.

Which heritage chicken breeds do best in North America’s colder climates ( as in -40F)?

The Barred Plymouth Rock and Australorps are the two favorites for North America’s colder climates, but all of the chicken breed listed above will fare well in colder temperatures. Just make sure they have a shelter to go in when they need a little cold weather break! 

A well insulated chicken coop is important! Chickens will huddle close together when it is cold out, so you may get away with an unheated chicken coop. 

However, it needs to be well insulated and have a good thick layer of hay or straw on the floor for them. 


Tip: Instead of cleaning the coop floor weekly, simply add more hay or straw. 

This ends up adding more insulation to the coop. In spring, as temperatures warm considerably,

take a day to clean the coop.


Heritage Chickens – Which cold hardy chicken breeds are the best egg layers?

There are a few hardy breeds of chickens that will lay eggs year round and do so pretty consistently. The best hardy breeds that lay eggs and survive in cold weather temperatures are:

  • Australorps
  • Icelandics
  • Buff Orpington
  • Plymouth Rock

Here’s how to know if your chicken is a rooster or a hen!

Heritage Chickens are perfect for northern climates, making it easier to raise and keep chickens, even in hard winters.


frozen chicken being thawed for cooking

How to Defrost Chicken Fast

gifts for chicken lovers

Great Gifts for Chicken Lovers

Chicken Questions and Answers

Chickens cleaning up a garden bed after harvest.

Bored Chickens? Put Your Chickens to Work!


Heritage Chickens in the barnyard
Raise one or more of these heritage breeds to yield chickens that will lay eggs for long periods of time or produce great amounts of poultry to eat!


Originally published 2016; updated November 2022

Filed Under: Raising Chickens

How to Save Pea Seed for Planting Next Year

By Annie

You can easily save pea seed to plant next year! Here’s how…

Who doesn’t love to eat fresh garden peas? There’s nothing like snapping a ripe pea pod right off the vine, opening the pod and grabbing a handful of peas to eat.

Peas are so easy to grow and it’s also really easy to start seed saving to sow the following year. 

Save pea seed by shelling and drying
You can save pea seed from any of your pea pods!

We grow lots of sweet peas so we will have lots for eating later on; they are one of our favourite vegetables. And that’s what you should grow too – your family’s favourite vegetables!

Anything from green beans and tomatoes to snap peas and snow peas! Fresh veggies are great for soups, salads, stir fries, and other meals.

You can even grow your own herbs for fresh flavors in your favorite dishes. That way you won’t have to buy them during the winter months. But we like peas especially!

Blanching and then freezing bags of garden peas to enjoy during the winter is a great way to preserve peas. The peas will have that freshly picked flavor even in the dead of winter.

Here’s another great idea – saving your own sweet pea seeds. So whether you grow enough peas only for fresh eating or lots of rows of garden peas so you can preserve some for later, always remember to grow extra pea plants so you will have enough to save pea seed at the end of the gardening season. Here’s how to never buy pea seed again!


How to Save Pea Seed

First, be sure you use heirloom seed. You can buy heirloom seeds online, through an online garden nursery or at the local garden center. Plant your peas (here’s everything you need to know about how to grow peas) in good soil.

Peas are a great choice if this is your first attempt at seed savers, since peas will produce their seed the same season they’re planted and are also largely self-pollinators! No need to worry about potential cross-pollination. Plus, peas are easy to take care of and can also fix nitrogen levels in the soil.

You will need to have trellis, fencing or something like this garden netting for them to grow up as they love to send out little tendrils to grab onto whatever they can find, in order to grow taller. You can also use chicken wire.

After your pods fill with peas and you have started harvesting, just leave some pods on the vines to keep growing. These will become your seed for next year.

What’s the Best Way to Dry Pea Seed?

Save pea seeds drying in a shallow tray
It’s so easy to grow and save your own peas!

There are a few ways to dry pea seed. The very best way is to do it naturally. The ideal thing would be to just let the peas dry naturally on the vine in your garden.

They can stay on the pea shoots for months. When they become dry and brown, carefully pick off the mature pods into a small bucket or basket.

Transfer to a paper envelope, seal and store in a cool place until next year. Remember to label them with the variety name.

Tip: Keep an eye on the pods! You don’t want them to mature so far along that the pod starts to split and the peas begin to spill on the ground.

Garden peas growing along a fence.
Blooming pea vines grow up the garden fence.

Sometimes letting them dry on the vine just won’t work for your situation. Maybe you’re trying to free up garden space. Maybe a later maturing vegetable needs to go in right in the spot where the peas were growing.

Peas are such a nice early season veggie that you CAN easily plant something after the pea harvest.


Can I Dry Fresh Peas?

Yes you sure can! When we aren’t able to just leave the vines on the pea fencing,  here’s how we save our seed. I pick all the pods that look fairly dry and also pick some that are still green but starting to dry out.

Pea pods drying on a tray
Some of these pods are dryer than others, but all of these will be saved for seed.

I bring them in the house and spread the pods out on cookie sheets. Then I give them a stir with my fingers when I walk by. Instead of cookie sheets, you could just use a shallow bowl or even a basket.

Find something to use where you can spread the pea pods out without them piling on top of each other. Keep the pea pods in a single layer to help keep the pods away from each other. You don’t want them touching each other.

Dried pea pods ready for shelling
These dried pea pods are ready now for shelling.

Days later, here is what those pea pods look like. You can see how dry the pods are getting. Just keep letting them dry until the pods are completely dry.

Then, shell the pods. I just do this by hand, but if you had a lot to shell, why not thresh them instead? Just put the pods in a pillow case and smack it against a wall. This will help separate the peas from the pod. Remove the pods and save the seed.

Shelled dried peas on a tray
These partially dried peas won’t be store away for another week, when they are completely dried.

Just because the pea pods looked dry, that doesn’t always mean the actual peas inside are thoroughly dried enough to put away for storage.

Here are the peas after threshing; they are not dry enough yet. So, I will leave them here on the cookie sheet longer and let them dry more.

This could take a couple of weeks and you are always better to let them sit out longer rather than a shorter amount of time. It’s OK if they are very pale green or even, no longer green at all.

Storing Pea Seed

Then they get put into a seed envelope, labelled with their name and the year the seed was gathered. I keep my seeds downstairs in the cool basement. Next year, I bring them up and plant them in the garden!

Chicken dinner with garden peas
Japanese Chicken is a special treat for us along side garden peas.

Want to learn how to blanch and freeze garden vegetables? We love having garden peas alongside our Japanese Chicken – delicious!

This variety of shell pea is called Bounty and they taste wonderful, whether eaten fresh or frozen. Never buy pea seed again – save your own pea seed instead! The only thing to remember is to buy heirloom seed in order to start saving your own seeds.


More Helpful Posts

  • Looking for more Gardening Tips – plus links to our vegetable gardening articles!
  • Everything you want to know about How to Grow Peas in Containers or Garden is right here. Finally! A Food Garden Planner that has everything you need!


Start to save pea seed this year and never have to buy more again!

Stop buying seed - save your own pea seed. Here's how to save heirloom seed. #gardening #seed #heirloomseed #DIYgardenideas
This quick and easy guide will get you started on growing and saving your own pea seeds in no time!

Originally published 2017; last updated October 2022

Filed Under: Grow Your Own Vegetables

DIY Farmhouse Rope Candle Holder

By Annie

You’ll love this DIY farmhouse rope candle holder craft idea! Perfect for the tabletop in the entry hall or on your country porch.

Here’s a pretty way to spruce up your country home decor – this easy DIY craft project can be made in no time at all. You can make it in an hour and then you will have this roped candle holder to add to your farmhouse style decor.

Plus, they go perfectly with these DIY chalk painted mason jars to add just the right touch.

Farmhouse rope candle holder with holly and berries on a slab of wood.
f Create a vintage style statement with this DIY farmhouse rope candle holder.

All the supplies can be purchased online or you should be able to find what you need at the Dollar Tree or craft store in your area. Add your own extra personal touch with some greenery, a wood slab or some country style accents for rustic charm.


DIY Farmhouse Rope Candle Holder

Roped Candle Holder on a wood slab


Farmhouse Candle Holders Supplies:

Supplies to make roped candle holder
Here’s what you’ll need to create your own diy farmhouse candle holder.
  • Tall cylinder vase
  • Jute Rope
  • Cotton Rope
  • Glue gun
  • Scissors
  • Pillar Candle

Note: You could use hemp rope instead of jute if you like.

The very first thing to do is assemble all your supplies. Plug in your glue gun to let it heat up. Always be careful when handling a glue gun!

Think about how high on the vase you want the rope to be. Take a look at the photo further down to get an idea of how high I went with the wrapped rope.

You may want to wrap the rope only a few times – depends on the look you’re going for!


Wind rope around the candle pressing it into the glue.
Begin wrapping the rope around the candle holder – work fast before the glue dries.

Unwind some of your jute rope and grab your hot glue gun. Start by applying a thin line of glue along the bottom of the vase.

Immediately start wrapping the jute rope over top the glue, going all the way around the vase. You will need to work quickly because the glue will start to dry fast once it has been applied to the vase.

Glue rope to vase with glue gun
Put hot glue on the cut end of rope so it won’t ravel.


Keep applying thin lines of glue and wrapping the rope around the vase to the desired height is reached. Cut the rope and cover that cut end well with hot glue to prevent it from raveling. 


Wrap once around with cotton rope, then cut using scissors.
Use sharp scissors to cut the cotton rope after wrapping.

Next wrap one time around the vase with the cotton rope. Cut the end and immediately cover the cut end with hot glue to prevent raveling.

Decorating your candle holder

Now it’s time to style your farmhouse candle holder however you like!


Finished rope wrapped candle holder on table.
Add greenery of your choice according to the seasons.

I’ve set a thick scented vanilla pillar candle inside the vase, then set it on a wood slab that still has its live edge. You can get these wood slices online.

Another way to display the roped candle would be to set it on a heavy galvanized metal candle holder!

Here’s my top picks for the best scented candles!

Farmhouse candle holder on a table
These candle holders would look lovely as wedding table centerpieces.

I added some greenery I got at the Dollar store and voila! Here it is. I can even change up the greenery and wood base according to seasons.

I think holly with its red berries would look great wrapped around the base for Christmas time.

I’m going to make more of these so I can have several different sets of these pretty farmhouse candle holders. They will look great along with our old country lantern in our living room! I’d like to have a couple on the kitchen counter too and really tie it all together.

These candle holders would make a great vintage style statement for a country wedding, a summer barbeque or a family reunion. Why not make a few for your next gathering?

See how easy it will be to make this DIY farmhouse rope candle holder? These would look great with a beach or coastal theme too!

If you’re looking for some country home decor inspiration, take a look below!

More Farmhouse decorating crafts and ideas:

These DIY chalk painted mason jars add just the right touch.

Painting wood paneling can brighten up any dark room!

The very best ideas for your country porch!

Make some of these cute Mini Book Ornaments for your Christmas tree.

Looking for wedding decor ideas? Take a look


Are you signed up for our newsletters?

Want to find out which are The 5 Easiest Vegetables to Grow?

Available only to subscribers; join our Newsletter!

Filed Under: Farmhouse Decor & Crafts

  • « Previous Page
  • 1
  • …
  • 6
  • 7
  • 8
  • 9
  • 10
  • …
  • 53
  • Next Page »

Connect With Us!

  • Email
  • Facebook
  • Instagram
  • Pinterest
  • Twitter

Search this site

Generic selectors
Exact matches only
Search in title
Search in content
Post Type Selectors
Search in posts
Search in pages

Our Most Popular Posts

Garlic cloves in oil

How to Preserve Garlic in Oil – and Other Ways to Store Garlic

a open jar of pickled brussel sprouts on a counter

Easy Pickled Brussels Sprouts Recipe (Water Bath Canning)

Privacy Policy

Read about our Privacy Policy

Disclosure

Please note that some of this site’s links are affiliate links, and CountryLivinginaCaribooValley.com is a participant in the Amazon Services LLC Associates Program, an affiliate advertising program designed to provide a means for us to earn fees by linking to Amazon.com and affiliated sites. At NO ADDITIONAL COST TO YOU, I will earn a small commission, if you purchase them. I recommend them as they are good products.

Theme Design By Studio Mommy · Copyright © 2026