Country Living in a Cariboo Valley

Homesteading in BC

  • How to Get Started
  • Vegetable Gardening
  • Preserving Food
  • Recipes
  • Homemade Wine Recipes
  • About Us
  • Work With Me
  • Shop
    • Vegetable Garden Planner Printable: Grow Your Best Garden Ever
    • Grow Enough Food for a Year
    • Delicious Dandelions: A Recipe Collection
    • Dirt to Dollars: Selling at the Farmers Market
    • 8 Pounds in 8 Weeks: Raising Chicks for the Dinner Table
    • Making Wild Wine
    • Build a Hanging Chicken Feeder
    • 15 Things to Know About Living in the Country

Pickled Asparagus – Recipe

By Annie

This recipe for Pickled Asparagus is so simple but yields delicious results every time!

Great for serving on an appetizer plate or in a Caesar or Bloody Mary as a garnish, these Pickled Asparagus Spears are a real treat. These are zingy, snappy and crunchy awesome!

Jar of asparagus in pickling brine with garlic and pepper.
These asparagus pickles are a fun twist on the classic pickle and have so many delicious uses!

Why You’ll Love this Recipe

Asparagus may seem like a strange choice to pickle, but once you try this recipe you’ll be changing your tune! If you like asparagus, this recipe is for you. That delicious green flavor infused with dill, cayenne pepper, garlic, and more is absolutely delicious.

You can use a pickled asparagus spear in drinks in place of celery stalks for a burst of flavor, or serve them with appetizers to impress your guests!

Simple to make and easy to store, this pickled asparagus recipe is something you’ll revisit over and over!

Pickled asparagus makes a healthy snack, full of vitamins and fiber.

How to Make Pickled Asparagus

(Note: 1 pound of Asparagus makes 1 pint jar, with asparagus left over!)


Ingredients for pickled asparagus on a cutting board.
With just a few ingredients, you can pickle your own asparagus. So simple and hassle-free!


  1. Harvest 1 pound of fresh asparagus. Have one whole cayenne pepper on hand.
  2. Put the pickling ingredients (cider vinegar, coarse salt, sugar) in a saucepan and bring to a boil on the stove, using medium heat. You can use white vinegar instead of cider vinegar if you like. Give this mixture a good stir while it is on the stove. Once it has boiled, remove from stove and let it cool.
  3. Into your clean jar, add 2 or 3 garlic cloves, along with the dill weed and pickling spice.
  4. Now pack in your asparagus spears, nice and tight.

    Asparagus stalks upright in a mason jar on a cutting board.
    Be sure to trim your spears down so they stand up nice and straight and you can pack them in tight!
  5. Then add your cayenne pepper, making sure you can see it from the outside of the jar. It adds such a nice pop of red colour to those bright green spears.
  6. Using a canning funnel, pour the cooled pickling liquid over the spears. Wipe the rim of the jar, cover with a canning seal and tighten the canning ring.


How to Trim Asparagus Spears for Pickling


Asparagus spears cut in half on a cutting board.
Use this easy method to measure how tall your asparagus spears need to be to fit in the jar.


  • Hold a spear up against your jar so you get a rough idea of how much stalk to cut off.
  • You want them to be standing up in the jar – it looks so nice this way! Put one spear right in the jar to see how much further trimming you need to do. Then use that one spear as a guideline for cutting the rest.
  • The bottom of the Asparagus stalk can be nibbled raw, lightly steamed or turned into some delicious Asparagus Soup. Or, turn them into this delicious side dish – Garlic and Parmesan Asparagus.


Asparagus spears in a jar with all of the components for pickling.
In about 5 days these asparagus pickles will be ready to enjoy, but they’re even better if you give them a couple of weeks!

Tips for Pickled Asparagus

  • These Asparagus Pickles can be eaten after about 5 days, but are even better if you can leave them in the fridge for two weeks.
  • They will keep in the refrigerator for about 3 months, if they last that long. You may find they get eaten up pretty quickly!
  • To save some for the winter, just can them. Water bath can your Asparagus Pickles for 10 minutes – here’s how to do that!
  • NOTE: To make these shelf stable they MUST be canned in a boiling water bath.
  • For some extra heat and flavor, you could also include jalapeno peppers. Or, toss in an extra garlic clove!
  • If you don’t have any pickling spice on hand or can’t find it in stores, you can use a combination of these ingredients to achieve the same effect: dill seed, black peppercorns, crushed red pepper flakes, bay leaves, mustard seeds, allspice berries, coriander seeds, ground ginger, cloves, and cinnamon. Add/subtract ingredients to taste!


More Pickle Recipes

Our entire Country Living in a Cariboo Valley Recipe Collection can be found here, and here are some more pickled recipes!

  • Check out this guide on how to make and preserve Pickled Beets.
  • Pickled Eggs are another tasty and nutritious pickled food!
  • Forage young ferns and make a batch of Pickled Fiddleheads.
  • Make some easy Dill Pickles; this recipe has the canning instructions.
  • Another green vegetable, Pickled Brussels Sprouts are an interesting and delicious twist on the classic pickle.
  • For some information on how to use a pressure canner, you can also check out this post!


Pickled Asparagus Recipe

If you enjoy this recipe for asparagus pickles, please be sure to rate it 5 stars below! And print this off or save it to your Recipes folder!

how to pickle asparagus, perennial vegetables, vegetables, food

Pickled Asparagus

Yield: 1 pint jar
Prep Time: 15 minutes
Cook Time: 15 minutes
Total Time: 30 minutes

Crunchy and with a real zingy!
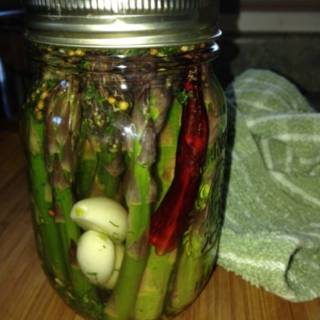
Ingredients

  • 1 lb Asparagus
  • 1/2 pint water
  • 1/4 cup cider vinegar
  • 3/4 tbsp coarse or kosher salt
  • 1/2 tbsp sugar
  • 2 or 3 cloves garlic
  • 1/2 teaspoon dillweed
  • 1/2 teaspoon pickling spice
  • 1 cayenne pepper

Instructions

  1. Combine and bring to a boil:
  2. water, cider vinegar, salt and sugar. Stir often.
  3. After the mixture comes to a boil, remove from the stove and let cool.
  4. Meanwhile, trim fresh Asparagus to a size where they will fit standing up in jar.
  5. Add garlic, dillweed and pickling spice to the clean jar.
  6. Pack Asparagus spears into the jar tightly.
  7. Add cayenne pepper to the jar.
  8. Pour cooled liquid mixture over spears. Wipe the jar rim and add a fresh seal. Tighten using a canning ring.
  9. Leave in fridge for at least 5 days to allow flavours to develop.
  10. Will store in fridge for up to 3 months.
  11. Water bath can the jar if you want to add to your pantry for long term storage.
Nutrition Information:
Yield: 8 Serving Size: 2 pickled spears
Amount Per Serving: Calories: 19Total Fat: 0gSaturated Fat: 0gTrans Fat: 0gUnsaturated Fat: 0gCholesterol: 0mgSodium: 664mgCarbohydrates: 4gFiber: 1gSugar: 2gProtein: 1g

Did you make this recipe?

Please leave a comment on the blog or share a photo on Pinterest

© Annie
Cuisine: American / Category: Recipes

First Published June 2017; Updated April 2021

Thanks for checking out this recipe. For more, follow me on Facebook, Pinterest, Instagram, and Twitter!


Filed Under: Recipes

Easy Japanese Chicken Recipe

By Annie

This easy Japanese chicken recipe is an easy and delicious meal that packs a lot of nutrients and will satisfy any cravings for Japanese flavors.

Chicken with rice, peas and sauce on a plate.
This easy Japanese chicken will become a staple for an easy dinner that’s bursting with flavor!

Why You’ll Love Easy Japanese Chicken

One of our favourite special dinners is when we make this Japanese Chicken recipe. It’s zingy and just dang delicious. If I have a lot of chicken pieces, I just double the sauce recipe.

The secret with this dish is to be sure to baste it several times. Since we raise our own chickens for meat, we often use our homegrown chicken for this meal.

When you’re craving sweet and sour chicken but don’t want to shell out an arm and a leg for takeout, this recipe comes to the rescue! Easy, tasty, and so adaptable, you’ll come back to this one over and over!


Ingredients

(Full list of ingredients listed in the recipe below.)

Cut chicken ready for coating with flour and egg.
Fresh chicken ready for cooking!
  • chicken – I use any type of chicken pieces for this dish. Breasts, thighs, whichever. If you use wings, cut them in half. This is one of our homegrown chickens – nice and big! I’m using drumsticks and thighs tonight.
  • egg
  • flour
  • butter
  • soy sauce – a classic sauce for making an Asian-inspired chicken dish.
  • water
  • white sugar – pairs well with the soy sauce for a sweet and sour kind of effect.
  • vinegar – puts the sour in sweet and sour!
  • salt

How to Make Japanese Chicken

Flour, egg, and chicken ready to be coated.
This simple coating gives your chicken a fantastic crispy exterior!

Directions

  1. Dip each piece of chicken in beaten egg. Then coat the chicken really well with flour on both sides.
  2. Fry in butter until deep brown and crisp, turn over part way through the frying time. We always use one of our cast iron deep frying pans. These Lodge cast iron pans are the best, hands down. Over 10,000 great reviews on them.

    Chicken frying in a skillet.
    Cook 10 minutes each side.
  3. Put chicken pieces in a shallow roasting pan and pour the sauce over top. I like to turn the chicken over several times before I pop the dish in the oven.
  4. Bake at 350 degrees for 1/2 hour, depending on the size of the chicken. I often leave the chicken in for at least 45 minutes, but our chickens are quite large.
  5. Baste the chicken or just turn it over several times, to let the sauce soak in. The more you baste, the better it tastes. You simply cannot baste the chicken enough.


Fried chicken in a roasting pan with lots of sauce.
Baste the chicken often while baking for a moist and tender result.


Recipe Tips and Variations

  • We like to serve it along with rice and some homegrown garden peas. This Japanese Chicken is a delicious dinner that everyone loves!
  • Two thirds of this meal is totally homegrown – we love knowing what we are eating. And it’s so satisfying knowing we can grow so much of our own food.
  • This chicken would also be great served over your noodle of choice.
  • For an even more holistic meal, fry the chicken with some vegetables! Peas, carrots, broccoli, green beans, peppers, snow peas, mushrooms, onions, and a whole assortment of other vegetables would taste delicious served with this Japanese chicken recipe!
  • You could even try this with another kind of meat like pork, the sauce in this dish is extremely versatile and works in a large number of recipes!


Japanese Chicken with sauce served along rice and peas
We love this Japanese Chicken recipe!


More Chicken Posts

Our entire Country Living in a Cariboo Valley Recipe Collection can be found here, and here are some posts that specifically deal with handling chicken and chicken recipes!

  • Check out this post on chicken farming 101 if you’re interested in learning how to raise chickens yourself.
  • Forgot to let frozen chicken come up to room temp? This guide will show you some ways to quickly defrost a chicken.
  • Easy Mediterranean Lemon Chicken is a delicious recipe that can be made with both homegrown chicken and herbs!
  • Another great recipe you can make with your very own chicken and vegetables is this Roasted Homegrown Chicken Dinner.


Easy Japanese Chicken Recipe

If you enjoy this easy Japanese chicken recipe, please be sure to rate it 5 stars below! And print this off or save it to your Recipes folder!

Japanese Chicken, sweet and sour chicken, dinner, recipe, food

Japanese Chicken

Yield: 4
Prep Time: 20 minutes
Cook Time: 45 minutes
Total Time: 1 hour 5 minutes

Like a Sweet and Sour sauce....but not. It's better. The flavour goes right through the chicken. Baste it several times. A mouth watering favourite at our house.

Ingredients

  • 3 lbs. chicken, cut up and skin on
  • 1 egg, beaten
  • 1 cup flour
  • 1 cup butter
  • 3 tbsp Kikkoman soya sauce
  • 3 tbsp water
  • 1 cup white sugar
  • 1/2 cup vinegar
  • 1/2 tsp salt

Instructions

  1. Dip in beaten egg and then cover them really well with flour.
  2. Fry in butter until deep brown and crisp, turn over part way through the frying time.
  3. Make a sauce with the remaining ingredients.
  4. Put chicken pieces in a shallow roasting pan and pour the sauce over top.
  5. Bake at 350 degrees for 1/2 hour, depending on the size of the chicken

Did you make this recipe?

Please leave a comment on the blog or share a photo on Pinterest

© Annie
Category: Main Course

First Published March 2017; Updated April 2021

Thanks for checking out this recipe. For more, follow me on Facebook, Pinterest, Instagram, and Twitter!

Tangy Japanese Chicken wings on a plate with sauce.
This take on sweet and sour chicken works with so many cuts of poultry and pairs well with any kind of rice or noodle!
 

Filed Under: Food, Recipes

Raspberry Vinegar with Honey

By Annie

This Raspberry Vinegar with Honey is a sweet and tangy mixture that’s a refreshing and delicious way to use raspberries. Make it into salad dressing or drizzle it on anything that needs a punch of fruity flavor!

Collage that shoes raspberries in a bowl, leaves, and a close up of raspberries.
This raspberry vinegar utilizes delicious honey to bring extra sweetness that plays nicely with the berry flavor!


Thanks so much to Annie for allowing me to do a guest post on her blog! I’m happy to be here and share the good things in life with her readers!

Why You’ll Love Raspberry Vinegar with Honey

Raspberries have been a favorite since childhood. Even as a little girl, I knew that when I had my own home, raspberries would be at the top of the list. Not only are the fruits delicious, but they grow well even in cold climates, which is a double-bonus for northern folks!

While I don’t own land (or a cottage) yet, I am part of a community farm with a wonderful raspberry patch, from which my man and I get a full harvest each year. I’ve been promised I can dig my own starts from these bushes when we do purchase land!

Oh yes, that excites me! And at that point, I’ll be refreshing my mind with Annie’s blog post on how to grow and care for raspberries!

In my mind, no summer is complete without these red, luscious fruits! When harvest season rolls around, I have a difficult time actually using them. A winter freezer without whole, frozen raspberries is like a bank account without money!

I usually talk myself into sacrificing half the berries for a few cordials, a batch or two of raspberry kvass, mini-jars of delicious jam and of course, raspberry vinegar!

With this fermented liquid, brilliancy of color is equally matched by brilliancy of flavor. And the salad dressing you can make with the finished product is lovely.

Because good things are meant to be shared, I’m going to share my favorite raspberry vinegar recipe with you today! The recipe makes approximately 7 cups of the finished product.

Both fresh and frozen berries are viable options. If using frozen fruit, be sure to thaw before beginning the process. Hint: making vinegar from frozen raspberries in early spring while snow blankets the earth is a wonderful way to curb the garden itch!

Bowl of raspberries in water.
These raspberries are so red and beautiful, and full of flavor!

Ingredients

  • 4 cups raspberries (x3)
  • 6 cups chlorine-free water (x3)
  • 1/2 cup raw honey
  • glass jar or bowl
  • 2 finely-woven cloths


How to Make Raspberry Vinegar with Honey

  1. Place 4 cups raspberries in a glass jar or bowl. Add approximately 6 cups water. Cover the mouth of container with a cloth and secure to keep fruit flies out.
  2. After 24 hrs have passed, place a second cloth in a colander and place colander over a bowl. Pour berries and liquid into cloth-lined colander, straining the liquid.
  3. Tie up the ends of cloth and hang from a kitchen cupboard, allowing juices to drip into the bowl for several hours.
  4. When dripping has ceased, toss berries or save for morning smoothies. Place another 4 cups of new raspberries in the container or jar.
  5. Take the strained, red raspberry water and pour over fruit.

    Raspberries dripping through cloth.
    Making this vinegar in multiple rounds ensures there’s plenty of punchy raspberry flavor.
  6. Let it also set for 24 hrs. Strain as instructed above and toss the old berries. On day 3, repeat the process by pouring twice-infused liquid over another 4 cups fresh fruit, once again letting it stand for 24 hrs. Strain liquid for the 3rd time.
  7. In a glass jar, bowl or in a crock, add 1/2 cup honey (crystallized or liquid), then add the deep red, raspberry-infused liquid. Come back 24 hrs later and stir honey. It will quickly dissolve. Be sure to cover the open-mouthed container with a cloth, tightly tying down to keep fruit flies out. The aroma of fermented fruit is certain to attract them!
  8. Vinegar ferments best in temperatures of 60-70F (15-21C). Let it sit without a lid for 2-5 months. When fermentation begins, you’ll see tiny bubbles on the sides of the glass.
  9. Several weeks later, it will smell slightly sour. The process to completion will take several months. Be aware that if you seal up vinegar while its still in the fermenting phase, pressure will build and explode glass jars and bottles!

Err on the side of caution: if you must seal it up, be sure to check for pressure 2 days later! If free from pressure build-up, vinegar is done processing and has gone “flat.” It’s delicious, ready to use immediately.


A bowl of raspberries and glass jar of raspberry vinegar.
The beautiful color from the raspberries transfers over to the vinegar!


Autumn Rose is an author, blogger and chronic Lyme survivor. She is passionate about bringing nutrition into her home and for this reason cooks from scratch, gardens and practices raw food preservation. She loves old fashioned living and leads what she refers to as the simple cottage life. Together, she and her husband are working to implement this lifestyle while saving to purchase land. There, they hope to build their own cottage and lead a life focused on what really matters most. Her tutorials, writing and musings can be found on her blog atraditionallife.com


More Sweet and Fruity Recipes

Our entire Country Living in a Cariboo Valley Recipe Collection can be found here, but here are some fruity highlights!

  • Homemade Lemonade
  • Chewy Coconut Cookies
  • Pumpkin Cranberry Banana Bread


First Published February 2017; Updated April 2021

Thanks for checking out this recipe. For more, follow me on Facebook, Pinterest, Instagram, and Twitter!

Filed Under: Food, Grow Your Own Fruit, Recipes

How to Make Pickled Eggs – Easy Recipe

By Annie

Here’s how to make Pickled Eggs – just store them in the refrigerator.

If you raise hens, come late Spring you may find yourself with a lot of eggs!

Whenever you have a surplus of fresh eggs, why not use pickling as a delicious way to use some of those extra eggs?

A jar of pickled eggs sit on a counter
Save this to your Pinterest recipe board.

Pickled Eggs Recipe Backstory

I love our backyard chickens! They add so much to a homestead and they don’t cost a lot to keep. Our chickens help us in lots of ways – we love keeping our chickens busy. And they love to work, fluffing up compost piles and eating weed seeds.

Chickens often stop or slow down the egg laying in the winter time. And let’s face it, chickens deserve a rest just as much as we do. They also expend a lot of energy just trying to stay warm in the cold winters.

New to having chickens in the backyard? Here’s some Chicken Questions and Answers for you to learn before you get your own back yard chickens.

Once Spring starts to come around, chickens start laying again. A lot of this has to do with the hours of light in the day. More daylight hours signal chickens to start laying again. If you’ve got hens, often you will end up with a stockpile of eggs. Chickens lay so well in the spring, it doesn’t take long to get several cartons stacked up.

How to Store Extra Eggs

Eggs will last a long time. And, they don’t need to be refrigerated, although most people do. When we get several cartons full of eggs from our chickens, we start storing them in our cold room. There they will last for months.

I store them in order of when I gather them. So, oldest eggs on the top or at the front of our shelf, and newer eggs behind that. This way, I can be sure we are eating the oldest eggs first.


A basketful of extra eggs.
Look how beautiful these fresh eggs are!


I often make deviled eggs or egg salad sandwiches, but there’s a limit to how often we eat these egg dishes. So when we have lots of cartons of eggs to use fresh, we start pickling eggs. We just take the oldest ones we have and pickle them up – Graham loves them.

We think there’s nothing better than a pickled egg or two with lunch or as a late afternoon nibble.

Here’s how we make them – super easy! And great to have on hand for a healthy snack.


Several cartons full of fresh eggs.
Pickled Eggs take minutes to make. Delicious as an appetizer. Great way to use up lots of eggs.

Pickled Eggs – Ingredients and Instructions

Here’s what you need to whip up a batch!

  • large eggs
  • white vinegar
  • water
  • pickling spice
  • cayenne, habanero pepper or red pepper flakes
  • garlic ( we use at least 5 cloves in each jar because we love it so much)
  • bay leaf


Place eggs in a small saucepan and cover with cold water. Bring water to a boil and immediately remove the pot from heat. Cover and let eggs stand in hot water for 10 to 12 minutes.

Remove from hot water, cool and peel.

Pickling Brine Recipe:

In a medium saucepan over medium heat, mix together the vinegar, water and pickling spice. Bring to a boil and mix in the garlic and bay leaf. Remove from heat and let it cool a bit.

Fill a clean quart jar with boiling water, let sit while the eggs are boiling. When ready to put eggs in jar, just dump the water.

Put in your hard-boiled eggs and pour the pickling liquid over the eggs. Then seal and refrigerate 8 to 10 days before serving. 


Tips on Making Pickled Eggs

  • Here’s the one thing you need to know if you are using really fresh eggs. Don’t. Make sure you are not using really fresh eggs. If you are using farm eggs, leave them in cool place for 2 weeks. Here’s why: the eggs need to be about 2 weeks old.
  • Grocery store eggs are never as fresh as those from the chicken farmer, so you can likely use store bought eggs right away.
  • Your boiled eggs need to be aged a bit because, if they are too fresh, you can take a bunch of the egg white away when you peel them. They’ll look awful with gouges of white missing. You want them to be pretty and smooth, especially if you want to serve them to guests.
  • Pickled eggs take only a few minutes to get ready and put in the fridge. They make for a great quick snack. They’re nutritious, low in saturated fat, filling, have lots of protein and come in their own carrying case 🙂
  • Serve them along side some Garlic Pesto on crackers and some smoked canned salmon. You can even have them as a side dish at dinner.
  • Pack them for school and work lunches for a quick healthy bite to eat. They are also great to take along when you are hiking or camping.
  • Take 30 minutes and get a jar ready. Then, leave them there for a couple of weeks before eating.


Fresh eggs in a chicken coop.
Keeping your own chickens and collecting fresh eggs is incredibly rewarding!


How long does it take Pickled Eggs to be ready to eat?

You have to give the eggs time to sit, so the pickled flavor can get right through and penetrate the eggs. I put the date on the lid, so we know when they were made. Roughly, they take 10 days before they are ready to eat.

Do pickled eggs need to be refrigerated?

There is always a debate about whether eggs should always be kept in the fridge – some people leave theirs out on the counter at room temperature. 

We don’t do that – we always store them in the fridge. If we don’t want to eat them really cold, we remove a few, set them on a plate and let them warm up just  a bit.

Here’s the finished product – don’t they look good? And they’re delicious along with some of our home made Pickled Fiddlehead Ferns!


Jar of pickled eggs and peppers.
Look how delicious these eggs and peppers look together, and so easy to make!


If you want to make the flavor milder, you may want to use 1 tbsp pickling spice and skip adding any peppers for your first batch. Go ahead and add dill seed if you like!

You can always spice things up more when you make your second batch, should you want them a bit zingier. You can also add beet juice for beautiful color.

And by the way, here’s an easy way to test an egg for freshness. This is a sure fire way to tell if eggs are still good. This works well if you should ever find a clutch of eggs your hens have been hiding!


Green and red peppers still on the plant.
These fresh peppers really heightened the flavors of our pickled eggs.

How Long do Pickled Eggs Last?

Once opened, food that has been pickled generally lasts for months if kept in the fridge. Pickled eggs can last up to 4 months, provided they are kept in the refrigerator in an airtight container. Their long life makes them one of the perfect snacks there is. 

Variations and Serving Suggestions

  • You can vary this recipe by using different kinds of peppers, using mustard seeds or adding some small pearl onions.
  • The only thing you should not change is the ratio for the vinegar and water. Sometimes we add jalapeno peppers or habanero peppers….or both! Make these spicy pickled eggs with any spice you like.
  • Graham loves eating the peppers and I love eating the garlic cloves!
  • Since we grow all kinds of peppers in our Greenhouse, we usually have several varieties of peppers to choose from! We grow cayenne, jalapeno, habanero along with different kinds of sweet bell peppers.


More Recipes

Our entire Country Living in a Cariboo Valley Recipe Collection can be found here, but here are some highlights!

  1. If you like beets, here’s a recipe for pickled beets that is sure to please.
  2. Lentil Soup with Ham is a delicious and hearty soup recipe.
  3. Another great snack is Paprika Kale Chips; so easy and tasty!
  4. Making Homemade Lemonade is a great way to stay cool and refreshed in the warmer months.


Pickled Eggs Recipe

If you enjoy this guide on how to make pickles eggs, please be sure to rate it 5 stars below! And print this off or save it to your Recipes folder!

Pickled Eggs

Pickled Eggs

Yield: 12 servings
Prep Time: 45 minutes
Total Time: 45 minutes

This Pickled Eggs recipe makes a dozen to keep in the fridge. Great with a beer for an afternoon snack. Healthy and tasty; add peppers and garlic if you like.

Ingredients

  • 12 extra large eggs
  • 1 1/2 cups white vinegar
  • 1 1/2 cups water
  • 2 tablespoons pickling spice
  • 1 cayenne or habanero pepper
  • 1 clove garlic, crushed ( we use at least 5 cloves in each jar because we love it so much)
  • bay leaf

Instructions

  1. Place eggs in a small saucepan and cover with cold water. Bring water to a boil and immediately remove from heat. Cover and let eggs stand in hot water for 10 to 12 minutes.
  2. Remove from hot water, cool and peel.
  3. In a medium saucepan over medium heat, mix together the vinegar, water and pickling spice. Bring to a boil and mix in the garlic and bay leaf. Remove from heat.
  4. Fill a clean quart mason jar with boiling water, let sit while the eggs are boiling. When ready to put eggs in jar, just dump the water.
  5. Put in your eggs and pour the hot liquid over the eggs then seal and refrigerate 8 to 10 days before serving.
Nutrition Information:
Yield: 12 Serving Size: 1 Servings
Amount Per Serving: Calories: 79Total Fat: 5gSaturated Fat: 2gTrans Fat: 0gUnsaturated Fat: 3gCholesterol: 186mgSodium: 73mgCarbohydrates: 1gFiber: 0gSugar: 0gProtein: 6g

Did you make this recipe?

Please leave a comment on the blog or share a photo on Pinterest

© Annie
Cuisine: American

First Published January 2017; Updated March 2021

Thanks for checking out this recipe. For more, follow me on Facebook, Pinterest, Instagram, and Twitter!

Bowl of fresh brown eggs.
Whether you use fresh or store-bought eggs, this recipe makes for a delicious and healthy snack or breakfast!
 

Filed Under: How To, Recipes

Lentil Bean and Ham Soup

By Annie

This Lentil Bean and Ham Soup is the perfect meal for a cold evening! Easy, delicious, hearty and filling!

This homemade soup is darn good, so deliciously healthy (especially if you use homemade tomatoes) and so very filling. It tastes even better the next day, as all good homemade soup should! 

Lentil Soup with Ham in a bowl on the table
This Lentil Ham Soup is healthy, filling and delicious.

Why You’ll Love This Ham and Lentil Soup

After the Christmas holidays (and the money that is spent!) we like to try to live “low to the ground” during January. And that includes our grocery bill. Here’s our recipe for Ham and Lentil Soup. It’s a favourite for a cold winter day!

Although we don’t spend a huge amount at Christmas, we like to cut the spending for the next month or two, if we can.

So we eat out of our pantry, cold room & freezers and just hunker down. We make soups, stews and other delicious homemade meals.

Full of fiber, lots of protein, low in saturated fat and so filling. Along with the bread, even teenagers will be full after a nice big bowl of this soup! Enjoy!


lentil soup with ham in a bowl on the table
This Lentil soup is a healthy and filling dinner recipe.

Tips for Lentil Soup

  • If we start the soup early enough in the morning, we can cook the soup on top of our woodstove in a Dutch oven. We love doing this because it’s easy, it makes the house smell awesome for hours and we don’t even need to turn on the electric stove to get it made.
  • If you do make it on your electric stove, plan for it to take about 3 hours.
  • You can also make this in a slow cooker.
  • Just remember, once you add the lentils, give the soup a good stirring every half hour or so, especially in the beginning. This will really help to avoid the lentils sticking on the bottom of the pot. 
  • This soup can feed a family of 6 for about $10 and that’s a great price for dinner!
  • Add a loaf of fresh homemade bread to serve along with it. If you don’t already have a breadmaker, consider getting one this year. Find one at the thrift store if you can’t afford a new one, but get one. You will save so much money on bread – right now, we pay almost $5 a loaf for multigrain bread. So we make our own. The breadmaker is so convenient.

Ingredients Needed

  • ham – the star of the dish! This is a great way to use leftover ham.
  • tomato soup – provides an great base for this soup.
  • lentils – dried soup mix also works for this, or you could use both. Split peas are another option.
  • herbs – use whatever kinds of herbs you like!
  • salt and pepper – to taste.
Ingredients to make Ham Lentil Soup
The basic ingredients for the soup. Add herbs and spices to your taste.


  • Put a large pot of water on to boil. Dice the ham and add to the water, adding a little olive oil if you like. Bring to a boil, then turn down and let simmer for 45 minutes so the broth water is full of meaty goodness.
  • Add the tomato soup and the soup mix. Be sure to stir it frequently as the lentils tend to stick to the bottom of the pot.
  • Add salt and pepper to taste. Add a few of the herbs, and if you have bay leaf, add a couple now.
  • Let soup simmer on the stove top for about two hours. Cook lentils until the lentils are tender. 
  • About 15 minutes prior to serving add some more herbs. Serve with hot biscuits.

Storing Leftover Soup

Just let the soup cool, then store it (lid on) in the fridge for several days. If you’ve got lots, store some in an airtight container in the freezer.

This makes a wonderfully easy dinner for those busy weeknights!

Variations and Serving Suggestions

  • For even more flavor and nutrition, add some more vegetables to your soup! Carrots, kale, celery, onion, garlic, and any kind of leafy greens would enhance this soup!
  • Spice this soup up with some smoked paprika.
  • You can easily use a ham hock for this recipe or any cut with a ham bone. Boil the meat on the bone for about half an hour, then remove the meat and bone. Cut meat into smaller pieces then proceed with the recipe.
  • You can also use chicken broth as your base instead of tomato soup, which will give you a lighter soup.
  • Instead of canned soup, use lentils tomatoes freshly chopped – then add fresh herbs from the garden.
  • Serve with fresh baked bread or some croutons for added crunch and texture.
  • Biscuits and cornbread would also pair well as sides for this soup.

Other Fantastic Dishes

Our entire Country Living in a Cariboo Valley Recipe Collection can be found here, but here are some highlights!

  1. These Turmeric Garlic Pork Chops are a great option for a flavorful and filling meal.
  2. Pumpkin Cranberry Banana Bread is great as a dessert or a sweet and decadent breakfast.
  3. If you’ve never made your own Homemade Pizza Dough, you’re missing out on a cheaper and tastier option than store bought!

Lentil Soup Recipe

If you enjoy this recipe for delicious ham and lentil soup, please be sure to rate it 5 stars below! And print this off or save it to your Recipes folder!

Lentil soup in a bowl ready to eat

Lentil Bean and Ham Soup

Yield: 8
Prep Time: 20 minutes
Cook Time: 4 hours
Total Time: 4 hours 20 minutes

A hearty and delicious soup best served on a cold day. Add a side salad and some homemade biscuits.

Ingredients

  • 3/4 pound ham
  • 2 cans tomato soup
  • 1/2 bag dried soup mix or lentils, or both
  • water
  • Herbs: parsley, lovage whatever you like
  • salt and pepper

Instructions

  1. Put a large pot of water on to boil. Dice the ham and add to the water. Let it come to a boil, then turn down and let simmer for 30 minutes.
  2. Add the tomato soup and the soup mix. Be sure to stir it frequently as the lentils tend to stick to the bottom of the pot.
  3. Add salt and pepper to taste. Add a few of the herbs. Let simmer for at least two hours, the longer the better.
  4. About 15 minutes prior to serving add some more herbs. Serve with hot biscuits.
Nutrition Information:
Yield: 8 Serving Size: 1 Servings
Amount Per Serving: Calories: 144Total Fat: 3gSaturated Fat: 0gTrans Fat: 0gUnsaturated Fat: 1gCholesterol: 27mgSodium: 783mgCarbohydrates: 17gFiber: 3gSugar: 7gProtein: 13g

Did you make this recipe?

Please leave a comment on the blog or share a photo on Pinterest

© Annie
Cuisine: American / Category: Dinner

First Published January 2017; Updated March 2021

Thanks for checking out this recipe. For more, follow me on Facebook, Pinterest, Instagram, and Twitter!


A bowl of warm lentil with ham soup.
This Lentil with Ham soup is full of protein and fiber.


Originally published Jan 2017; latest update Nov 2024

Filed Under: Recipes

  • « Previous Page
  • 1
  • …
  • 7
  • 8
  • 9
  • 10
  • 11
  • Next Page »

Connect With Us!

  • Email
  • Facebook
  • Instagram
  • Pinterest
  • Twitter

Search this site

Generic selectors
Exact matches only
Search in title
Search in content
Post Type Selectors
Search in posts
Search in pages

Our Most Popular Posts

Garlic cloves in oil

How to Preserve Garlic in Oil – and Other Ways to Store Garlic

a open jar of pickled brussel sprouts on a counter

Easy Pickled Brussels Sprouts Recipe (Water Bath Canning)

Recent Posts

  • Top 10 Greens to Grow
  • How to Grow Brussel Sprouts
  • Reuse Canning Jars – 10 Useful Ways to Upcycle
  • Chive Oil Recipe – Infused Oil Recipes

Annie

Search our Site

Archives

Country Living in a Cariboo Valley

Privacy Policy

Read about our Privacy Policy

Disclosure

Please note that some of this site’s links are affiliate links, and CountryLivinginaCaribooValley.com is a participant in the Amazon Services LLC Associates Program, an affiliate advertising program designed to provide a means for us to earn fees by linking to Amazon.com and affiliated sites. At NO ADDITIONAL COST TO YOU, I will earn a small commission, if you purchase them. I recommend them as they are good products.

Theme Design By Studio Mommy · Copyright © 2026