Country Living in a Cariboo Valley

Homesteading in BC

  • How to Get Started
  • Vegetable Gardening
  • Preserving Food
  • Recipes
  • Homemade Wine Recipes
  • About Us
  • Work With Me
  • Shop
    • Vegetable Garden Planner Printable: Grow Your Best Garden Ever
    • Grow Enough Food for a Year
    • Delicious Dandelions: A Recipe Collection
    • Dirt to Dollars: Selling at the Farmers Market
    • 8 Pounds in 8 Weeks: Raising Chicks for the Dinner Table
    • Making Wild Wine
    • Build a Hanging Chicken Feeder
    • 15 Things to Know About Living in the Country

15 Things to Know About Living in the Country

By Annie

Thinking of making a move to your dream piece of property?

Here are 15 things to know about living in the country!


Want a half acre just outside of town where you can have more space to raise your kids and grow some of your own food?

Or like us, maybe you have an itch to get way out into the country where you can do your own thing and not have to concern yourself with bylaws and rules.


Grab my ebook

15 Things to Know About Living in the Country!


15 thing to know about living in the country, self sufficiency, homesteading, country living


There are many things to consider when looking for your country property. Things that don’t really matter as much if you live in town or the suburbs.

Some things you would not even think of when you live in town. Some things you just take for granted, because they are available in every town or city.

Life IS different out here!

You will want to read this book while you are planning your move.


I have listed 15 (16 actually) important things to know before you buy your future homestead.

Even if you have already chosen your new place, you will get some great information from the eBook.

Some of the points covered are:

having a well for your water

the importance of a wood supply

being within a fire protection zone or living outside of it.

I have purposely made the eBook very inexpensive (it’s only .99 cents!). It’s not a long book, but it is informative.

Read through it and start turning ideas over in your mind. It will help you think of other things that pertain to you specifically.

Add these things to the list and be sure to ask questions before buying your dream property. It is very important to do as much research as possible before making any decisions.

Make sure you know what to plan for and what to look for when you want to make a move!


15 thing to know about living in the country, self sufficiency, homesteading, country living


Grab your copy today!


15 Things to Know About Living in the Country


Filed Under: EBooks, Great Books

Southern Living’s Banana Bread Recipe

By Annie

I’ve been making this banana bread recipe since I was a teenager. Turns out it’s the same as Southern Living’s banana bread recipe.

One of our favorite quick breads, this easy recipe uses ripe bananas (I even use overripe bananas) – it’s a great way to use them up!

A couple of slices of this quick loaf with butter or smeared with cream cheese are the perfect afternoon snack.

We even enjoy banana bread as a fast breakfast – if you take lunch to work, it makes the perfect afternoon treat. It’s an easy pick me up any time of day when you need something to eat.

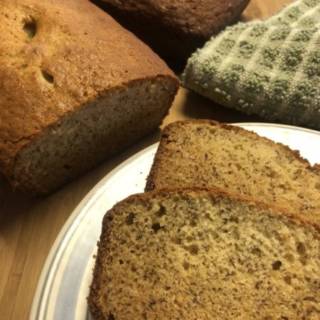
Slices of banana bread sit on a white plate.
This Southern Living banana bread recipe is a classic.

Why You’ll Love This Easy Banana Bread Recipe

When it’s kind of chilly outside and we’re getting nice and warm by the wood stove, I love to bake. Earlier today, I got busy in the kitchen making this easy recipe. I want to share it with you because it is just so good. It really is delicious.

I’ve been making this recipe for a long time. I got the recipe from my Mom and I have no clue where she got it from. It may have from an old church cookbook. I remember the Ladies Society putting together cookbooks with their very best recipes.

This makes 1 really large loaf, but you can split the batter between two pans and decrease the baking time to 45 minutes. 

Here’s the best banana bread recipe you are going to find!

How to Make Homemade Banana Bread 

Note: Most bakers probably use an electric mixer for this recipe, but I always just use wooden spoon to mix by hand.

Mashed bananas in a clear bowl.
Be sure to get your bananas nice and mashed so they incorporate well into the batter.
  • Mash three bananas really well. If I am using firmer bananas, I put them in the microwave for 20 seconds to help soften them up.
  • Add milk and vanilla, stir well then set aside.
  • Electric mixer: use low speed.
Butter, sugar, and eggs in a clear bowl.
Cream butter and sugar, then add eggs to start the batter.
  • Use a large bowl for this next step. In the end, all the batter will end up in this bowl.
  • Cream softened butter with sugar and add two large eggs. Mix well.
  • Electric mixer: Use medium speed.
Wet and dry ingredients for banana bread in a clear bowl.
Be sure to fold in the dry ingredients gently to achieve a soft and moist texture.
  • Add dry ingredients (all purpose flour, baking powder, baking soda and salt) to the butter mixture.
  • Sift the flour if you like – I don’t bother to do this step and it never seems to matter.
  • Some bakers like to combine flour and other dry ingredients together first before adding to the butter mix. I never bother and it’s never been a problem.
Mixing together wet and dry banana bread ingredients with a wooden spoon.
It already looks delicious and it hasn’t even been baked yet!
  • Mix everything together.
  • Mixer: Use medium speed.
  • Meanwhile, grease and flour a loaf pan (or use cooking spray).
Banana bread batter in a bowl with two baking dishes behind it.
Well worth getting these Pyrex baking dishes for your baking cupboard!
  • I love my Pyrex loaf pan – since it’s glass, it’s easy to clean and never wear out.
  • Spoon the batter into the loaf pan.
Slices of banana bread on a plate with two loaves behind them.
This banana bread is the perfect comfort food for any time of the year!
  • Bake at 325 degrees for 60 -75 minutes depending on your oven. Test it to see if it is done by inserting a long wooden pick or skewer. If it comes out mostly clean, the loaf is done. If not, give it another 5 -10 minutes.
  • Note: If it’s getting too brown on top, create a shield with aluminum foil at this point.
  • Once it’s done, remove and cool bread in the loaf pan for about 10 minutes, then transfer over to a wire rack where it can sit for another 20 minutes.

FAQ

What kind of bananas should I use for this recipe?

  • The very best bananas to use for this loaf are the really super over ripe ones. The riper the better, baby!

What’s the best way to eat this banana loaf?

  • Enjoy this best Banana Bread recipe in the world (according to us!) with a tall glass of cold milk or a hot cup of coffee.

How do you keep banana bread moist?

  • Make sure to use the ripest bananas possible, even to the point where they almost look black. You can also use bananas that have been frozen!
  • Be sure to fold the dry and wet ingredients together very carefully with a spatula or spoon to make for a soft and tender texture.
  • Start checking the bread at 40 or 45 minutes; when you’re able to remove a toothpick and see just a few moist crumbs, remove the bread immediately.

How long will this bread last?

  • It will generally keep for about a week sitting out on the counter, but around day 4 the bread will start to dry out a bit. Be sure to cover well with some plastic or foil to prevent this as much as possible.
  • This loaf will also freeze well if you have leftovers you want to save. In the freezer, it should be fine for at least four months!

Variations and Substitutions for Southern Living’s Banana Bread Recipe

  • Add a handful of nuts (walnuts or pecans are delicious in this simple recipe).
  • Some other great ways to up the flavor profile would be to add more spices (like nutmeg, cinnamon, clove, or allspice), or mix in some chocolate chips or nuts!
  • Add fresh fruit, like a handful or two of blueberries or halved cherries.
  • Make Banana muffins instead of the banana loaf:
  • Use as 12 count muffin pan and use muffin cups or baking spray. Spoon batter into each cup then bake at 425F in a preheated oven for 20 minutes.

More Sweet Recipes

Our entire Country Living in a Cariboo Valley Recipe Collection can be found here, but here are a few highlights for your sweet tooth!

  1. Chewy Coconut Cookies
  2. Lemon Loaf Cake with Rosemary Glaze
  3. Fireball Pumpkin Pie

Southern Living’s Banana Bread Recipe

If you like this easy and delicious recipe, be sure to rate it 5 stars below!

Banana Bread

Banana Bread

Yield: 1 quick banana bread
Prep Time: 20 minutes
Cook Time: 1 hour
Additional Time: 30 minutes
Total Time: 1 hour 50 minutes

Classic comfort food for an afternoon snack. Great for a fast breakfast along with a smoothie. Grandma's and Southern Living's recipe for Banana Bread.

Ingredients

  • 1 1/2 cup sugar
  • 1/2 cup butter
  • 2 eggs
  • 3 mashed bananas, mash them really well
  • 1 tsp vanilla
  • 1/4 cup milk
  • 2 1/4 cup flour
  • 1/2 tsp baking powder
  • 3/4 tsp baking soda
  • 1/2 tsp salt

Instructions

  1. Combine the sugar, butter and eggs. Stir well. In another bowl, sift the flour, baking powder, baking soda and salt.
  2. In yet another bowl, mash the bananas really well. I find if I put them in the microwave for 15 seconds, it helps soften them up. Once they are mashed, add the milk and the vanilla. Stir together.
  3. Add the flour mixture and the banana mixture into the sugar mixture. I usually do this in thirds, giving it a good stir before adding more. Make sure it's mixed well.
  4. Grease and flour one loaf pan, pour the batter in and bake at 325 for 60-75 minutes, depending on your oven. Use a wooden skewer to insert into the loaf to see if it is ready, it may need to bake a few more minutes. Once the skewer comes out clean, the loaf is done.
  5. Remove from the pan after 10 minutes rest and let it complete cooling on a wire rack another 20 minutes or so.  Enjoy!

Notes

I always make this recipe by hand, but many bakers use a mixer.

Nutrition Information:
Yield: 12 Serving Size: 1 inch slice
Amount Per Serving: Calories: 408Total Fat: 10gSaturated Fat: 6gUnsaturated Fat: 4gCholesterol: 54mgSodium: 296mgCarbohydrates: 74gFiber: 2gSugar: 35gProtein: 6g

Did you make this recipe?

Please leave a comment on the blog or share a photo on Pinterest

© Annie
Cuisine: American / Category: Recipes

First Published November 2012; latest update November 2026

Thanks for checking out this recipe. For more, follow me on Facebook, Pinterest, Instagram, and Twitter!

Close up of a sliced loaf of banana bread.
You’ll never need another recipe once you try this one!


Filed Under: Food, Recipes Tagged With: recipes

Temporary Chicken Coop – Easy DIY

By Annie

Need a temporary chicken coop or just an alternate spot to park a few birds? Here’s some cheap and easy chicken coop ideas.

When you have chickens in the backyard, there may be times when you actually need another place to house come of them. Or, if you haven’t had the chance to actually build a coop before they arrive, you have to have some place to put them.

Here’s how we build a temporary chicken coop on our small farm. All it takes is some type of easy housing, some T posts and wire.

Temporary chicken coop with roost, nest boxes and hay with chickens inside.
If you ever need to move a couple of chickens, you will appreciate having a temporary chicken coop.

We were fortunate enough to have a tiny wooden frame building we used, when we had to separate our flock. But, read on for other things you can use for a portable chicken coop. You will find an idea or two for inspiration!

Little chicken coop with door open and a ramp with 4 chickens.
Any little building you have can work as a temporary coop!

This is an old goat house that was on the property when we bought it. We used it first for our main chicken coop. We started with 4 chickens as I wasn’t sure whether I would like having them.

I had zero experience with raising poultry and starting with small numbers would allow me, as a beginner, to ease into raising farm animals.

Turns out, we loved having chickens and every year we kept getting more and more.

We worked on getting a proper hen house down at the barn and once we did, we moved all the girls in there.

Our Large Chicken Coop Design

Over on another post about when we built a barn, we wrote about how we built a coop with multiple outdoor runs, nesting boxes and roosts for the hens to sit on. Check it out if you want to see our DIY chicken coop plan.

Nesting boxes in a chicken coop.
These nesting boxes are in the larger barn chicken coop.

Anyway, a few years later, we had 17 hens and were getting about 9 eggs a day. Some of the hens were 3 years old and we weren’t sure who was laying and who was enjoying a free ride in the Valley.

While we enjoy raising animals, we feel they have to pull their own weight, so to speak. So if some ladies weren’t laying at all we needed to figure that out and dispatch the free loaders.

Small Chicken Coops

I moved the girls in two at a time over to the small goat house, in an attempt to find out who was laying and who was not. We took the easy way out and made a nesting box out of a cardboard box and some hay as cushioning and it worked great.

For feeding, we just hung a homemade chicken feeder from the ceiling. We threw some dirt on the floor for them and added a shallow tub of sand to give them some grit.

I’ve read you can check the birds vents to see if they are nice and pink and those should be the ones laying. I couldn’t figure it out, they all looked pretty good and yet, still only about 7 or 8 eggs a day. So I started using the other coop for housing.

And it worked. It took awhile, but we found out that only 9 hens were laying consistently. So, we culled the rest and used their meat for dog food.

Temporary chicken coop with a wire fence around it and 2 chickens in the run.
Add a sturdy wire fence to keep the birds inside.

We had set up temporary fencing around the goat house, so the exiled girls could run around outside during the day. Read all about how easy it is to set up temporary fencing for chickens here.

Once we figured out who wasn’t laying and dispatched them, it was time to take down the fencing.

Temporary fencing for a large chicken run.
Using temporary fencing is a great way to expand your free ranging.

We can’t leave temporary fencing up over winter. Since we use a lot of chicken wire in the fencing (because it’s lightweight so I can easily move it around myself) the winter snows would just crush it. So, at the end of the season, I have to take down all the chicken run fencing that ran around the temporary coop.

More Ideas for a Portable Chicken Coop

An unused truck canopy sits on bales of hay providing housing for the white chickens.
Look around and see what you can recycle into a home for your birds.

Here’s another possibility. The following year we needed extra room for meat birds we were raising.

Looking around, we found we had a truck canopy we weren’t using. So, we set that up on bales of hay for a sturdy and insulated small coop for them.

Need more ideas for coop possibilities? Why not make a chicken tractor? The tractor is a great idea, if you have the time to make it, because you can use them not only as a portable chicken coop, but you can actually move them around.

This allows the birds fresh grass to eat and it won’t wear your lawn down if you keep moving the tractor every other day or so.

Other possibilities include using an empty playhouse, or building a simple coop with pallets. Make portable coops with plastic piping and greenhouse plastic.

Any of these makes for a good low-cost option for housing chickens in the backyard! Want to read more of our chicken raising posts?

Find out the best ways to store fresh eggs (which you’ll need to know for Spring time).

Got questions about keeping backyard poultry? You can find even more common chicken questions and answers here.

Wondering what does the term straight run chickens mean?

And, here’s a post about how to keep chickens from being bored.

Finally, you can read about our experiment of learning to grow fodder for chicken feed.

Chickens in a temporary chicken coop.
Save this to Pinterest for later!

Temporary Chicken Coop – Easy DIY

Temporary chicken coop made from an old greenhouse
Add this to your Pinterest Chicken board!

originally published 2012, latest update March 2026

Filed Under: Raising Chickens

How to Harvest and Dry Parsley

By Annie


Once you learn how to dry Parsley, it will be easy to store jars of dried herbs to use in your favorite recipe.

Herbs are so easy to grow and they are super easy to preserve over the Winter. Many people grow herbs in pots inside their homes, or you can dedicate part of your flower garden to grow herbs like Parsley outside.

When you know how to dry Parsley, you will always have some on hand.
I use a good pair of kitchen scissors to cut and harvest bundles of fresh Parsley from the garden.

We grow Rosemary in a pot, because our winters are far too cold for it to survive outdoors. Every summer, we move the Rosemary to our outdoor porch and every Fall, we bring it back inside.

But Parsley is easy to grow outdoors (or indoors!) – it also self seeds quite easily, which is a bonus I always like. The beautiful green color and subtle herb-y aroma is also welcome to have around the house.

The only downfall with dried herbs is they never seem to taste as good as fresh herbs. That’s all right by us – we would still rather harvest and dry our own herbs and settle for the flavor, just because we know that they haven’t been sprayed with any chemicals.

 How to Harvest Parsley

So every year, we grow some Parsley plants and just keep trimming the Parsley. Not only do we use it fresh, but we are also trying to keep it from trying to go to flower and set seed. If the plant survives our winter, it will act as a perennial and come back up in the Spring.

Parsley growing in a pot, ready to be picked and dried.
Save this to your Pinterest Herb board!

However, I always let a couple of Parsley plants go to seed. Why? So that in the Spring, if we get lucky, some of those seeds sprout and give us new Parsley plants. This way, I have my bases covered and I know I will never need to buy more seed. 

When I want to dry Parsley, I cut a large amount of stems off the mother plants. Air-drying or making dehydrated parsley is a great way to increase longevity.


How to Air Dry Parsley

Learning how to dry parsley means you will always have it on hand to use in cooking.
Use kitchen scissors to trim Parsley leaf from the stem.

I usually cut the stems fairly low on the plant, especially if that plant has a lot of growth. I like to cut and place my herbs right into a large shallow open weave basket.

The basket allows air to circulate better through the herbs – which is definitely what you want for drying!

Cleaning and Trimming Parsley

When I bring the full basket inside, I first snip off all the tips and discard the Parsley stems. These are some really handy herb scissors that make quick work of trimming! There isn’t any point in drying the stems of the plant.

It’s important to wash your parsley to be sure it’s clean of dirt, bugs, and other natural contaminants that are best to get rid of. Dry your parsley by patting with a paper towel, or you could put it through a salad spinner.

If you want to avoid damaging the parsley at all, another way to dry it is to hang upside down over a paper towel or some parchment paper and allow it to drip-dry. But parsley is fairly resilient, so patting it dry shouldn’t do any real damage.

Dry herbs in shallow bowls and stir every day
I use shallow bowls and try to spread the herbs out.

I leave all the tips sitting in a shallow bowl. I’ll give them a good stir with my fingers every few days or so and let it dry before storing in mason jars. In the photo, I am drying the herb Lovage which we also use a lot of. Read more about growing Lovage!

We like to use a lot of Parsley in our cooking. If we do ever run out, I know I can easily get more at the grocery store, but we usually do harvest and dry enough to keep in storage until the next Spring.

By then, our new plants are ready to have a bit of a trim and we use that fresh.

Herbs hanging from twine for drying
Air dry herbs by tying bundles with twine and hanging.

Another method to air-dry parsley involves tying the parsley into small bundles using rubber bands or twine and storing the parsley bundles in brown paper bags.

Poke holes in the bags to encourage air flow and store in a cool place away from moisture.


How to Dry Parsley in the Oven

If you’re looking for a quicker method to dry your parsley, the instructions are simple. Spread the leaves out in a single layer on a baking sheet and popping them in the oven.

You can do this with multiple baking trays at a time. Bake at 170 degrees F for about 20 minutes, but keep an eye on the parsley to make sure it doesn’t burn or crumble.

You can also use a food dehydrator, which is specifically designed to dry foods. Follow a similar method, spreading parsley leaves onto dehydrator trays and set to about 95 degrees.

It can take up to 18 hours to complete this process, but the low and slow method may help preserve the freshness of the flavor.

Drying parsley by using appliances like the microwave won’t work; the trick is low heat for a more extended period of time.

Parsley in a basket for drying
Click to save to your Pinterest board.

Ways to Use Dried Parsley

Dried parsley leaves are great to use in all kinds of cooking, including as a garnish to add color and flavor to all of your favorite dishes. Throw some parsley in homemade soups or stews, mix it into casseroles, include it in pesto, sprinkle on top of pasta or even mix into salads.

If you want even finer parsley flakes, you can crush your dried parsley using a mortar and pestle or by using a wooden spoon and a sturdy bowl.

More articles on Drying and Using Herbs can be found here:

  • How to Grow Herbs Indoors and Outdoors – everything you need to know!
  • How to Dry Herbs – in depth info and great herbal tips.
  • Grow Valerian Herb – a pretty flower with an incredible scent!
  • How to Grow Lovage – also known as the “Maggi” plant.
  • More info on drying herbs


Originally published 2012, latest update March 2026

Filed Under: Drying Herbs

Chewy Coconut Cookies – Recipe

By Annie

These delicious coconut cookies are soft and chewy and just sweet enough to satisfy your dessert cravings!

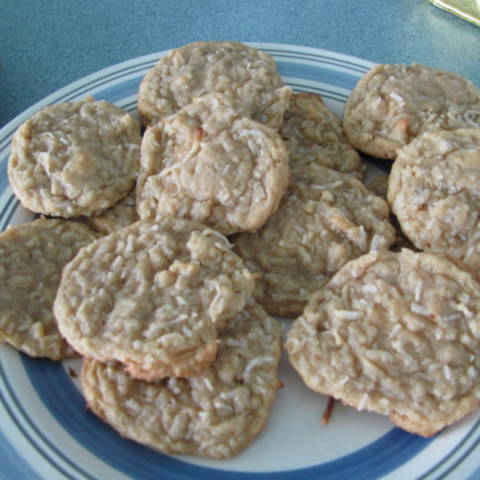
Coconut cookies sitting on a blue plate.
These cookies are sweet and light, so delicious!


Why You’ll Love These Coconut Cookies

We usually eat healthy foods here; our love of gardening helps us grow a lot of what we eat. But we’re not only about the vegetables and fruits, we each have a sweet tooth. I don’t bake sweets every week and when I do, it’s often a sweet loaf, like Banana Bread or Pumpkin Cranberry Banana Bread.

But when we are in the mood for something sweeter, I will whip up a batch of these chewy coconut cookies. We like them so much they never last long. Graham can vouch for these. So can I.

If you love coconut, you’ll make these more than once. Guaranteed.


How To Make Chewy Coconut Cookies


Coconut cookies sit on a plate.
Once you try this recipe, you’ll come back to it again and again.


  • Combine flour, baking soda and salt and then set it aside. Cream butter and add both sugars.
  • Stir until the batter is smooth.
  • Beat in an egg and add the vanilla. Blend until fluffy.


Flaked coconut being mixed into cookie dough.
This seems like a lot of coconut to add, but add it all!


  • Gradually blend in the flour mixture and then add the coconut.
    • Note: At this point, the dough will be very thick. Be sure to blend the coconut in well.
  • Drop by the teaspoon onto an ungreased cookie sheet.
    • Note: Place the dough about 3 inches apart, because these cookies will really spread!


Baked coconut cookies sitting on plates.
Make sure not to overbake; you want these cookies nice and chewy!


  • Bake in a preheated 350 F oven for 8 – 10 minutes. Make sure to watch them in the last minute.
  • You will want to remove them as soon as you see the bottom edge of the cookies turn golden brown. It may seem they aren’t done yet, but if you take them out now, they will be nice and chewy.
  • Remove them right away from the sheet and cool on wire racks.

The recipe makes about 2 dozen chewy cookies. I always double the recipe when I make these. They keep great in the cookie jar – not that they’ll be around very long!


FAQ

What’s the difference between flaked coconut and shredded coconut?

  • It mostly comes down to shape. While flakes are a bit thicker and shorter, shreds tend to be longer and wider.
  • Either could really be used for this recipe, they’re more or less interchangeable. Just make sure the pieces aren’t too big (unless that’s how you like your cookies!).

Can these coconut cookies be made vegan?

  • Yes! One way to do this is replace the butter with coconut oil and omit the egg, instead adding a tablespoon of ground flaxseed and about 3 tablespoons of water.


Serving Suggestions and Variations

  • For some added sweetness and flavor, try adding some mini chocolate chips to your cookie batter.
  • Instead of butter, you could use coconut oil in order to emphasize the coconut flavor.
  • To make your cookies even heartier, add some oats into the batter. (That means you can eat them for breakfast, right?)
  • Other add-ins that would enhance these cookies: dried fruit like cranberries or raisins, white chocolate chips, macadamia nuts, lemon zest.


More Sweet Recipes

Our entire Country Living in a Cariboo Valley Recipe Collection can be found here, which includes some of these great recipes:

  1. If you’re looking for something light and refreshing, try this Lemon Loaf Cake with Rosemary Glaze.
  2. My Easy Fantasy Fudge will satisfy all of you chocolate lovers out there!
  3. Fireball Pumpkin Pie is perfect for cold days when you need a little kick of cinnamon to warm you up.


Chewy Coconut Cookies Recipe

If you like this recipe for coconut cookies, be sure to rate it 5 stars below!

Enjoy! Let us know what you think. These chewy cookie treats have become one of Graham’s favourites!

I originally found this recipe on Allrecipes

coconut cookies sitting on a plate

Chewy Coconut Cookies

Prep Time: 15 minutes
Cook Time: 9 minutes
Total Time: 24 minutes

Delicious with a cup of coffee or a glass of milk, these soft and chewy coconut cookies are sure to please.

Ingredients

  • 1 1/4 cup flour
  • 1/2 tsp baking soda
  • 1/4 tsp salt
  • 1/2 cup butter, softened
  • 1/2 cup brown sugar
  • 1/2 cup white sugar
  • 1 egg
  • 1/2 tsp vanilla
  • 1 1/3 cup flaked coconut

Instructions

  1. Combine the flour, baking soda and salt. Set aside.
  2. Cream the butter and both sugars until smooth. 
  3. Beat in the egg and vanilla until fluffy.
  4. Gradually blend in the flour mixture, and then add the coconut.
  5. Mix very well; the dough will be stiff. Make sure the coconut is well mixed into the dough.
  6. Drop onto ungreased cookie sheet. Put them about 3 inches apart as these cookies really spread in the oven.
  7. Bake at 350 degrees for 8 - 10 minutes. Remove them from the sheet right away onto wire racks.

Did you make this recipe?

Please leave a comment on the blog or share a photo on Pinterest

© Annie

First Published August 2012; Updated January 2021

Thanks for checking out this recipe. For more, follow me on Facebook, Pinterest, Instagram, and Twitter!

Filed Under: Recipes

  • « Previous Page
  • 1
  • …
  • 47
  • 48
  • 49
  • 50
  • 51
  • …
  • 53
  • Next Page »

Connect With Us!

  • Email
  • Facebook
  • Instagram
  • Pinterest
  • Twitter

Search this site

Generic selectors
Exact matches only
Search in title
Search in content
Post Type Selectors
Search in posts
Search in pages

Our Most Popular Posts

Garlic cloves in oil

How to Preserve Garlic in Oil – and Other Ways to Store Garlic

a open jar of pickled brussel sprouts on a counter

Easy Pickled Brussels Sprouts Recipe (Water Bath Canning)

Privacy Policy

Read about our Privacy Policy

Disclosure

Please note that some of this site’s links are affiliate links, and CountryLivinginaCaribooValley.com is a participant in the Amazon Services LLC Associates Program, an affiliate advertising program designed to provide a means for us to earn fees by linking to Amazon.com and affiliated sites. At NO ADDITIONAL COST TO YOU, I will earn a small commission, if you purchase them. I recommend them as they are good products.

Theme Design By Studio Mommy · Copyright © 2026