Country Living in a Cariboo Valley

Homesteading in BC

  • How to Get Started
  • Vegetable Gardening
  • Preserving Food
  • Recipes
  • Homemade Wine Recipes
  • About Us
  • Work With Me
  • Shop
    • Vegetable Garden Planner Printable: Grow Your Best Garden Ever
    • Grow Enough Food for a Year
    • Delicious Dandelions: A Recipe Collection
    • Dirt to Dollars: Selling at the Farmers Market
    • 8 Pounds in 8 Weeks: Raising Chicks for the Dinner Table
    • Making Wild Wine
    • Build a Hanging Chicken Feeder
    • 15 Things to Know About Living in the Country

More Chicken Questions & Answers

By Annie

Not long ago, I put up a post with Chicken Questions and Answers – take a look if you are thinking of raising chickens for the first time.

Here’s a follow up post with more questions and answers. If you’ve got questions, just leave a comment on this post and I’ll get an answer for you.


More Chicken Questions and Answers


Colorful male rooster with orange and gold and brown feathers in a farm barn yard.


Are chickens any good at tick control?

Yes they are. Chickens are great for any type of pests, like mosquitoes, flies, and grubs.

However, for ticks, you may want to look into guineas. Those are supposed to be extremely effective against ticks. We have never had guineas, so I don’t know much about them.


chickens free range in the yard


If you want to reduce the number of pests inside your vegetable garden, you can build your chicken coop right outside the garden. Then, build the run around the entire garden. You will find that the number of bugs goes way down. Raising chickens is a proven way to have a lot less bugs around!

It’s like building a moat around your food garden – I saw pictures of one setup a fellow did and it was really fantastic. He said he had hardly any bugs inside the garden at all.

Even if you have your chicken coop close to your garden, you should see the benefit of less pests in there. After harvesting, you could let your chickens free range inside the garden. They’ll find the grubs that are there and enjoy eating them.

However, they will also eat every single worm they find, so it is a trade off. I like to have our worms stay in the garden soil to give some aeration.

In general, having chickens around free ranging will definitely help to keep the bug and tick population somewhat under control. We have a lot of bugs here in the spring. If we are raising chickens, there are definitely fewer bugs. And that’s a good thing.

Why do chickens peck the feathers off each others’ backs?


Hen sits on an egg in her nesting box


This could be happening for a few different reasons. Chickens get bored if they are not kept busy.

Boredom can lead them to picking on each other (both literally and figuratively). Keep your chickens busy by having a large enough grassy area for them to look for bugs and weeds to eat.

Try to not keep them confined all the time. We use some temporary fencing to set up an area that they can hang out in. You can move the fencing from time to time so that the chickens are placed in a new area.

Don’t we all remember long car rides when we were kids with our siblings and having fights breaking out? Yes, same thing…too much of a confined space is not a good thing.

It’s the same thing when raising chickens. Chickens will also peck each others feathers if they are missing something in their diet.

I think this is usually protein, but it could also be some mineral deficiency. Make sure they are getting a well rounded diet, usually including laying pellets that you can buy at the feed store.

Feeding them weeds and table scraps are fantastic for chickens, but if you aren’t feeding them any scraps with protein, they aren’t getting all they need to remain healthy.

Think about how difficult it must be for them to lay an egg a day on an inadequate diet.

There is protein in the bugs and worms they eat, but is it enough? I’d rather feed them the lay pellets every day and then supplement that with the foods they find while free ranging.

Do chickens get taken by hawks or other predators during the day at all?


A predator owl sits on a fence post looking for prey.


Absolutely. Predators can get very brave during the day. They are braver at night, but they’ll scope out your chicken coop during the day. Here’s an owl sitting on one of our fence posts. She’s looking for field mice and voles.

If no humans are around, predators could snatch a hen or two in broad daylight. Hawks, owls and other birds of prey will definitely go after small chicks. Sometimes here in the Valley, Mama could raise 12 chicks and have 11 of them taken by the ravens.

Birds of prey are merciless and they are usually far more patient than us humans. They will wait us out and as soon as we turn our backs, here they come.

Screening in the top of your chicken run so that no birds can swoop down into it will help a lot. Make sure the holes in the screens are quite small, as you won’t want a hawk getting caught in the holes of the netting or screening.

Does a rooster protect his hens in any way?


Rooster and hen both Cornish Cross variety of white meat bird.


Yes, he does protect his hens and a rooster will usually do a good job. However, a rooster is no match for a hawk or owl. When the rooster senses danger, his call will alert the hens who will go running for cover.

He’s kind of like the captain of a ship that is going down. He will put himself in danger to save all his ladies and their children. Roosters can be really mean and I have seen some that are incredible fighters.

Want to know how to tell the difference between hens and roosters?

Is there anything you absolutely should not feed chicken in terms of leftover food and what not?


Orange slices and lemon slices sit on a cutting board.


There are a few things I know chickens should not eat. Green potatoes for one. Be sure no part of a green potato peel gets cooked up for them.

Potato leaves, tomato leaves, eggplant leaves are also no no’s, as they are members of the nightshade family. They don’t like citrus fruits and I am not sure if its just the taste they don’t like or if they don’t eat them because they know somehow they shouldn’t.

You will find that it is pretty simple. If the chickens don’t like something or it isn’t good for them, they just won’t eat it.

If you are going to feed their eggs back to them, be sure to cook them thoroughly first. You never want them to taste raw eggs or they may start pecking at their own eggs to get at the inside.


A large rooster in a farm barnyard.


More about Raising Chickens

Have more Chicken Questions? Have you read this article about raising chickens yet?

Ordered chicks? Here’s what Must be ready BEFORE your chicks arrive

Your chicks are home? Here’s what you need to do once your chicks have arrived


Filed Under: Raising Chickens

A Prepper’s Handbook

By Annie

If you are new to the idea of Preparedness, there can be a lot to learn. There are all kinds of levels of Preparedness, from the small (having 3 days of emergency water on hand) to the medium (having a well stocked Pantry with a few months worth of food) to the large (having a few years of food on hand) to the extreme (building a panic room fully equipped with gas masks, weapons and enough ammunition to wipe out any Zombie).

Have you ever watched “Doomsday Preppers”? I watched it for the first time last week, when I found it while channel surfing. To me, those folks are extreme in their thinking. That being said, when a huge crisis hits, they’ll be sitting back with plenty of food and weapons on hand. They’ll be eating their MREs with one hand while picking off zombies with the gun in their other hand. Now that I think about it, do you need special bullets to kill Zombies? I am not sure.

Prepping has got a bad rap amongst a lot of people and it’s not helped when tv shows like DP are on. Of course, they choose the extremest folks they can find, in an effort to boost ratings. Prepping has its place and frankly I wish a lot more people did some prepping! Why people look only to their government to help them in times of crisis is so shortsighted in my opinion. Stop looking to others to help you out of your emergency and be proactive and look out for yourself!

If you agree with the idea of Peak Oil, surely you must agree with the general principles of Preparedness. Even if you disavow Peak Oil, how can anyone go wrong with being somewhat prepared for emergencies?


emergency preparedness, country living in a cariboo valley, homesteading, self sufficiency


Ever had a power outtage that lasted a week? Has your community ever gone through a “Boil Water Advisory”? These are just two examples of events that can, and do, happen. The farther you live from the city or even a town, the higher your chances of having extended power outtages. Well, I guess that is true only if you live in an area where there are lots of trees to take down the power lines.

Way out here in the Cariboo bush, we have had power outtages lasting over a week. Having a generator certainly helps, not that we run it all the time. Having a full pantry and Cold Room helps a lot as well. If you have full freezers and the power goes out, what is the best thing you can do to keep your food from thawing out? DON’T open the freezers AT ALL. Not even once. Throw a thick blanket or comforter over the freezer and leave it alone! Only if the outtage lasts for more than 3 days, will you need to fire up the generator a couple times a day for an hour each time.

Perhaps the most beneficial thing to us in keeping food on hand is that we simply don’t have to go to town. To go to town is a 40 minute drive each way for us – we make the trip once a week, basically so I can get the weekly newspaper, pick up our mail, and go out for lunch. When we’re in town, we pick up anything we may need for the following week. If we get home and realize we forgot something, too bad. It goes on the list for the next week’s trip.


emergency preparedness, country living in a cariboo valley, homesteading, self sufficiency


There is nothing we love more than being at home. We have plenty to do around here and that keeps our days full and active. When we start to run out of things to do, we go fishing and usually end up planning the next project while we’re out on the water. Being prepared for us means that we have more freedom than most people. We can do what we want, usually when we want. Well, except for golfing, it’s pretty hard to do that in the Cariboo winters.

We don’t worry about having to go to the grocery store or convenience stores to pick up processed crap that really we shouldn’t be eating anyway. Hungry? Open a jar of home canned Lamb Stew or make a pizza with home canned sauce.

So, there are lots of reasons why people can really benefit from being a Prepper on some level. Now if you do believe in Zombies, you probably need more detailed information that I can provide. There are lots of websites out there, just do a Google search.

This book, the Prepper’s Long Term Survival Guide is a fantastic resource you will use over and over again. Keep a hard copy of this book!

  • Bare minimum storage requirements
  • Principles of preparedness
  • Common Mistakes in Food Storage

and so much more. 

When an Emergency strikes, be prepared! You can slowly start building an inventory of food, medicines, lighting and all of that. Just start thinking about it and every month, add something to your Preparedness supplies. Emergencies do, and will, happen and the more prepared you are, the better you and your family will be.

So, how prepared are you? A little, a lot or not at all?


Filed Under: EBooks, Emergency Preparedness

Come Into the Greenhouse

By Annie

These last weeks, it has been pretty busy around here. Hoping I get a chance now to put up some posts on what we have been up to. Here’s our Greenhouse – I’ve been spending quite a bit of time in there the last couple of days.

greenhouse, country living in a cariboo valley, tomatoes, peppers, northern greenhouse


This photo was taken last summer. In my Cold Room Inventory post, I wrote about hunting around downstairs only to find we had no green beans left in storage. I have got to plant lots this year.

Since we’re not planting a lot of tomatoes or peppers this year, I figured I would plant green beans throughout the greenhouse this summer. We have been having wonderfully warm days, but the nights are still very cool here. Too cool certainly, to plant bean seeds in the main garden. I’ll wait another week at least before planting them out there, and even then, will be covering them with Remay cloth.


greenhouse, country living in a cariboo valley, tomatoes, peppers, northern greenhouse

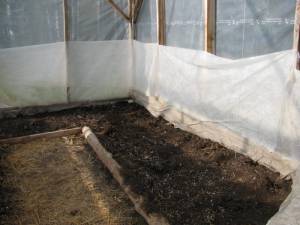
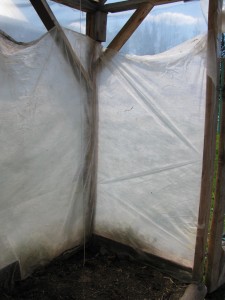
Thinking of how I could increase the temperature in the unheated Greenhouse, a thought occured to me. Why not staple up Remay cloth around the inside perimeter? This should increase the temperature by 2 or 3 degrees and I could get an earlier start with planting beans in there.


greenhouse, country living in a cariboo valley, tomatoes, peppers, northern greenhouse

While I was stapling it up, I realized I could just attach it half way up for now. That should help keep it even warmer. That’s what I did and later on, after the plants are all up and established, I should be able to staple the Remay up the rest of the Greenhouse walls.

After finishing with the cloth, I started watering the beds. I also laid a layer of compost over the whole area. I watered well several times a day for 3 days, digging down with a trowel to see how far down the moisture was going. It is amazing how dry the soil is when you first start watering it. It takes several repeats to get the soil moist enough for planting.

This morning, I brought my few tomato and pepper plants out to the Greenhouse.


greenhouse, country living in a cariboo valley, tomatoes, peppers, northern greenhouse

I have 5 Sweet Green Peppers that have been planted into the pots and they will sit on the shelf there.


greenhouse, country living in a cariboo valley, tomatoes, peppers, northern greenhouse

This morning, I stapled up the Remay in the one front corner, in preparation for planting Tomatoes.


 greenhouse, country living in a cariboo valley, tomatoes, peppers, northern greenhouse

After I dig the hole, I pound in the stake that this plant will need to hold itself up. Always have a stake or some type of support for your tomatoes, the plant ends up heavy and you don’t want branches snapping off, once the fruit is setting.

Then I put in the plant, usually taking off the lowest branches in order to plant the tomato deeper in the ground than it was in its growing pot. Deeper is always better for tomatoes. Then right away, I use a couple of velcro ties to hold the stem to the stake.


greenhouse, country living in a cariboo valley, tomatoes, peppers, northern greenhouse


I love these ties – I bought a roll probably 5 years ago and it’s still going strong. As the tomato plant now settles in and starts growing, I will add more ties, securing the plant to the stake. By the harvesting season, I could well have 6 or more ties on each plant. Sometimes, depending on how much fruit is on the plant, we also need to use string. We hang it from the Greenhouse ceiling and then tie the tomato branches to it.

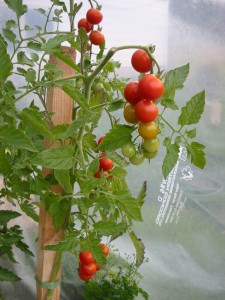
These plants have already set their first flowers. Hopefully in a few months, the plants will look like this.


 Are you growing in a Greenhouse? Would you like to? We sure do love using ours! If you want to read more about growing in a Greenhouse, just click the link.

Filed Under: Greenhouse, Grow Your Own Vegetables

How to Weed an Asparagus Patch

By Annie

Here’s how to weed an Asparagus patch to grow healthy plentiful stalks of Asparagus every year.

Asparagus is one of the very early treats in our garden. By the time it’s ready for picking in June, we’re itching for fresh garden vegetables. And nothing can beat the taste of fresh Asparagus! Steamed very lightly for maybe 4 minutes tops, it’s one of our favourite sides dishes at dinner.

Weeding an asparagus patch
Here’s how to weed an asparagus patch so you can get long harvests.

Part of maintaining your asparagus beds is regular weeding. Weed control of both annual weeds and the much worse perennial weeds is something that should be done starting in early spring. Here’s more about how to weed an asparagus patch, so you can grow lots of healthy stalks every spring.

If you’ve got weeds in asparagus beds, do your best to remove them throughout the growing season. You will find you have healthier harvests of asparagus spears!

How to Weed an Asparagus Patch

Before we get into the weeding details, here’s some general important information to know about how to grow asparagus in your garden.

Planting An Asparagus Bed

Asparagus needs to be planted in its own bed; you can also grow asparagus in raised beds, which will definitely make it easier to keep weed free.

Asparagus is a perennial, which means it is planted once and will then come up every spring, grow, then die down in the fall. It is common for a well-cared for patch of Asparagus to be productive for decades. 

This is why it needs its own space; you don’t want to plant Asparagus where you will be tilling or digging. Take the time to amend the soil heavily before planting Asparagus crowns.

Also, because Asparagus takes several years before you can start freely picking the stalks, always try to order one or two year old asparagus crowns from the nursery. 

The older the asparagus crowns that you plant, the sooner you will be able to enjoy really good harvests. So, try for two (or even three) year old Asparagus crowns.

Planting asparagus in a trench
Plant asparagus crowns on a mound of dirt in a trench for best results.

Using a Trench for Asparagus Plants

The very best way to get a patch started is by digging a trench roughly 2 feet deep. Then, make a mound of dirt in the trench. Plant the individual crowns by spreading the roots freely into the trench. Then, backfill with some of the soil (not all).

Over that first growing season, keep backfilling the trench as the plants grow. This will allow each asparagus plant to be grown as deep as possible, with the growing stalks under the dirt as deep as possible. This is great for the coming years.

Leave the plants alone the first year, and do not not cut any at all. The plants will settle in over that first year and you want as much energy as possible going into feeding those roots.


Asparagus needs to grow in a weed free bed.


The following year you can snap a few stalks but don’t take much. And take only one stalk from each plant. Leave as much alone to grow and send up those beautiful asparagus fern fronds. Always leave plenty of stalks for next year’s crop. The longer you can hold off free picking, the more Asparagus you will have in later years.

By the third or fourth year, you should be able to pick freely. Here in our Zone 3 garden, the final harvest is in mid-July or so, then we leave the rest of the plants to grow.

Weeding an Asparagus Bed

Our garden is an organic garden, so we don’t use any type of chemicals here. Although you can use chemicals like roundup to keep your bed weed free, that’s not the route we go.

The most important thing to keep in mind when cleaning and maintaining your Asparagus patch is to NOT disturb the roots of the plants. This is because if the roots get cut or nicked by your garden trowel, that portion of the plant may die. Asparagus roots are so sensitive!

 If you have lots of weeds that have creeped into your patch, start weeding at a point farthest away from the actual plants. Then use a shallow garden trowel to gently start lifting the dirt and pulling weeds. 

I have learned from experience that the roots are so darn sensitive to any lifting or nicking that I won’t use either a hoe or a shovel. I use only the shallower garden trowel. Always remember, shallow cultivation is the key!

Soil that is lightly worked will make it easier for getting rid of weeds. Take your time and start working your way from the outside of the bed, where you can did deeper and work towards the actual plants, where you will need to work much shallower and gentler.

If you have any trailing weeds, like couch grass or Johnson grass (that grow by underground runners), this process will make it easier to get the entire root out without breaking off.

Over the season, if you can keep any small weeds from growing, do it! Check your patch weekly and get rid of any weed seedlings.

You can also use this Canada Thistle DIY weed killer recipe in your asparagus bed, but be careful not to hit the asparagus plants with it, as it will kill anything it touches.

Mulching an Asparagus Bed

What can you put on asparagus to keep the weeds down?

Once you have your patch all weeded and cleaned out, using mulch is a great way to keep any new weeds from growing up in the bed. I like to put roughly a 5 inch layer of mulch (we use straw) over the entire patch.

Asparagus stalks growing through mulch
The stalks will grow up through the mulch.

The stalks will be able to grow through the straw, and once I see them poking up, I can remove a little bit of the straw around each of the asparagus plants.

Other mulches to use on asparagus patches include:

  • pine shavings
  • bark mulch
  • straw
  • spent clean hay
  • pine needles
  • leaves
  • sawdust
  • seaweed (composted)

Can you use plastic as a mulch for asparagus?

Yes, you can use plastic as mulch! We often do this, using a roll of black plastic. Black plastic gets laid in between each of our asparagus rows, then put straw on top of that.


Using plastic or heavy mulch can help keep the weeds down in the Asparagus bed.

We also lay the plastic all around the outside of the actual bed itself, to keep grass from encroaching from the lawn. Plastic works well to keep the weeds under control.

And as a bonus, if you have spreading weeds like we do, any roots that do get through are much weaker because they have zero access to light. This makes it even easier for weeding the asparagus bed.

Growing Asparagus in a Raised Bed

This is by far the best way to grow your own patch. Building a raised bed means lots of good soil, a nice deep trench for the asparagus to grow and it is more difficult for weeds that grow from spreading roots to take hold.

I wish we would have planted asparagus in a raised bed here, as it would have saved hours of weeding time.

First Asparagus poking through soil
The first asparagus stalks of the year poking through the soil

We have boards all around the perimeter of the asparagus patch. That does help quite a bit; we dug a trench and then set the boards in that trench.

However, with the couch grass we have, it doesn’t help much because the roots just go deeper, get under the board and pop up in the bed. It would have been much better if we had grown the plants in a raised bed to start with. It is a good option worth considering when you start your own patch.


Asparagus fronds in late August
Pretty Asparagus fronds in late August.

Keeping the Asparagus Bed Weed Free

Once we stop picking (and it is always hard to do that!) we leave the spears to grow into fronds. This will help us get a larger harvest next year.

Spend the time before you plant your Asparagus bed to make it the very best you can. Make sure it is weed free and then keep it that way. An Asparagus bed can easily remain in the same place for twenty years.

You can learn more about growing Asparagus here.


Asparagus likes to grow in a weed free bed of its own. This perennial vegetable can live for 30 years!


Asparagus is one of the earliest vegetables you can eat in the Spring and it is delicious. Steam it very lightly, then enjoy. It will be crunchy, firm and delicious!


Pickled Asparagus recipe - spears with a zing!


Make some Pickled Asparagus for your pantry! These Asparagus Spears have a great zing to them – add one to your Caesar or Bloody Mary!

We also enjoy this side dish – Garlic Parmesan Asparagus with garden fresh stalks is so good!

Now that you know how to weed an Asparagus patch, plan where to site your bed and get some crowns in the ground.

Asparagus stalks poking through garden soil.
Save to your Pinterest board.


Filed Under: Grow Your Own Vegetables

Starting Seeds

By Annie

As much as I love winter, I am always excited about Spring. Starting seeds is always a sure sign that Spring is right around the corner. I usually have my garden plan set for the year and look forward to moving ahead. I love to do my planning during the cold days of winter, with a cup of tea in hand and a gardening catalogues or three.
 
propogating, growing under lights
I have two ways to get seed in the ground. The seeds for root crops (beets, potatoes, carrots, etc) will all be planted right into the garden. As soon as the soil is dry enough, I can get in the garden and get these seeds planted. Root crops usually don’t mind the cold and some even prefer it. Other vegetables, like peppers and tomatoes, cabbages, broccoli and cauliflower get started in the house.


Just one of my boxes of seeds. These are a mix of seeds I have gathered myself from previous years and also some that I have ordered online or at the store. I try to use heirloom seed when I can. I can save the seeds from this years plants and won’t have to buy them next year. Also, there are no GMO’s and I like that!


These styrofoam cups are great for starting seeds. You can use them over and over again; if you handle them carefully they last for years..


I reuse the trays that grocery store meat comes on – they are especially handy. Those narrow trays work great for setting seedlings onto our windowsills in the living room, once the plants get moved upstairs.


propogating seeds, greenhouse


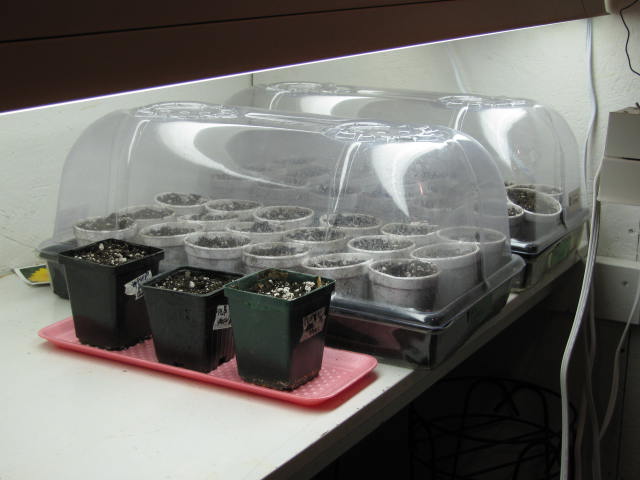
Here’s a picture of my seedling room. I’ve got the heat on in the room and before long, I’ll be putting an oscillating fan in the room. The fan will help stir the air and also strengthen the stems of the seedings.

I have greenhouse covers on a few of the trays, but you don’t need them. If I use them, I like to spray the inside of the cover with water from a misting bottle. Put the lids back on and it has a greenhouse effect on the seedlings.


As always, the Inspirational Plaque is set behind the seedlings to threaten encourage them to grow.

I find that although I may start out with full trays of one kind of seedling, I do find myself moving cups from one flat to another later on. This just depends on things like extra room, light and other variables. So I label each cup so that I will always know what is what. In the end it can be tricky to know a broccoli from a cauliflower.


Filed Under: Starting Seeds

  • « Previous Page
  • 1
  • …
  • 48
  • 49
  • 50
  • 51
  • 52
  • 53
  • Next Page »

Connect With Us!

  • Email
  • Facebook
  • Instagram
  • Pinterest
  • Twitter

Search this site

Generic selectors
Exact matches only
Search in title
Search in content
Post Type Selectors
Search in posts
Search in pages

Our Most Popular Posts

Garlic cloves in oil

How to Preserve Garlic in Oil – and Other Ways to Store Garlic

a open jar of pickled brussel sprouts on a counter

Easy Pickled Brussels Sprouts Recipe (Water Bath Canning)

Privacy Policy

Read about our Privacy Policy

Disclosure

Please note that some of this site’s links are affiliate links, and CountryLivinginaCaribooValley.com is a participant in the Amazon Services LLC Associates Program, an affiliate advertising program designed to provide a means for us to earn fees by linking to Amazon.com and affiliated sites. At NO ADDITIONAL COST TO YOU, I will earn a small commission, if you purchase them. I recommend them as they are good products.

Theme Design By Studio Mommy · Copyright © 2026