Country Living in a Cariboo Valley

Homesteading in BC

  • How to Get Started
  • Vegetable Gardening
  • Preserving Food
  • Recipes
  • Homemade Wine Recipes
  • About Us
  • Work With Me
  • Shop
    • Vegetable Garden Planner Printable: Grow Your Best Garden Ever
    • Grow Enough Food for a Year
    • Delicious Dandelions: A Recipe Collection
    • Dirt to Dollars: Selling at the Farmers Market
    • 8 Pounds in 8 Weeks: Raising Chicks for the Dinner Table
    • Making Wild Wine
    • Build a Hanging Chicken Feeder
    • 15 Things to Know About Living in the Country

A New Way to Make Rhubarb Wine

By Annie

We usually make one or two batches of Rhubarb wine each year. Several years ago, Graham made a Rhubarb bed and I think we have 7 plants out there. That provides us with plenty of Rhubarb, both for making wine and also for stewing and using in baking.

Here’s a link to the process we have used in the past for making Rhubarb wine. It’s easy to make, easy to bottle and easy to sip on. This year however we are trying something new with the way we get the Rhubarb ready for the primary fermenter.

Instead of breaking the stalks, then covering them with water, this year I cut all the Rhubarb into fairly small pieces (maybe 1/2 inch each). Then I tossed them in Ziplock bags and put them in the freezer. We were wondering whether a freeze/thaw method would work better. We have always had to add water to the wine, but this time there is no water at all in the primary.

The liquid is pure juice, or quite close to that. The only water in there came from any frozen crystals of ice around the Rhubarb.


IMG_7739


The picture shows 2 bowls of thawing Rhubarb and also one large bowl of Saskatoon berries. I had these picked but hadn’t yet cleaned them before weighing and popping in the freezer.

Once I had enough Rhubarb and Graham was here to give me a hand, we moved on to the next step. We took the Rhubarb out of the freezer and set each bag into a strainer, pot or whatever else we could find. We could take the bags out of the freezer at night and by morning, the Rhubarb would be quite well strained.

Then I squeezed all the Rhubarb (yes with my hands!) and got even more juice out of the stalks. After squeezing that much Rhubarb, I realized something that should be on my Christmas gift list! Yes, a press!
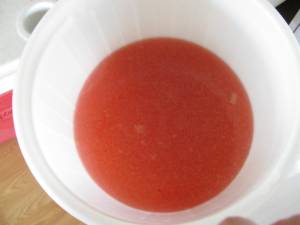
 

Rhubarb Juice being turned into Wine


Squeezing the fruit may well result a more cloudy wine, but we’re willing to take the risk. There are tablets we can add later to clarify the wine and hopefully take out all the cloudiness.

I kept squeezing and straining Rhubarb until we hit the 5 gallon mark on the primary fermenter. Since we had lots of Rhubarb left still, we washed out another primary and got to work putting on a second batch.

You can read about the rest of the process by following the link above, which will take to you the Rhubarb Wine Recipe page of this website. If you have never tried it, Rhubarb wine is quite tasty and it’s easy to make. Pick up a wine making kit and get started – the only expense really is in buying the equipment. Also, you will need to buy sugar, but that’s it. If you can, start collecting empty wine bottles or have your friends start collecting for you. You can pay them back for their work by giving them a bottle of your wine!

If you are growing the fruit, wine is easy to make and a lot more affordable than the local beer and wine store.


Filed Under: Homemade Wine Recipes

How to Make Your Own Hanging Chicken Feeder – eBook

By Annie

When we were getting ready to bring home our first laying hens, we were looking at chicken feeders and waterers at our local feed store. The feeder they had there had a price tag of $50, which seemed awfully high to us.


How to Build a Hanging Chicken Feeder

Graham took a good look at them and thought he could easily build one for our hens. So we went home and started looking around for materials we could use. Within half an hour, we had found what we needed and he got to work building our own hanging chicken feeder. Within the hour it was ready to be hung in the coop, and we paid less than $10 to make it!

You will find that if you place the chicken feeder on the ground, some of the food tends to get wasted because the chickens throw it around. A hanging feeder works much better as the chickens need to eat standing up. Place the feeder at a level where it will be slightly above chest level. You can use chain or wire to hang the feeder from the coop ceiling.

So, if you are planning to get some laying hens for eggs, or planning to raise some meat birds for your dinner table, consider this eBook. How to Make a Hanging Chicken Feeder contains all the information you need to build your own. There are lots of photos, along with the step by step procedure to make it easy for you to construct it. It’s pretty easy to build, you don’t need to be a handyman!

It is always best to try to procure whatever equipment you need in as least expensive way as possible. Who wants to spend $50 on a feeder when you can build one for $10? Trying to always use this philosophy when outfitting your homestead will help your wallet keep as much of your cash in it as possible.

How to Build a Hanging Chicken Feeder costs $4.99. Download your copy today and start building your own feeder!


Filed Under: EBooks, Great Books

Harvesting Rhubarb

By Annie

Graham made our Rhubarb Bed a couple of years ago. We divided some of our existing plants, so we were able to increase the total number of plants we have. We are up to 7 plants now, I think, so we get lots of Rhubarb every year. That’s a great thing, because we love making Rhubarb Wine with our harvests.


Rhubarb Bed


IMG_7057


This is the flower stalk coming up. Be sure to cut that off, so you the energy of the plant goes into making even more Rhubarb stalks.


IMG_7060


Cut the leaves off. NEVER feed them to livestock or humans, as they are poisonous. Instead, since the leaves are so nice and large, lay them down over your bed. They will act as a mulch and help keep the weeds down.

Here’s how we have made our Rhubarb Wine in past years – this year we are going to try something different. We would ideally like to have less water in the wine, and more straight Rhubarb juice.

So I have washed the stalks and cut them into 1/2 inch pieces. Then they go into a Ziplock bag and they get weighed. The weight gets written down on the front and all the bags go in the freezer. When it comes time to start making the wine, we will remove the bags and dump the Rhubarb into a large strainer. As it thaws, the juice will run down into a primary container below the strainer. The actual Rhubarb that is left over after draining will go on the compost pile or we will give it to the chickens.

The other day, I was able to get almost 23 pounds of Rhubarb in the freezer. Today’s harvest netted us another 25 pounds in the freezer and we are no where near done. I would not be surprised if we ended up with at least 150 pounds. That’s going to be a lot of wine!

If you would rather bake with the Rhubarb or make jam, take a look at this recipe book.


Filed Under: Grow Your Own Fruit

The Meat Bird Chicks Have Arrived

By Annie

I went to the local Post Office this morning and picked up 25 chicks, sent to me  by a hatchery in Alberta. Normally, a hatchery will add a chick or three to the order, in case some die during transit.

The chicks, after hatching, can live up to 3 days without food or water, due to the nutrients they received while in the shell.

The order this year contained 26 chicks. I’m hoping for no failing chicks!


What to have ready when meat bird chicks arrive

We set up a small brooder this year, because we ordered only the 25. In years past, we have ordered over 100 sometimes, so we made a brooder using a 4 x 8 sheet of OSB as the brooder floor.

You can also buy a chick brooder – they have several choices on Amazon.


brooder setup


Here’s the brooder we made in 2010, you can see it is a lot larger, but you need to have your brooder large enough for all the birds to have a bit of space.

It was so large that we used OSB for the sides of the brooder, instead of cardboard.

You can see there is lots of room there for the chicks. They will be just fine in here for about two weeks. Eventually, they will get moved to the barn.


be ready when your chicks arrive


Here’s a picture showing just what you want to see when you look into the brooder.

How do things look to you? Do you see anything out of the ordinary? Do the chicks look all right?


what to look for when your chicks arrive


All of the 4 important things are shown in the picture:


1) Some of the chicks are at the feeder eating.

2) Some of the chicks are at the waterer drinking.

3) Some of the chicks are resting.

4) There is a thermometer inside the brooder so temperature can be easily checked.


Keep a careful watch on the temperature. If you see the chicks crowding around the outside walls, it means the chicks are too hot and we would need to raise the heat lamp a bit.

If the chicks are crowding under the heat lamp, that means the chicks are cold and are trying to warm up.


Want to read more about how to raise meat birds? Check out our book – it has everything you need to know!

Filed Under: Raising Meat Birds

Make Your Own Easy Homemade Lemonade!

By Annie

This easy homemade lemonade recipe uses the juice of real lemons. A healthy organic lemonade and a fun kids activity for a hot day!

I love homemade lemonade and one of the great things about being in California at this time of year is having citrus trees all around us. There are lots of grapefruits and oranges too; it is like citrus heaven here.

Cold glasses of lemonade sit on a picnic table.
This delicious lemonade is a classic summer beverage!


Easy Homemade Lemonade Backstory

Graham has been enjoying lots of fresh grapefruits and we have a juicer so we have been making lots of fresh juice.

I used the juicer and made a nice large jug full of lemonade – here’s the recipe. It’s incredibly easy to make and you can adjust the amount of sugar you add! We like ours with 2/3 cup sugar for a batch and I add 5 cups cold water. Adjust yours to taste!


A lemon tree with lemons growing.
These fresh lemons are bursting with flavor and make our lemonade so fresh!


How to Make Easy Homemade Lemonade


A sugar syrup on the stove being stirred.
Be sure to allow all of the sugar to dissolve and fully combine for the best simple syrup!


  • Start by making a simple syrup using 1 cup sugar and 1 cup water. Heat the two together slowly on the stove and stir.
  • Once the sugar is dissolved, remove from the stove and let it cool.


An electric juicer juicing lemons.
This electric juicer completely streamlines the lemonade making process, what a great tool!


  • Juice up your fresh lemons (we bought a Black and Decker juicer, and it sure beats hand juicing!). I usually juice up enough lemons for two batches of lemonade. I just keep the extra juice in a jar in the fridge.
  • Put the lemon juice in a large jug and add the sugar syrup. Then add cold water and stir well.
  • Keep your easy homemade lemonade in the fridge and enjoy! Give it a quick stir before pouring.

How Do I Choose the Best Lemons?

  • For perfect lemons, look for rinds that are pretty clear of blemishes and have an even coloring.
  • The fruit should feel heavy for its size, which indicates lots of juice!
  • Fruits with skins that are smoother and have less texture tend to yield more juice, which is important to keep in mind for a lemonade recipe.
  • Avoid any lemons with soft spots or wrinkles.
  • Smell the fruit and choose the ones that have sweet, strong aromas.

Variations and Serving Suggestions

  • You can make lemonade ice cubes to keep on hand to add to water or other fruit drinks.
  • Another great way to enjoy lemonade even colder is to pour it into popsicle molds and make lemonade pops!
  • Serve with a sprig of fresh mint or basil for an added pop of refreshing flavor.
  • Muddle up some fruit and stir it into your drink for some added fruity flavor. Blueberries, raspberries, strawberries, peaches, mangoes, melon, or any combination of these would taste great in this drink!
  • Try adding some sparkling water (or a sparkling wine if you’re feeling like it) to give your lemonade some fizz.

More Great Country Living Recipes

Our entire Country Living in a Cariboo Valley Recipe Collection can be found here, but here are a few highlights!

  1. This Healthy Homemade Granola is perfect for breakfast time or for a filling snack!
  2. For some guidelines on how to make and can your own salsa, check out this post.
  3. Banana Bread is so easy to make and such a crowd-pleaser!
  4. These Lemon Meltaway cookies are the perfect snack.

Easy Homemade Lemonade

If you like this refreshing homemade lemonade recipe, be sure to rate it 5 stars below!

freshly made lemonade in a glass

Homemade Lemonade

Yield: 4 cups lemonade
Prep Time: 15 minutes
Cook Time: 10 minutes
Total Time: 25 minutes

Homemade lemonade is a refreshing treat. Easy to make your own lemonade from scratch with this recipe.

Ingredients

  • 1 cup sugar
  • 1 cup water
  • 1 cup lemon juice
  • 3 - 4 cups cold water

Instructions

    Make a simple syrup using 1 cup sugar and 1 cup water.

    Heat the two together slowly on the stove and stir until the sugar is dissolved.

    Let it cool.

    Juice 5 or 6 lemons, enough to make 1 cup of juice.

    Put 1 cup of lemon juice in a large jug and add the sugar syrup.

    Then add 3 or 4 cups of cold water.

    Mix well, store in refrigerator.

Nutrition Information:
Yield: 4 Serving Size: 1
Amount Per Serving: Calories: 204Total Fat: 0gSaturated Fat: 0gTrans Fat: 0gUnsaturated Fat: 0gCholesterol: 0mgSodium: 46mgCarbohydrates: 53gFiber: 0gSugar: 51gProtein: 0g

Did you make this recipe?

Please leave a comment on the blog or share a photo on Pinterest

© Annie
Cuisine: American / Category: Recipes

First Published April 2013; Updated January 2021

Thanks for checking out this recipe. For more, follow me on Facebook, Pinterest, Instagram, and Twitter!

Filed Under: Recipes

  • « Previous Page
  • 1
  • …
  • 46
  • 47
  • 48
  • 49
  • 50
  • …
  • 53
  • Next Page »

Connect With Us!

  • Email
  • Facebook
  • Instagram
  • Pinterest
  • Twitter

Search this site

Generic selectors
Exact matches only
Search in title
Search in content
Post Type Selectors
Search in posts
Search in pages

Our Most Popular Posts

Garlic cloves in oil

How to Preserve Garlic in Oil – and Other Ways to Store Garlic

a open jar of pickled brussel sprouts on a counter

Easy Pickled Brussels Sprouts Recipe (Water Bath Canning)

Privacy Policy

Read about our Privacy Policy

Disclosure

Please note that some of this site’s links are affiliate links, and CountryLivinginaCaribooValley.com is a participant in the Amazon Services LLC Associates Program, an affiliate advertising program designed to provide a means for us to earn fees by linking to Amazon.com and affiliated sites. At NO ADDITIONAL COST TO YOU, I will earn a small commission, if you purchase them. I recommend them as they are good products.

Theme Design By Studio Mommy · Copyright © 2026