This post contains affiliate links. Learn More
Looking for a guide that teaches everything you’ll need to know about how to grow cabbage?
This article contains all the information and cabbage gardening tips you’ll need! Grow your own cabbage from seed to fully grown heads and ready to eat. Keep reading to find out how to grow cabbage from seed, when to transplant cabbage seedlings, how to harvest cabbage, and more.
Cabbage is a great crop to grow for its dense heads of inner leaves that are great for salads, coleslaw, stir fries, kimchi, soups and more. It’s also easy to harvest and store your cabbage throughout the winter to preserve it through the cold.

You can find all our vegetable growing articles here!
Why You Should Grow Cabbage
Cabbage is not a difficult plant to grow, especially in the Northern areas. It loves cooler weather and is quite hardy.
Cabbage is a heavy feeder (a nitrogen lover) and tends to quickly deplete soil moisture and nutrients. This means there will need to be a good layer of composted manure or organic fertilizer in the garden for it. Cabbage is such a good Cold Room staple for over Winter.
It is really worth it to set aside some room in your garden for cabbage. Stored at the right temperature, Cabbage heads will last for several months.
Cabbage is high in vitamins like A, B1 and B2, vitamin C, fiber, and calcium. Uncooked, cabbage will have a higher nutritional value, but it can be eaten both cooked and raw.
General Information on Cabbage
To begin, here are some essential facts about the plant and its growth process. Also called Brassica oleracea, cabbage is an annual vegetable crop that’s known for its dense leaves. It’s related to other crops such as cauliflower, broccoli, and Brussels sprouts.
Generally, you’ll want to aim to plant cabbage in a place that gets full sun. This means at least six hours of strong sunlight a day, but up to eight is optimal.
Cabbage tends to quickly deplete soil moisture and nutrients. Prepare for this by treating your soil with some kind of manure, compost, fertilizer, or other organic matter before planting. To encourage large heads to form, try to incorporate more phosphorus and potassium into your soil when applicable.
You’ll want to make sure to water regularly and generously. With that being said, be sure the soil is well draining to prevent roots and stems from splitting, rotting, or otherwise becoming stunted.

Summer Harvest
If you’re looking to harvest your cabbage in the summer, sow cabbage seeds about 6-8 weeks prior to the final spring frost. This date will vary depending on your location, so be sure to match it up to your area’s climate.
Fall Harvest
A fall harvest can also be achieved by planting mid- to late summer. If you live in a particularly arid or hot area, hold off a bit longer to prevent these young late-season plants from shriveling in the hot sun.
Soil pH is best kept between 6.5 and 6.8, which can also help prevent clubroot disease.
How to Grow Cabbage
I start seedling flats of Red and Green Cabbage in the seedling room. We often can’t get into the garden until late April or even May, depending on the snow. I start seeds indoors under lights for lots of different vegetables.
Want to know which vegetables I just direct seed into the garden? Check out my article – I can direct seed quite a few things, but others definitely need to be started indoors, because of our shorter growing season.
Planting Cabbage Seeds in Containers
When it comes time to plant seeds, I reuse Styrofoam cups (with a hole in the bottom) or red Solo cups. Starting seeds in Solo cups is a great way to ensure that they’re well contained and protected, even indoors.
Seeded one or two a cup and about an inch deep in the soul, they sit in the seedling room for a couple of weeks where it is bright and warm.

These cabbage seedlings are doing great! It won’t be long until they can start being moved upstairs away from the seedling lights.
When I run out of room for more seedlings downstairs, I move the cabbages upstairs. They are one of the first veggie seedlings to come upstairs and they’ll spend a couple of weeks in front of the living room windows.
Hardening Off Seedlings
Then I start bringing them out onto the porch during the day, to start hardening off. First I move them for just a couple of hours in the mid morning, when it is neither too warm nor too cool. Over a few days I extend the amount of time they spend outdoors.

Excuse the clothes drying in the background! But, I sure do love my drying racks! I use them upstairs in winter, so the heat from the wood stove dries our clothes.
Once the garden is dry enough that the tilling can be done, the cabbage is one of the first vegetables I can transplant.

Transplanting Cabbage Seedlings into the Garden
Looking at the picture, you can see that I plant my cabbages pretty close together. They are about 8 – 10 inches apart. That’s OK, I like to plant thickly. I feel it helps reduce weeds and the big leaves will help to keep the soil moist. Besides, I’ll be thinning these cabbages as time goes on. They will have plenty of room to grow nice and huge.
If you have a lot of space, you can plant them as far apart as 18 inches or even 24 inches. This is largely based on personal preference!

Cabbage is quite hardy and fairly wind resistant. It doesn’t usually suffer too much from transplanting, especially if I can transplant on an overcast day. After planting them in the garden, I water them several times that same day. Just a nice good misting to help them settle in.
I watered the pots BEFORE bringing them down into the garden and this is an important thing to do. Don’t let your seedlings dry out! After a few weeks, they have grown several new leaves. Soon they will be large enough to start heading up.

A beautiful healthy head of cabbage just starting to grow. I usually plant a mix of both green cabbages and purple cabbages.

Here is that same cabbage plant close to the end of July. It’s growing really well, isn’t it?
If you have pigs or chickens, by this time you can start picking a few of the outside loose leaves off. Feed them to your animals and reduce your feed bill. We love knowing our animals are eating healthy homegrown food. Want to learn more about how to grow your own animal feed?
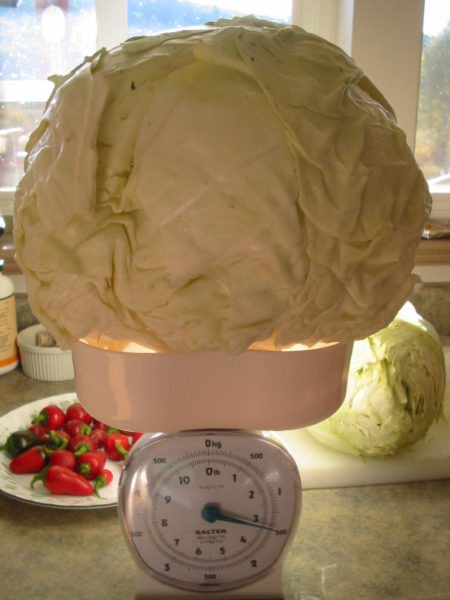
We can grow some BIG cabbage here in the Cariboo. This one weighed in at over 13 pounds! It was a surprise when the dial on the kitchen scale went all the way around…and then some!
How to Keep Cabbage Healthy
- Plant cabbage alongside other cole crops like kale, broccoli, kohlrabi, collards and cauliflower, as well as things like beets, peas, celery, radishes, and lettuce.
- Five inches tall is a good height to transplant cabbages from their smaller containers to a garden, as well as a good time to trim and thin them out.
- Use mulch around the planting area to help retain moisture (works great in hot dry weather) and regulate the temperature of your soil.
- If you plan to grow cabbages year after year, consider rotating their location every time you sow the seeds to prevent soil-borne diseases.
- Every week, you’ll want to water about 2 inches per square foot of garden. Excess water can cause cabbage heads to grow too fast and split on the stalk.
- The optimal temperature of soil for cabbage growth is 60 to 65 degrees F. Anything lower than 45 degrees F is almost sure to damage cabbage and form loose heads. If there’s an unexpected chill, find a way to cover the cabbages.
Pests and Deterrents
- Keep your cabbage safe from pests. Common cabbage pests include cabbage loopers, cabbage worms, cabbage moths, aphids, cabbage root maggots, white butterflies, slugs, flea beetles, snails, and other insects. There are also dangers like black rot and other fungus varieties like downy mildew and clubroot. To prevent and treat pests and diseases, try growing companion plants (like dill and thyme), removing any infected or diseased plants from the garden, and in some cases, hand picking pests from your cabbages.
- Another way to deter pests is to use any product that contains Bacillus thuringiensis, or Bt, which is a more natural type of pesticide that, when ingested by cabbageworms and other pests, will kill them off in two to three days.
- If birds such as pigeons become a problem, you can cover the cabbage plants with Remay cloth.

How to Harvest Cabbage
- Wait for the cabbages to reach full maturity, which takes about 70 days. Maturity is reached when cabbage heads are nice and firm. It’s important to harvest once mature, as fully grown heads have potential to split on the stem if left for too long.
- With a sharp knife, cut the head of the cabbage at the base.
- Remove any yellow leaves and bring the plant indoors or to a cool and dry place.
- Cabbages can produce 2 crops if harvested correctly. For a second growth, be sure to leave outer leaves on the side of the plants and the cabbage root in the ground, then harvest when they reach approximately the size of a tennis ball.
How to Store Cabbage From the Garden
By the end of the season we always have lots of Cabbage to harvest. Make some sauerkraut or cabbage rolls. We put several heads of red and green cabbage in the Cold Room.
To prepare cabbage for the Cold Room, I peel off several layers of leaves. You can tell there are no loose leaves at all in the picture above. When you place them on the shelves, be sure they are not touching each other. Allow air all the way around.
I love cabbage in a Coleslaw! Shredded Red and Green Cabbage, with a good sized Grated Carrot for good measure – Great for alongside steaks!
Cabbage can also be stored in the refrigerator for up to 2 weeks wrapped well in plastic. Be sure to properly dry the leaves before storing to prevent rot.
Best Cabbage Varieties for a Garden
There are a number of varieties of cabbage that you can plant in your garden that will yield delicious cabbage leaves. Here’s a list of some popular varieties and why they make good garden growers. Linked cabbage varieties are available on Amazon!
- Early Jersey Wakefield – Produces 2 to 3 pound heads and is great at resisting splitting.
- Savoy Cabbage – Great for later planting or colder climates, this variety is more resistant of frosts and produces beautiful crinkled leaves. Alcosa and Wirosa are both Savoy types of cabbage.
- Napa Cabbage – a variety of Chinese cabbage with an oblong head and ruffled leaves.
- Blue Vantage – A disease-resistant variety that should require less upkeep.
- Primo – Perfect if you prefer and earlier harvest of cabbage.
- Golden Acre – This variety is quick to mature and typically produces 3 pound heads.
- Ruby Perfection – A red cabbage variety that’s excellent for the fall.
How to Grow Cabbage from Seed


originally published July, 2019; latest update March 2026