This post contains affiliate links. If you buy through these links, I may earn a small commission.
Learn how to make pickled beets! Can in mason jars to enjoy all year round.
Beets grow great in a northern garden. And they taste delicious. You can can them up to serve as a vegetable at dinner. You can cook them up to serve as a vegetable side dish at dinner. We also enjoy them as pickled beets too!
Want more articles about preserving food? Check out all of our Preserving Food posts here.

We love pickles here and every year we preserve a few dozen jars of different types of pickles. We’ve enjoyed making (and eating!) Pickled Garlic Scapes, which we make in early July. We’ve also made homemade Pickled Fiddleheads and have a couple jars tucked away to enjoy later.
But now, I want to share with you how to make and preserve pickled beets. Here’s the complete process and recipe to make your own homemade pickled beets.
I’m going to show you exactly how to make home made pickled beets. But first, watch this video which shows the process and then keep reading for the full recipe!
I hope you’ll love this canned beets recipe. You can print the recipe off; it’s at the bottom of this post.

Beets are easy to grow and you can get a really large harvest from even one row of seeded beets.
Here’s where you can find everything you need to know about growing beets in your garden.

Beets can be planted in early spring and then thinned as they are growing. I like to seed heavily and then thin the beets later.
I find seeding heavy helps to keep the weeds down as there isn’t much room for them to grow inside the rows.

Why you need to thin Beet plants
Here’s an interesting thing about growing beets. Beets grow in clusters from the seed, so even if you plant lightly, you will still need to thin. You will find several beet plants coming up from each single seed!
Graham just love beets and seriously cannot get enough of them. I always want as many beets as I can possibly get. And when the beets are still small, I go into the garden to thin them.
I usually have 2 rows of beets planted and by thinning the small ones out, there is more room for the rest of them to grow larger.

I usually end up with my harvest basket full of thinnings after I work my way through the row of beets. After I cut and wash all the beet tops, I stuff them in the fridge.
We often end up with two huge plastic bags of greens! We use the leaves both for salads and steamed greens. Plus, we freeze leafy greens so later we can use them in smoothies or as a side dish!

I like to leave thinning the beets until the roots are large enough to make Pickled Beets from them. Let your plants grow so you can benefit from both ends – leaves for greens and roots for pickling!

How to Make Pickled Beets:
Pickled Beets Recipe:
- 10 cups prepared beets
- 2 1/2 cups white vinegar
- 1 cup water
- 1 cup granulated sugar
- 3 tbsp pickling spice
Cooking Beets for Pickling
Wash and scrub the beets well with a small brush. I usually rinse them a few times first to get any leftover dirt off of them.
I always leave the root on at the bottom and leave about 2 inches of greens above. This really helps lessen the bleeding that can happen while they are cooking.
Put the beets in a large saucepan, cover with water and bring to a boil. Boil beets until tender – drain them and then set them in a sink of cold water.
Pickling Spice Mixture

While the beets are cooking, get your liquid ready. Combine the vinegar, water, sugar and pickling spices in a pan and set on the stove.
Bring this mixture to a boil and then gently simmer 15 minutes.

Now it’s time to get the beets ready for the canning jars. The beets need to have their skins removed but this is a pretty easy task and you won’t have to peel them.
It’s easier to do this while you are holding the beet under water. Press lightly on the skin surface and it will begin to slide off.
You’ll find the tops just slip right off, and usually the tap root does too. Just slice it with a knife if you need to.
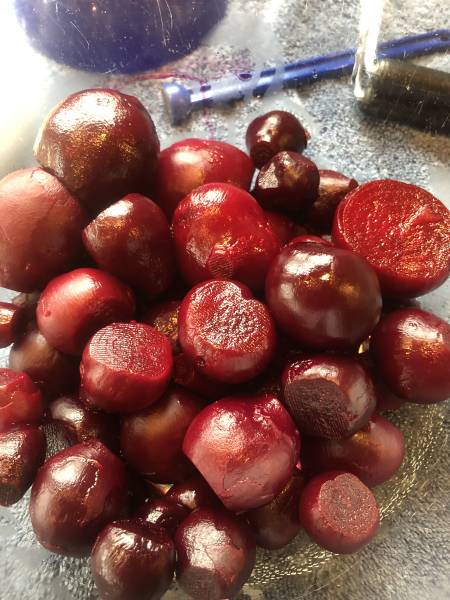
Here’s a bowl of small beets after having their skins slipped. They are ready to go into canning jars for processing.
If you are using larger beets, just slice beets to fit in the jars.
Canning Pickled Beets:
Meanwhile put clean mason jars into your boiling water bath canner and let them sit in the boiling water for 15 minutes to sterilize the canning jars.
I like to use pint jars for Pickled Beets, as we can usually finish off an opened pint jar fairly quickly.
If I used quart jars, the opened jar may end up sitting for months in the fridge. Not that there is anything wrong with that – use whatever size jars you like.
If you have a large family, the quart size would likely work better for you.

I heat water in the kettle and pour it over the canning seals, which I have put in a bowl. I put mine in tops and bottoms alternating.
This just makes it a bit easier to pick them up one by one as I need them. It’s important that the seals have been warmed up before setting them on top of the jars.

Once I have the skins slipped from the beets, I put them into pint canning jars. If you use a funnel, it saves on drips.
Buy yourself a canning funnel – it has a very wide mouth and it will sit in pint or quart jars perfectly. It saves a lot of mess.
Herbs you may want to add
You can add additional herbs to each jar such as a teaspoon of one of:
- dill
- whole allspice
- whole cloves
- bay leaves
- cinnamon stick
- garlic cloves
Add the liquid vinegar mixture to each jar, leaving 1/2 inch headspace. Wipe the lid clean, put on a seal and a ring.
Put your jars into the boiling water bath for 35 minutes (for us, check your altitude). Canning time totally depends on your altitude – we add extra time because we are at 2800 ft.
Make sure the water is above the tops of jars! Add more water to your canner if you need to, then wait till the water is boiling again before you add the filled jars.
The jars must be fully submerged through the entire canning time.

Removing the Jars from the Water Bath Canner
After the canning time is up, move the jars to your counter top and leave them alone for 24 hours. This is an important part of the canning process. The filled jars need to slowly cool down to room temperature.
Don’t move them around and don’t knock the seals, trying to see if they have sealed. Set aside a part of your counter top that you can put the jars and just leave them there.
No drafts, either, so if you have to have them near an open window, lay a towel over top of them to keep them out of the draft.
How to Tell if Canning Jars are Sealed
Soon after the jars have started to cool, you should hear a pinging sound. This is the lid sealing fully to the jar. Every jar should ping!
I used to count each ping, knowing how many jars I had put in the canner. I don’t bother doing that now.

What I do now is, after 24 hours is up, I tap lightly on each jar top. I can tell the sound of a sealed top and an unsealed top.
You will too, once you do more canning. The tops of sealed jars will curve downward, but do the tapping test and be sure.
If a jar hasn’t sealed, I can either reprocess it or just put it in the fridge and we enjoy them as refrigerator pickled beets!
This is an easy way to put some extra food in storage. Stock up your pantry with shelf-stable foods like this and enjoy them all year.
Another bonus of thinning the beets is, that come the end of summer, we will have lots of larger beets in the garden.
We can harvest those and pressure can jars of beets. Those beets in the photo above have been pressure canned.
They are delicious cooked along with a beef roast and other vegetables in the oven. Roasted beets are very tasty!
Now that you’ve learned how to make pickled beets, what kind of pickles will you make next?
Usually, if you make Pickled anything, you can use a water bath canner for the canning. If we want to have jars of beets on hand (Not pickled) then we need to pull out the pressure canner.
Never guess when it comes to canning. Always be sure before you start that you are using the right process.

![]()
Buy the Ball Book and follow the process and recipes. Enjoy!

Pickled Beets FAQ’s:
Are pickled beets good for you?
Pickle beets are a very healthy dinner option! Some of the benefits of eating beets include:
- potentially lowering blood pressure
- improved blood flow
- can potentially reduce heart disease and possibility of stroke
What are the nutritional benefits of eating beets?
Beets are a great source of vitamins and minerals including:
- iron
- vitamin C
- fiber
- potassium
- low in salt (sodium)
- mineral benefits such as calcium
Now you know how to make pickled beets, so tuck a few shelf-stable jars away to enjoy all year!
Want to find out which are The 5 Easiest Vegetables to Grow?
Available only to subscribers; join our Newsletter!

Pickled Beets Canning Recipe
Make pickled beets from small bite sized beets or slice larger beets before canning in pickling brine.
Ingredients
- 10 cups prepared beets
- 2 1/2 cups white vinegar
- 1 cup water
- 1 cup granulated sugar
- 3 TBSP pickling spice
Instructions
Cooking Beets for Pickling
Wash and scrub the beets well with a small brush.
Trim, leaving the root on at the bottom and about 2 inches of greens above.
Put them in a saucepan and cover with water.
Boil until tender - drain and set them in a sink of cold water.
Slip the skins off the beets while you are holding the beet under water.
Press lightly on the skin surface and it will begin to slide off. Slice the root with a knife if you need to.
Add the small beets to the jars. If you are using larger beets, just slice beets to fit in the jars. Using a canning funnel makes this easier.
Add the liquid mixture to each jar, leaving 1/2 inch of headroom. Wipe the lid clean, put on a seal and a ring.
Pickling Spice Mixture
While the beets are cooking, get your liquid ready. Combine the vinegar, water, sugar and pickling spices in a pan and set on the stove.
Bring this mixture to a boil and then gently simmer 15 minutes.
Canning
Put clean mason jars into your boiling water bath and let them sit for 15 minutes to sterilize.
Set seals in a bowl and pour very hot water over the canning seals and let them sit till needed.
After filling jars, put them into the boiling water bath for 35 minutes (check your altitude). Canning time totally depends on your altitude - we add extra time because we are at 2800 ft.
Make sure the water is above the tops of jars! Add more water if you need to.
After the canning time is up, carefully remove the jars and leave on the counter top too cool for 24 hours.
Notes
Optional: Add 1 tsp (to each jar) of fresh herbs such as dill, whole allspice, whole cloves, bay leaves, cinnamon stick, garlic cloves etc.
Nutrition Information:
Yield: 20 Serving Size: 1Amount Per Serving: Calories: 81Total Fat: 0gSaturated Fat: 0gTrans Fat: 0gUnsaturated Fat: 0gCholesterol: 0mgSodium: 67mgCarbohydrates: 18gFiber: 2gSugar: 17gProtein: 1g

originally published Aug, 2019; latest update September, 2022